Bring Home A Classic Synth With The DIY Fairlight CMI

[Davearneson] built a modern version of a classic synthesizer with his DIY Fairlight CMI. If there were a hall of fame for electronic instruments, the Fairlight CMI would be on it. An early sampling synth with a built-in sequencer, the Fairlight was a game changer. Everyone from A-ha to Hans Zimmer has used one. The striking thing about the Fairlight was the user interface. It used a light pen to select entries from text menus and to interact with the audio waveform.

The original Fairlight units sold for £18,000 and up, and this was in 1979. Surviving units are well outside the price range of the average musician. There is an alternative though – [Peter Vogel] has released an iOS app which emulates the Fairlight.

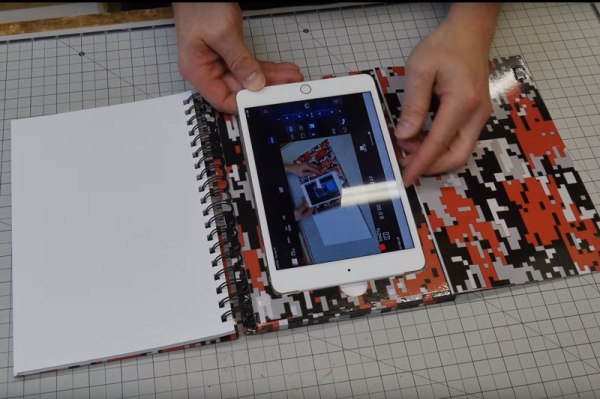
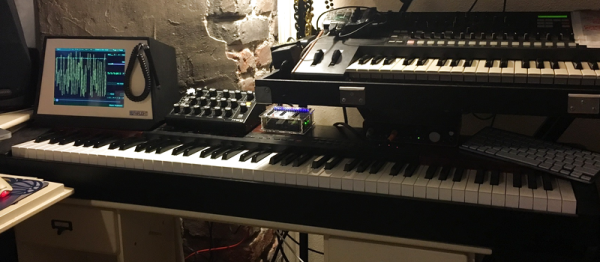
[Davearneson] had an old iPad 2 lying around. Too slow to run many of the latest apps, but just fast enough to run the Fairlight app. An iPad doesn’t exactly look like a classic instrument though. So he broke out the tools and created a case that looked the part.

The front of the case is made of framing mat board. The rest of the shell is wood. [Davearneson] used Plasti-Dip spray to replicate the texture of 1970’s plastics. The audio interface is a Griffon unit, which provides audio and MIDI connections. [Davearneson] extended the connections from the Griffon to the rear of the case, making for a clean interface.

The iPad doesn’t exactly support a light pen, so a rubber tipped stylus on a coil cord takes it place. The result is a device that looks and works like a Fairlight – but doesn’t need a steady diet of 8″ floppy discs to operate.

Interested in classic digital synthesizers that are a bit more budget friendly? Check out Al Williams’ article on the SID chip, or this 3D printed synth based upon the 4046 PLL chip.

Reverse Engineering Apple’s Lightning Connector

Introduced with the iPhone 5 nearly two and a half years ago, Apple’s Lightning connector has stymied the incredible homebrew electronics scene that was previously accustomed to the larger, older, better documented, and more open 30-pin connector. Now, finally, the protocols inside the Apple Lightning connector have been broken. We’re still a ways off from a Lightning breakout board, but this is the first proof that a serial console can be obtained through a Lightning connector. That’s the first step to totally owning an iDevice, and this is how all those exploits will start.

[Ramtin Amin] began the teardown of the Lightning connector began as most reverse engineering tasks should – looking at the patents, finding a source for the connectors, and any other products that use similar hardware. [Ramtin] found a Lightning to Serial converter powered by an STM32 microcontroller. Disassembling the firmware and looking at the output on a logic analyzer, [Ramtin] figured out part of the protocol, most of the wiring, and after some research, schematics for how an until-now unidentified chip in Lightning-enabled iProducts was wired.

The chip in question is colloquially known as the Tristar, and more accurately as a CBTL1608A1. During the teardown craze of the iPhone 5 launch, this chip was frequently identified as a DisplayPort Multiplexer. It is a mux, but not for DisplayPort – it’s only to connect the accessory (Lightning) UART, debug UART, baseband, SoC, and JTAG. This is the key to the castle, and being able to get through this chip means we can now own our iDevices.

The chip is an incredibly small BGA affair that [Ramtin] desoldered, reflowed onto a breakout board, and connected to an STM32 Discovery board. Using the techniques he used with other Lightning-enabled hardware, [Ramtin] was able to connect his iPhone and ever so slightly peek his head into the inner workings of his device.

It’s not complete control of an iDevice yet, but this is how all those future exploits will start. [Ramtin] uploaded a short video as a proof of concept, you can check that out below.

Continue reading “Reverse Engineering Apple’s Lightning Connector”

IPad Finds New Home In Mac Classic

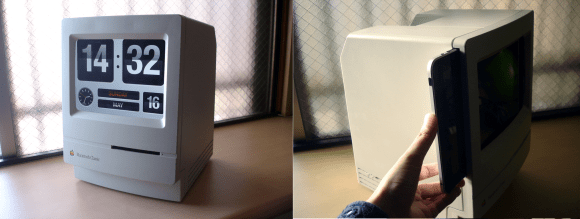
Who of us out there don’t have a spare iPad and Mac Classic kicking around? If you are one of those lucky folks then this project is for you. [site hirac] has made a pretty neat stand for an iPad made out of a Mac Classic case (translated). It just happens that the screens of the Mac Classic and iPad are pretty darn close in size. Although the screen size is similar, the resolution is not. The original Macintosh Classic had a black and white screen with a resolution of 512 × 342 pixels. The iPad’s resolution of 1024 x 768 pixels has 450% more pixels than the original Mac.

To get the iPad to fit correctly, the case had to be significantly modified. First, all of the internals of the Mac were removed, leaving just an empty case. The front panel of the case was removed and a slot on the left side is made. This slot helps to allow the iPad to slide into the Mac. On the inside of the front panel quite a few of injection molded supports were trimmed away for clearance. A slot was also cut in the left side of the rear case half. When the case is re-assembled, the slots in the front and rear halves provide a large enough hole for the iPad to fit through. Oddly, there are some plastic features on the front panel that are at just the right height to hold the iPad in the ideal location to line up with the screen cutout in the case.

Continue reading “IPad Finds New Home In Mac Classic”

Customized IPad LCD Screen Clips Onto Macbook As A Slick Second Screen

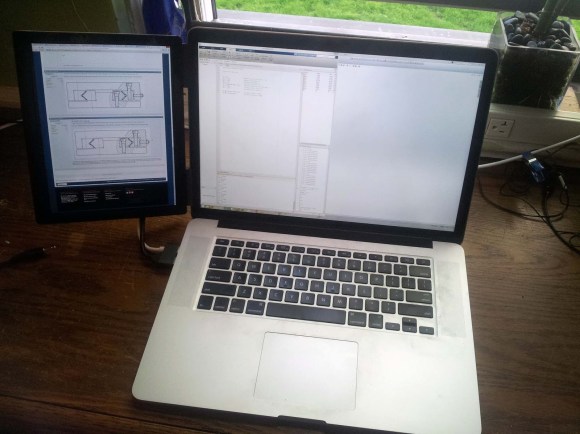
Macbook with iPad second screen

Last year, [Ben] found a good deal on iPad 3 LCD screens. He couldn’t resist buying a couple to play around with. It didn’t take him long to figure out that it’s actually quite simple to use these LCD screens with any computer. This is because the LCD panels have built-in Apple Display port interfaces. This means that you can add your own Display Port connector to the end of the LCD’s ribbon connector and just plug it into a computer. You’ll also need to hook up a back light driver, which [Ben] was able to find pre-made for around $35.

The hack doesn’t stop there, though. [Ben] wanted to have a nice, finished product. He laser cut an acrylic bezel for the LCD screen that was a perfect fit. He then milled out a space for the LCD to fit into. The acrylic was thick enough to accommodate the screen and all of the cables. To cover up the back, [Ben] chose to use the side panel of a PowerMac G5 computer case. He chose this mainly for aesthetics. He just couldn’t resist the nice brushed aluminum look with the giant Apple logo. It would be a perfect match to his Macbook.

Once the LCD panel was looking nice, [Ben] still needed a way to securely fasten it in the right place. He knew he’d want it next to his Macbook, so why not attach it directly to the Macbook? [Ben] got to work with his 3D printer and printed up some small plastic clips. The clips are glued to the iPad screen’s acrylic bezel and can be easily clipped on and off of the Macbook screen in seconds. This way his laptop is still portable, but he has the extra screen real estate when he needs it. [Ben] also printed up a plastic clip that turns the iPad’s USB power connector and the Display Port connector into one single connector. While this is obviously not required, it does effectively turn two separate plugs into one and makes the whole project that much more slick.

Counterfeit Apple Charger

More Counterfeit Apple Chargers Than You Can Shake An IPod At

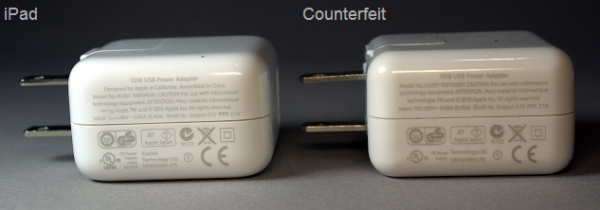
Phones, MP3 players, designer bags, artwork, money…. anything with value will bring out the counterfeiters looking to make a quick buck. Sometimes the product being counterfeited isn’t even necessarily expensive. For example, an Apple iPad Charger. [Ken Shirriff] got a hold of a counterfeit iPad Charger, took it apart, and did some testing.

So why would someone buy a counterfeit product? To save some money! The counterfeits are usually cheaper to reel the potential buyer in thinking they are getting a deal. In this case, the Apple product costs $19 and the knock-off is $3, that’s a huge difference.

Continue reading “More Counterfeit Apple Chargers Than You Can Shake An IPod At”

An Open Source IPad Display Adapter

Those fancy 2048×1536 pixel resolution displays found in the iPad 3 and 4 can be used for much more than high def Candy Crush and Netflix viewing. [Freddie] over in Southampton, UK built his own adapter to connect these high-resolution LCD panels to anything with a DisplayPort connection. It’s called OSCAR, and it’s the open source way to add a whole lot of pixels in a second (or third, or fourth….) monitor.

The LCD panels found in the iPad 3 and 4 don’t use the usual LVDS connection found in just about every other LCD panel ever made. It uses an extension of the DisplayPort protocol, meaning any graphics card with one of these ports already does the heavy lifting for this panel. The only other thing that’s needed is an adapter to control the power and backlight, which is easily handled by an ATMega32U4. This makes OSCAR Arduino compatible, making it easy to add sensors and USB playthings.

OSCAR is available on Kickstarter for £65 (~$100 USD) for the board itself. Adding to that, you’ll need to grab an iPad retina display through the usual channels for about $65. Not exactly cheap, but try finding another better-than-1080p display for that price.

Connect A Retina Display To A Regular Computer

You don’t have to search very long before you find someone raving about the Retina display used in Apple iPads. We’re not going to disagree. These 9.7″ panels pack in a whopping 2048×1536 resolution and the color is fantastic. But we were surprised to hear you can get one of these for a meager $55. That’s how [Andrzej] sourced the part when he set out to connect a Retina display to a regular PC.

It turns out this isn’t all that hard. The display uses the eDisplayPort protocol. This is an extension of DisplayPort which is an alternative to LVDS that is gaining a foothold in the industry. An external DisplayPort adapter can already be found on higher-end laptops, which means this should be a snap to use as an external display if the signals can be routed correctly.

To do this, [Andrzej] figured out how to order the PCB connector for the panel’s ribbon cable. He then etched and populated his own board which serves as an adapter for a DisplayPort cable. It even powers the panel, but an external 20V supply is necessary for the backlight.

[Thanks Adam]