Model Hydroelectric Plant Is An Illuminating Educational Tool

There’s more than one way to light up a strip of LEDs. Have you tried building your own hydroelectric power plant to do it? Well, now you can. Replicating [Matic Markovič]’s entry into the 2020 Hackaday Prize is bound to teach you something, if not many things, about the way hydroelectric power is generated and the way the variables play into it.

In [Matic]’s model, water from an adjustable-height reservoir flows into a 3D-printed Pelton turbine. The water jet hits the turbine’s cupped fins at a 90° angle, causing the assembly to spin around rapidly. This mechanical energy charges a brushless DC motor that’s connected to an Arduino Nano, which rectifies the AC from the generator and uses it to light up an RGB strip like an equalizer display that represents the power being generated.

This is easily one of the coolest educational displays we’ve ever seen. The reservoir can move up and down over a 55 cm (21.6″) range with the flick of a three-way toggle, which makes it easy to see that the higher the reservoir, the more power is generated. [Matic] has the STLs and INOs in the usual places if you want to make your own. Flow past the break for a demonstration, followed by an exploded render that gets put back together by invisible hands.

Your hydroelectric setup doesn’t need to be fancy, it just needs to work. One man’s trash can be another man’s off-grid phone charger.

Continue reading “Model Hydroelectric Plant Is An Illuminating Educational Tool”

A Smart Controller For Your DIY UV Cure Box

Resin 3D printers are finally cheap enough that peons like us can finally buy them without skipping too many meals, and what means we’re starting to see more and more of them in the hands of hackers. But to get good results you’ll also want a machine to cure the prints with UV light; an added expense compared to more traditional FDM printers. Of course you could always build one yourself to try and save some money.

An earlier prototype build of the interface.

To that end, [sjm4306] is working on a very impressive controller for all your homebrew UV curing needs. The device is designed to work with cheap UV strip lights that can easily be sourced online, and all you need to bring to the table is a suitable enclosure to install them in. Here he’s using a metal paint can with a lid to keep from burning his eyes out, but we imagine the good readers of Hackaday could come up with something slightly more substantial while still taking the necessary precautions to not cook the only set of eyes you’ll ever have.

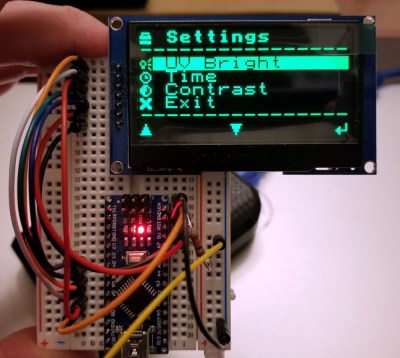
Of course, the enclosure isn’t what this project is really about. The focus here is on a general purpose controller, and it looks like [sjm4306] has really gone the extra mile with this one. Using a common OLED display module, the controller provides a very concise and professional graphical user interface for setting parameters such as light intensity and cure time. While the part is cooking, there’s even a nice little progress bar which makes it easy to see how much time is left even if you’re across the room.

At this point we’ve seen a number of hacked together UV cure boxes, but many of them skip the controller and just run the lights full time. That’s fine for a quick and dirty build, but we think a controller like this one could help turn a simple hack into a proper tool.

Continue reading “A Smart Controller For Your DIY UV Cure Box”

Lighting Up A Tiny Train Needs Tiny Tools

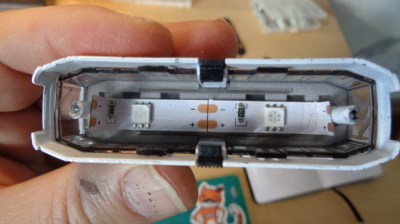
A tiny toy train that [voidnill] illuminated with a small LED strip fragment demonstrates several challenges that come with both modifying existing products, and working with small things in general. One is that it is hard in general to work around existing design choices and materials when modifying something. The second is that problems are magnified with everything is so small.

[voidnill]’s plentiful photos illustrate everything from drilling out small rivets and tapping the holes for screws to installing a tiny switch, LED strip, and button cells as a power supply. When things are so small, some of the usual solutions don’t apply. For example, cyanoacrylate glue may seem like a good idea for mounting small plastic parts, but CA glue easily wicks into components like the tiny power switch and gums up the insides, rendering it useless.

[voidnill] uses lots of careful cutting and patience to get everything done, and demonstrates the importance of quality tools. The LED strip fragment is driven by three small button cells, and while tape does a serviceable job as a battery holder, [voidnill] believes a 3D printed custom frame for the cells would really do the trick.

The kind of work that goes into making or modifying small things really puts into perspective the amount of effort behind projects like this coffee table with an N-gauge model railway inside it.

Adding Sensors To Improve Your Curling Game? Turns Out It’s Really Hard

Sometimes, a project turns out to be harder than expected at every turn and the plug gets pulled. That was the case with [Chris Fenton]’s efforts to gain insight into his curling game by adding sensors to monitor the movement of curling stones as well as the broom action. Luckily, [Chris] documented his efforts and provided us all with an opportunity to learn. After all, failure is (or should be) an excellent source of learning.

The first piece of hardware was intended to log curling stone motion and use it as a way to measure the performance of the sweepers. [Chris] wanted to stick a simple sensor brick made from a Teensy 3.0 and IMU to a stone and log all the motion-related data. The concept is straightforward, but in practice it wasn’t nearly as simple. The gyro, which measures angular velocity, did a good job of keeping track of the stone’s spin but the accelerometer was a different story. An accelerometer measures how much something is speeding up or slowing down, but it simply wasn’t able to properly sense the gentle and gradual changes in speed that the stone underwent as the ice ahead of it was swept or not swept. In theory a good idea, but in practice it ended up being the wrong tool for the job.

The other approach [Chris] attempted was to make a curling broom with a handle that lit up differently based on how hard one was sweeping. It wasn’t hard to put an LED strip on a broom and light it up based on a load sensor reading, but what ended up sinking this project was the need to do it in a way that didn’t interfere with the broom’s primary function and purpose. Even a mediocre curler applies extremely high forces to a broom when sweeping in a curling game, so not only do the electronics need to be extremely rugged, but the broom’s shaft needs to be able to withstand considerable force. The ideal shaft would be a clear and hollow plastic holding an LED strip with an attachment for the load sensor, but no plastic was up to the task. [Chris] made an aluminum-reinforced shaft, but even that only barely worked.

We’re glad [Chris] shared his findings, and he said the project deserves a more detailed report. We’re looking forward to that, because failure is a great teacher, and we’ve celebrated its learning potential time and again.

Social Media Jacket Puts Your Likes On Your Sleeve

The great irony of the social media revolution is that it’s not very social at all. Users browse through people’s pictures in the middle of the night while laying in bed, and tap out their approval with all the emotion of clearing their spam folder. Many boast of hundreds or thousands of “friends”, but if push came to shove, they probably couldn’t remember when they had last seen even a fraction of those people in the real world. Assuming they’ve even met them before in the first place. It’s the dystopian future we were all warned about, albeit a lot more colorful than we expected.

But what if we took social media tropes like “Likes” and “Follows”, and applied them to the real world? That’s precisely what [Tuang] set out to do with the “Social Touch Suit”, a piece of wearable technology which requires a person actually make physical contact with the wearer to perform social engagements. There’s even a hefty dose of RGB LEDs to recreate the flashy and colorful experience of today’s social media services.

Every social action requires that a specific and deliberate physical interaction be performed, which have largely been designed to mimic normal human contact. A pat on the shoulder signifies you want to follow the wearer, and adding them as a friend is as easy as giving a firm handshake. These interactions bring more weight to the decisions users make. For example, if somebody wants to remove you as a friend, they’ll need to muster up the courage to look you in the eye while they hit the button on your chest.

The jacket uses an Arduino to handle the low level functions, and a Raspberry Pi to not only provide the slick visuals of the touch screen display, but record video from the front and rear integrated cameras. That way you’ve even got video of the person who liked or disliked you. As you might expect, there’s a considerable energy requirement for this much hardware, but with a 5200 mAh LiPo battery in the pocket [Tuang] says she’s able to get a run time of 3 to 4 hours.

Considering how much gadgetry is packed into it, the whole thing looks remarkably wearable. We wouldn’t say it’s a practical piece of outerwear when fully decked out, but most of the electronic components can be removed if you feel like going low-key. [Tuang] also points out that for a garment to be functional it really needs to be washable as well, so being able to easily strip off the sensitive components was always an important part of the design in her mind.

The technology to sensors wearable and flexible is still largely in its infancy, but we’ve very excited to see where it goes. If projects like these inspire you, be sure to check out the presentation [Kitty Yeung] gave at the Hackaday Supercon where she talks about her vision for bespoke wearable technology. Continue reading “Social Media Jacket Puts Your Likes On Your Sleeve”

Infinity Cube Is Gorgeous Yet Simple

Typically when we hear the words “LED” and “Cube”, we think of small blinking devices on protoboard designed to flex one’s programming and soldering skills. However, while [Heliox]’s Cube Infini could be described as “a cube of LEDs”, it’s rather a different beast (video in French, subtitles available).

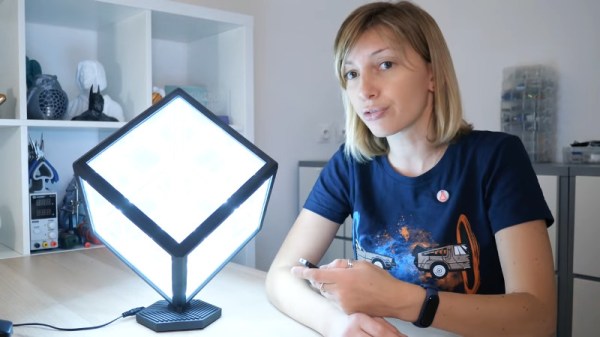
The cube starts with a 3D printed frame, designed in Fusion 360. The devil really is in the details — [Heliox] puts in nice touches, such as the artistic cube relief on the base, and the smart integrated cable management in the edges. The faces of the cube are plexiglass sheets, covered with a one-way reflective film that is applied in a similar manner to automotive window tint. For lighting, a high-density LED strip is fitted to the inside edges, chosen for maximum visual effect. It’s controlled by an IR remote and a cheap control module from Amazon.

While the build contains no particularly advanced tools, materials, or techniques, the final result is absolutely stunning. It’s a piece we’d love to have as a lamp in a stylish loungeroom or study. [Heliox] does a great job of explaining how the cube is designed and fits together, and it’s a testament to just what can be achieved with a little ingenuity and hard work.

Once you’re done here, check out this ping-pong based build.

Continue reading “Infinity Cube Is Gorgeous Yet Simple”

Blinkbox: addressable LED testing tool

BlinkBox: Debugging Tool For Addressable LEDs

How often do you find yourself having to pause a project to make a test circuit or write some test code to find the source of a problem? Do enough variations of the same test and you’ll eventually make a dedicated test tool. That’s just what [Devon Bray] found himself doing.

[Devon] does a lot of work with addressable LEDs of different types and after much experience, created the BlinkBox, a dedicated test tool for addressable LEDs. It supports multiple LED chipsets, you can give it a count of the LEDs you want to light up, and you can choose a test animation.  It even writes your settings to an EEPROM so you that don’t have to repeat yourself when you next turn it on.

He’s also done a very nice job packaging it all up, creating a 3D printed case, using backlit buttons for working in the dark, and even added a contrast knob for the LCD screen. Kudos to him for all the effort he’s put making this polished. Everything you need to duplicate it is available on his webpage, along with the schematic for the curious. Watch it in action, or just admire his handiwork in the video below.

Continue reading “BlinkBox: Debugging Tool For Addressable LEDs”