POV Tops Hobbyist Abilities

Sometimes a beautiful project is worth writing on that merit alone, but when it functions as designed,someone takes the time to create a thorough and beautiful landing page for their project, we get weak in the knees. We feel the need to grab the internet and point our finger for everyone to see. This is one of those projects that checks all our boxes. [Nathan Petersen] made a POV toy top called Razzler, jumping through every prototyping hoop along the way. The documentation he kept is what captured our hearts.
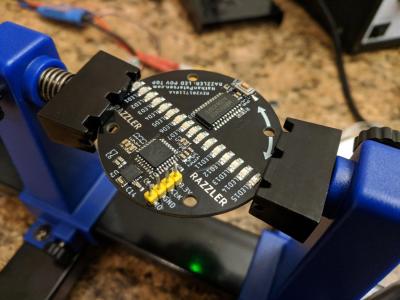
The project is a spinning top with an integrated persistence-of-vision (POV) display. That’s the line of LEDs that you see here. To sync up the patterns, the board includes an IMU, but detecting angular velocity with either gyroscope or accelerometer proved problematic. [Nathan’s] writeup of this is worth the read itself, but you’ll also enjoy the CNC workworking part of the project used to create the body of the spinning top.

This was [Nathan]’s first big solo project, and so many of the steps are explained by someone who just entered the deep-end very quickly. If you have experience, you may grin at the simplified reasonings, but for a novice, it makes for an approachable lesson. The way he selects hardware and firmware is pragmatic and perhaps even overkill, so you know he’s going into engineering. This overshot saved him when there were communication problems which needed a sacrifice of some processing power to run I2C on some GPIO.

We hope you enjoy reading about this combinations of POV, firmware (or is it?), and centrifugal force.

Infinity Cube Is Gorgeous Yet Simple

Typically when we hear the words “LED” and “Cube”, we think of small blinking devices on protoboard designed to flex one’s programming and soldering skills. However, while [Heliox]’s Cube Infini could be described as “a cube of LEDs”, it’s rather a different beast (video in French, subtitles available).

The cube starts with a 3D printed frame, designed in Fusion 360. The devil really is in the details — [Heliox] puts in nice touches, such as the artistic cube relief on the base, and the smart integrated cable management in the edges. The faces of the cube are plexiglass sheets, covered with a one-way reflective film that is applied in a similar manner to automotive window tint. For lighting, a high-density LED strip is fitted to the inside edges, chosen for maximum visual effect. It’s controlled by an IR remote and a cheap control module from Amazon.

While the build contains no particularly advanced tools, materials, or techniques, the final result is absolutely stunning. It’s a piece we’d love to have as a lamp in a stylish loungeroom or study. [Heliox] does a great job of explaining how the cube is designed and fits together, and it’s a testament to just what can be achieved with a little ingenuity and hard work.

Once you’re done here, check out this ping-pong based build.

Continue reading “Infinity Cube Is Gorgeous Yet Simple”

Homemade Daft Punk Helmet

You may not be French, and you may not have had a series of hit records, but you can still have the blinky LED helmet, thanks to this build from [Electronoobs]. They have put together a neat Daft Punk helmet built from 3D printed parts, an Arduino, a Bluetooth module, a string of WS2812 addressable LEDs and a simple app. The helmet itself is 3D printed, and the Arduino, Bluetooth, and battery are mounted in the chin. The LED panel is a series of WS2812 LED light strips wired together in series. The whole thing is controlled over a Bluetooth connection to an Android app that was built with the MIT App Inventor.

It’s a nice, simple build, but as we’ve discussed before choosing diffusers is hard. We’re not sure if a thicker panel covering the LED strips, or flipping the LEDs over and adding a reflective layer would be the right moves to improve upon the diffused look. Either way, it’s a neat place to start with your own build and a good way to learn about how to have fun with LED strips.

Continue reading “Homemade Daft Punk Helmet”

Open Source IDE For FPGAs As QtCreator Learns Verilog

Classic battles: PC vs Mac, Emacs vs Vi, Tastes Great vs Less Filling, and certainly one that we debate around the Hackaday watercooler: command line or IDE? There’s something to be said for using good old command line tools, and even if you like to configure your favorite editor to be nearly an IDE, at least it is one you are familiar with and presumably leverage over several different uses.

Most commercial FPGA tools come with a heavy-weight IDE. The open source tools for Lattice (IceStorm) typically is driven by the command line or a makefile. Until now. [Rochus-Keller] released VerilogCreator which is a plugin for QtCreator.

We were impressed because as IDEs go, QtCreator is both useful and lightweight, two things that don’t go together for many similar tools. [FPGAwars] has had an IDE based on Atom (apio-ide) although it hasn’t been updated in nearly a year. IceStudio sees more updates, of course, but it isn’t so much an IDE as a GUI-based code builder.

[Rochus-Keller] says there’s more to come. However, even at this early stage the IDE does syntax coloring, tooltips, inline messages, and can analyze source code allowing you to cross-reference symbols as you’d expect. There are configurations for Icarus to do simulations or you can use Verilator or Yosys — the synthesizer behind IceStorm. It appears it can also interact with Tcl-based workflows like those used by most FPGA vendor IDEs.

There’s quite a bit still on the to-do list, so we are excited to see where this is going. QtCreator isn’t hard to learn and it doesn’t’ feel as bloated as some of the big IDEs like Eclipse. If you want a quick introduction to QtCreator, we did that already. If you want to draw boxes instead of writing Verilog directly, try IceStudio.

Voice Controlled Camera For Journalist In Need

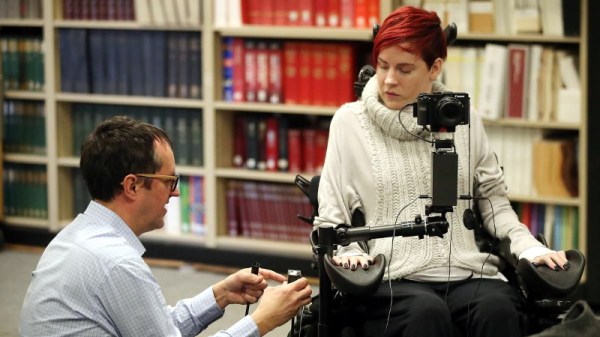
Before going into the journalism program at Centennial College in Toronto, [Carolyn Pioro] was a trapeze performer. Unfortunately a mishap in 2005 ended her career as an aerialist when she severed her spinal cord,  leaving her paralyzed from the shoulders down. There’s plenty of options in the realm of speech-to-text technology which enables her to write on the computer, but when she tried to find a commercial offering which would let her point and shoot a DSLR camera with her voice, she came up empty.

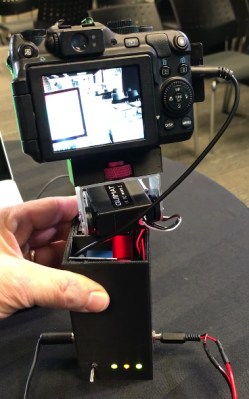
[Taras Slawnych] heard about [Carolyn’s] need for special camera equipment and figured he had the experience to do something about it. With an Arduino and a couple of servos to drive the pan-tilt mechanism, he came up with a small device which Carolyn can now use to control a Canon camera mounted to an arm on her wheelchair. There’s still some room for improvement (notably, the focus can’t be controlled via voice currently), but even in this early form the gadget has caught the attention of Canon’s Canadian division.

With a lavalier microphone on the operator’s shirt, simple voice commands like “right” and “left” are picked up and interpreted by the Arduino inside the device’s 3D printed case. The Arduino then moves the appropriate servo motor a set number of degrees. This doesn’t allow for particularly fine-tuned positioning, but when combined with movements of the wheelchair itself, gives the user an acceptable level of control. [Taras] says the whole setup is powered off of the electric wheelchair’s 24 VDC batteries, with a step-down converter to get it to a safe voltage for the Arduino and servos.

As we’ve seen over the years, assistive technology is one of those areas where hackers seem to have a knack for making serious contribution’s to the lives of others (and occasionally even themselves). The highly personalized nature of many physical disabilities, with specific issues and needs often unique to the individual, can make it difficult to develop devices like this commercially. But as long as hackers are willing to donate their time and knowledge to creating bespoke assistive hardware, there’s still hope.

Continue reading “Voice Controlled Camera For Journalist In Need”

Adaptive Infotainment Plays Tunes To Match Your Dangerous Driving

Part of the fun of watching action movies is imagining yourself as the main character, always going on exciting adventures and, of course, being accompanied by the perfect soundtrack to score the excitement and drama of your life. While having an orchestra follow you around might not always be practical, [P1kachu] at least figured out how to get some musical orchestration to sync up with how he drives his car, Fast-and-Furious style.

The idea is pretty straightforward: when [P1kachu] drives his car calmly and slowly, the music that the infotainment system plays is cool and reserved. But when he drops the hammer, the music changes to something more aggressive and in line with the new driving style. While first iterations of his project used the CAN bus, he moved to Japan and bought an old Subaru that doesn’t have CAN. The new project works on something similar called Subaru Select Monitor v1 (SSM1), but still gets the job done pretty well.

The hardware uses an Asus Tinkerboard and a Raspberry Pi with the 7″ screen, and a shield that can interface with CAN (and later with SSM1). The new music is selected by sensing pedal position, allowing him to more easily trigger the aggressive mode that his previous iterations did. Those were done using vehicle speed as a trigger, which proved to be ineffective at producing the desired results. Of course, there are many other things that you can do with CAN bus besides switching up the music in your car.

Continue reading “Adaptive Infotainment Plays Tunes To Match Your Dangerous Driving”

Freeforming The Atari Punk Console

This stunning piece of art is [Emily Velasco’s] take on the Atari Punk Console. It’s a freeform circuit that synthesizes sound using 555 timers. The circuit has been around for a long time, but her fabrication is completely new and simply incredible!

This isn’t [Emily’s] first rodeo. She previously built the mini CRT sculpture project seen to the left in the image above. Its centerpiece is a tiny CRT from an old video camera viewfinder, and it is fairly common for the driver circuit to understand composite video. And unlike CRTs, small video cameras with composite video output are easily available today for not much money. Together they bring a piece of 1980s-era video equipment into the modern selfie age. The cubic frame holding everything together is also the ground plane, but its main purpose is to give us an unimpeded view. We can admire the detail on this CRT and its accompanying circuitry representing 1982 state of the art in miniaturized consumer electronics. (And yes, high voltage components are safely insulated. Just don’t poke your finger under anything.)

With the experience gained from building that electrically simple brass frame, [Emily] then stepped up the difficulty for her follow-up project. It started with a sound synthesizer circuit built around a pair of 555 timers, popularized in the 1980s and nicknamed the Atari Punk Console. Since APC is a popular circuit found in several other Hackaday-featured projects, [Emily] decided she needed to add something else to stand out. Thus in addition to building her circuit in three-dimensional brass, two photocells were incorporated to give it rudimentary vision into its environment. Stimulus for this now light-sensitive APC were provided in the form of a RGB LED. One with a self-contained circuit to cycle through various colors and blinking patterns.

These two projects neatly bookend the range of roles brass rods can take in your own creations. From a simple frame that stays out of the way to being the central nervous system. While our Circuit Sculpture Contest judges may put emphasis the latter, both are equally valid ways to present something that is aesthetic in addition to being functional. Brass, copper, and wood are a refreshing change of pace from our standard materials of 3D-printed plastic and FR4 PCB. Go forth and explore what you can do!

Continue reading “Freeforming The Atari Punk Console”