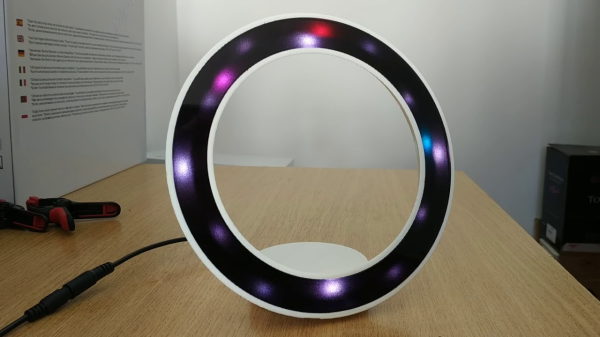
Flicker Detector Lets You Hear What You Can’t See

Have you ever looked at modern LED lighting and noticed, perhaps on the very edge of your perception, that they seemed to be flickering? Well, that’s because they probably are. As are the LEDs in your computer monitor, or your phone’s screen. Pulse width modulation (PWM) is used extensively with LEDs to provide brightness control, and if it’s not done well, it can lead to headaches and eyestrain.

Looking to quantify just how much flashing light we’re being exposed to, [Faransky] has created a simple little gadget that essentially converts flashing light into an audio tone the human ear can pick up. Those LEDs might be blinking on and off fast enough to fool our eyes, but your ears can hear frequencies much higher than those used in common PWM solutions. In the video after the break, you can see what various LED light sources sound like when using the device.

The electronics here are exceptionally simple. Just connect a small solar panel to an audio amplifier, in this case the PAM8403, and listen to the output. To make it a bit more convenient to use, there’s an internal battery, charger circuit and USB-C port; but you could just as easily run the thing off of a 9 V alkaline if you wanted to build one from what’s already in the parts bin.

Who knows? If you carry this thing around long enough, you might even hear the far less common binary code modulation in action (but probably not).

Continue reading “Flicker Detector Lets You Hear What You Can’t See”

New Part Day: SK6812 Mini-E. A Hand Solderable Neopixel Compatible LED!

Normally when we give you a New Part Day piece, it concerns a component that you will have never seen before. The subject of this find by [Robert Fitzsimons] then is a slight departure from that norm, given that the SK6812 Mini-E is a WS2812 or Neopixel compatible multi-colour LED of a type that has been available for a while now.

What makes this component new though is its packaging. The Mini-E variant of the SK6812 only appeared last year and has now found its way through to smaller order quantities on AliExpress. Its special feature is that it has a set of flat leads rather than the usual pads on the underside of the package. This means that unlike its predecessors it is readily hand solderable, as he demonstrates by attaching a set of leads to one.

The leads emerge halfway up the side of the device, which seems designed to be mounted recessed within a PCB hole. He demonstrates this with a piece of stripboard, and remarks that they would make a good choice for many small projects such as Shitty Add-On boards.

We’ve touched the leadless SK6812s a few times before, along the way remarking that in some respects they are better than the WS2812 they follow.

Continue reading “New Part Day: SK6812 Mini-E. A Hand Solderable Neopixel Compatible LED!”

It’s An LED Cube, But Maybe Not Quite What You Were Expecting

LED cubes are a pleasing ornament and still something of a talking point, but now they have reached the point of being available as inexpensive kits from China. The simpler ones don’t have quite the cachet they used to. It’s still a project that can deliver a few surprises though, as [Moritz v. Sivers] shows us very well with his glass LED cube. Instead of the usual wire frame construction he’s employed a novel technique of applying each layer of WS2812 LEDs to its own glass PCB.

The PCBs are created with self-adhesive copper foil, cut out with a CNC cutter and painstakingly transferred to the glass substrate with the help of a piece of transfer paper. The LEDs are soldered on, and once each board has been tested they are mounted in the manner of a toast rack to laser cut acrylic corner pieces. There are four layers of 16 LEDs each, which might not make for the largest cube, but still makes for a respectable show. The addressable LEDs take it a level above the 3D matrix type of cube with which you might already be familiar, and the extra time required to load each value into them doesn’t seem to slow the display down.

There are a couple of videos we’ve placed below the break, one showing it in action and the other taking us through the build process. This last one should provide plenty of inspiration for anyone with an interest in creating this type of PCB on glass or any other unusual substrate. Continue reading “It’s An LED Cube, But Maybe Not Quite What You Were Expecting”

Teardown And Analysis Of A Cheap Solar Lamp

If you walk the aisles of a dollar store one constant that you will see worldwide is the Chinese solar lamp. Your dollar gets you a white LED behind plastic, mounted on a spike to stick into the ground, and with a solar cell on top. It charges in the sunlight during the day and then lights the LED for a few hours at nightfall. They are in gardens everywhere, and no doubt landfill sites are full of them because they do not last very long. [Giovanni Bernardo] had one that stopped working, so he subjected it to a teardown to find out what was up, and what made it tick (Italian, Google Translate link).

As expected, the culprit proved to be a leaking and corroded 1.2 volt NiMh cell, and its replacement with an AA cell brought the lamp back to life. But the interesting part of this tale comes from his teardown and analysis of the lamp’s components. It’s centered around a YX8016 battery charger and power management chip. The device has an amazing economy of design with only four components including the solar cell and the LED. The final component is a small inductor that forms part of the boost converter to keep the LED lit as the battery voltage falls. The chip switches at 580kHz, and produces a 3.2 volt supply.

If this is a subject that interests you, don’t forget to take a look at the power harvesting challenge we ran a while back.

Little Hex Tricks Make Little Displays A Little Easier

Depending on the device in hand and one’s temperament, bringing up a new part can be a frolic through the verdant fields of discovery or an endless slog through the grey marshes of defeat. One of the reasons we find ourselves sticking with tried and true parts we know well is that interminable process of configuration. Once a new display controller is mostly working, writing convenience functions to make it easier to use can be very satisfying, but the very first thing is figuring out how to make it do anything at all. Friend of Hackaday [Dan Hienzsch] put together a post describing how to use a particular LED controller which serves as a nice walkthrough of figuring out the right bitmath to make things work, and includes a neat trick or two.

The bulk of the post is dedicated to describing the way [Dan] went about putting together his libraries for a 7-segment display demo board he makes. At its heart the board uses the IS31FL3728 matrix driver from ISSI. We love these ISSI LED controllers because they give you many channels of control for relatively low cost, but even with their relative simplicity you still need to do some bit twiddling to light the diodes you need. [Dan]’s post talks about some strategies for making this easier like preconfigured lookup tables with convenient offsets and masking bits to control RGB LEDs.

There’s one more trick which we think is the hidden star of the show; a spreadsheet which calculates register values based on “GUI” input! Computing the bit math required to control a display can be an exercise in frustration, especially if the logical display doesn’t fit conveniently in the physical register map of the controller. A spreadsheet like this may not be particularly sexy but it gets the job done; exactly the kind of hack we’re huge fans of here. We’ve mirrored the spreadsheet so you can peek at the formulas inside, and the original Excel document is available on his blog.

A Strange Display Gives Up Its Secrets

Providing a display for a project in 2020 is something of a done deal. Standard interfaces and off-the-shelf libraries for easily available and cheap modules mean that the hardest choice you’ll have to make about a display will probably relate to its colour. Three decades ago though this was not such a straightforward matter though, and having a display that was in any way complex would in varying proportion take a significant proportion of your processing time , and cost a fortune. [AnubisTTP] has an unusual display from that era, a four-digit LED dot matrix module, and the take of its reverse engineering makes for a fascinating read.

The LITEF 104267 was made in 1986, and is a hybrid circuit in a metal can with four clear windows , one positioned over each LED matrix. Inside are seven un-encapsulated chips alongside the LED matrices on a golf plated hybrid substrate. The chips themselves are not of a particularly high-density process, so some high-resolution photography was able to provide a good guess at their purpose. A set of shift registers drive the columns through buffers, while the rows are brought out to a set of parallel lines. Thus each column can be illuminated sequentially with data presented on the rows. It’s something that would have saved a designer of the day a few extra 74-series chips, though we are guessing at some significant cost.

This display may seem antiquated to us today, but it wasn’t the only option for 1980s designers. There’s one display driver from back then that’s very much still with us today.

Take Security Up A Notch By Adding LEDs

All computers are vulnerable to attacks by viruses or black hats, but there are lots of steps that can be taken to reduce risk. At the extreme end of the spectrum is having an “air-gapped” computer that doesn’t connect to a network at all, but this isn’t a guarantee that it won’t get attacked. Even transferring files to the computer with a USB drive can be risky under certain circumstances, but thanks to some LED lights that [Robert Fisk] has on his drive, this attack vector can at least be monitored.

Using a USB drive with a single LED that illuminates during a read OR write operation is fairly common, but since it’s possible to transfer malware unknowingly via USB drives, one that has a separate LED specifically for writing operations will help alert a user to any write operations that might be trying to fly under the radar. A recent article by [Bruce Schneier] pointed out this flaw in USB drives, and [Robert] was up to the challenge. His build returns more control to the user by showing them when their drive is accessed and in what way, which can also be used to discover unique quirks of one’s chosen operating system.

[Robert] is pretty familiar with USB drives and their ups and downs as well. A few years ago he built a USB firewall that was able to decrease the likelihood of BadUSB-type attacks. Be careful going down the rabbit hole of device security, though, or you will start seeing potential attacks hidden almost everywhere.