A Mini Stacker Arcade Cabinet

For [LumoW], what started as a school project turned into a passion project. He and his team made a hardware implementation of an arcade game called Stacker. Never heard of it? It’s pretty fun, kind of like an inverse Tetris. You can play the flash version here and see their mini arcade version after the break.

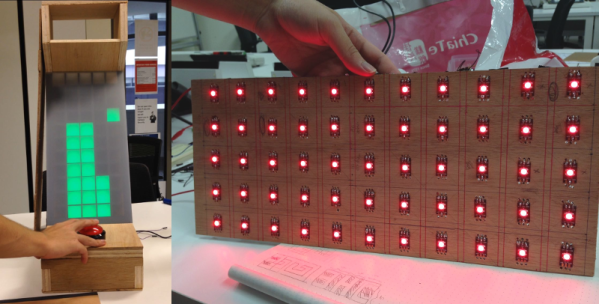
The game is based around the Mojo FPGA which the class required, and it’s programmed entirely in bitwise operators. It uses WS2812 RGB LEDs to represent the individual tower building blocks, and these are mounted on plywood in a matrix and separated into cells by a grid of foam board. After some trial and error, the team found the perfect shade of acrylic to diffuse the bright dots into glowing squares.

Since the game only needs one input, we don’t think [LumoW] should apologize at all for using the biggest, baddest button they could find. Besides, the game has that edge-of-your-seat action that can turn panic into heavy-handedness and cool DIY arcade games into shards of sadness.

Looking for something more advanced to do with an FPGA? Try your hand at vector games.

Continue reading “A Mini Stacker Arcade Cabinet”

Joule Thief Steals In Favor Of Christmas

A lot of things tend to get stretched during the holiday season, like shopping budgets and waistbands and patience. This year, [Chris] is stretching the limits of both the mini breadboard and the humble 1.5 V LR44 coin cell with his joule thief-driven LED mini Christmas tree.

With the push of a micro momentary, the joule thief circuit squeezes enough power from an LR44 to boot an MSP430 microcontroller, which needs 1.8 V – 3.6 V. After boot, the micro takes control of the joule thief circuit and milks it whenever the voltage falls below 3.2 V. This tree may be small in stature, but it’s feature-rich. A push of the same momentary button cycles through four different light shows, ending with a medley of all four. Be dazzled after the break.

The code for this tiny tree, which features an awesome ASCII breadboard layout and schematic, is up on GitHub. [Chris] has it listed among a few other manageable bare-metal ‘430 projects that would be great for beginners at pure C. If that sounds like you, why not give yourself the gift of learning a new language?

We’ve seen some spirited ways of lighting LEDs, but doing it with candle power takes the fruitcake.

Continue reading “Joule Thief Steals In Favor Of Christmas”

Spice Up Your Dice With Bluetooth

There’s no shortage of projects that replace your regular board game dice with an electronic version of them, bringing digital features into the real world. [Jean] however goes the other way around and brings the real world into the digital one with his Bluetooth equipped electronic dice.

These dice are built around a Simblee module that houses the Bluetooth LE stack and antenna along with an ARM Cortex-M0 on a single chip. Adding an accelerometer for side detection and a bunch of LEDs to indicate the detected side, [Jean] put it all on a flex PCB wrapped around the battery, and into a 3D printed case that is just slightly bigger than your standard die.

While they’ll work as simple LED lighted replacement for your regular dice as-is, their biggest value is obviously the added Bluetooth functionality. In his project introduction video placed after the break, [Jean] shows a proof-of-concept game of Yahtzee displaying the thrown dice values on his mobile phone. Taking it further, he also demonstrates scenarios to map special purposes and custom behavior to selected dice and talks about his additional ideas for the future.

After seeing the inside of the die, it seems evident that getting a Bluetooth powered D20 will unfortunately remain a dream for another while — unless, of course, you take this giant one as inspiration for the dimensions.

Continue reading “Spice Up Your Dice With Bluetooth”

Raspberry Pi Tracks Office Happiness

It’s always great to see people who haven’t had the opportunity to work with hardware like the Raspberry Pi before come up with a great project and have fun putting it together.  [Katja]’s company has a two-day hackfest where employees can work on some cool non-work-related projects. [Katja]’s team decided to use a Raspberry Pi and some buttons and LEDs to create a ‘happiness tracker‘ for the company.

The resulting project is mounted near the entrance to the office and when they come in or leave, an employee can push one of four buttons to indicate their mood at the time, ‘bad,’ ‘not so good,’ ‘good’ or ‘super.’ The result is tracked and an overall impression of the office’s happiness is the result.

The project consists of the aforementioned Raspberry Pi, four push buttons, five LEDs that animate when a button is pressed and another LED that shows the system is currently up and working. When a user presses a button, the five LEDs animate in the shape of a check mark to show that the button press was successful. A Python script running at startup on the Pi takes care of detecting button pressing, lighting LEDs and sending a message to the server which monitors the level of happiness.

It’s a simple project, but that’s exactly what you need when you start with hardware you haven’t worked with before. It seems like [Katja]’s team had fun building the project and they hope that this can help gauge the overall wellbeing of the office. [Katja]’s blog post has an embedded video of the project in action. In the meantime, check out this bit of facial recognition software that determines how happy you are based on your smile, or this project that lets you know how happy your plant is.

Using A Decade Counter To Make LEDs Flash

[Andrea De Napoli] created a LED display consisting of a half-dozen LEDs connected to the inverted signals of a CD4017 decade counter, giving the effect that a dark LED is running back and forth. The CD4017 works by activating 10 outputs, one at a time, as controlled by a clock signal sent to pin 14.

The first and last LEDs are lit by outputs 0 and 5 with the help of a PNP transistor and a 12K resistor. The middle four LEDs are switched by two outputs each and go dark when one of them goes high. [Andrea] really delves into the CD4017 and he shares a lot of detail in the project page.

Hackaday publishes a lot of posts about obscure ICs: Project 54/74 aims to create a database of die images of 5400 and 7400 series ICs. In a remix of a classic, the Baby 10 uses a 4017 to make a music sequencer. Continue reading “Using A Decade Counter To Make LEDs Flash”

How Good Is Your Aim First Thing In The Morning?

For the less than highly-driven individuals out there — and even some that are — sometimes, waking up is hard to do, and the temptation to smash the snooze button is difficult to resist. If you want to force your mind to immediately focus on waking up, this Nerf target alarm clock might get you up on time.

Not content to make a simple target, [Christopher Guichet] built an entire clock for the project. The crux of the sensor is a piezoelectric crystal which registers the dart impacts, and [Guichet]’s informative style explains how the sensor works with the help of an oscilloscope. A ring of 60 LEDs with the piezoelectric sensor form the clock face, all housed in a 3D printed enclosure. A rotary encoder is used to control the clock via an Arduino Uno, though a forthcoming video will delve into the code side of things; [Guichet] has hinted that he’ll share the files once the code has been tidied up a bit.

Continue reading “How Good Is Your Aim First Thing In The Morning?”

Electronic Prototyping With A 3D Printer

It would be nice if your 3D printer could spit out PC boards. There’s been lots of work done to make that happen, mostly centered on depositing conductive material, although we’ve been surprised no one has worked out how to just 3D print a plastic resist mask.

We recently found a GitHub group for [PCBPrints] which has small modules that would be useful in prototyping and breadboarding. They are really just carriers that create plug in modules for switches, LEDs, and the like. It looks like this is a aggregated list of other GitHub projects that realize these designs. The group is in Spanish, but Google Translate is your friend, as usual. You can see a video of one of the button modules in action, below.

Continue reading “Electronic Prototyping With A 3D Printer”