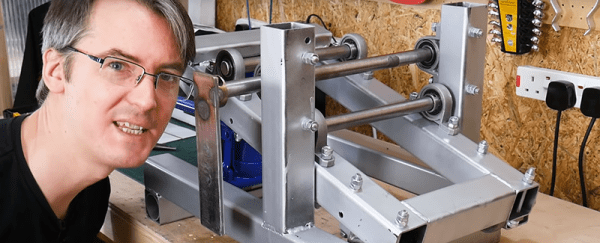
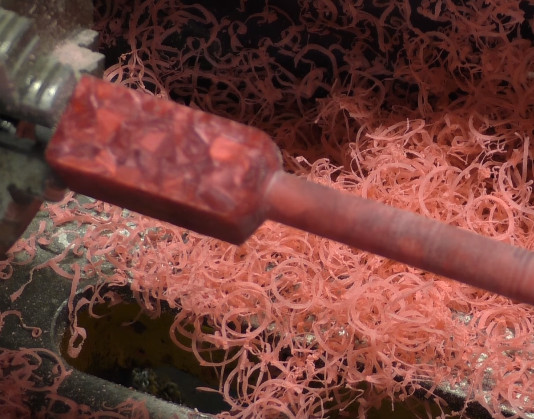
Metal fabrication is a useful skill to have. There’s plenty you can achieve in your workshop at home, given the right tools. There’s lathes for turning, mills for milling, and bandsaws and dropsaws for chopping it all to pieces. But what do you do if you need to make hoops and bends and round sections? You build a metal roller, of course – and that’s precisely what [James Bruton] did.
The main body of the tool is built out of box section, chosen largely as it’s what [James] had lying around. Bearings are of the familiar pillow block variety, with 20 mm bright steel serving as the rollers due to its better tolerance than mild steel stock. Set screws hold the shafts in place to avoid everything sliding around the place. A 10-ton bottle jack then provides the force to gently bend the workpiece as it passes through the rollers.
Initial tests were positive, with the roller producing smooth curves in 4 mm thick steel bar. There were some issues with runout, which were easily fixed with some attention to the parallelism of the shafts. It’s a tidy build, and can serve as a basis for further upgrades in future if necessary.
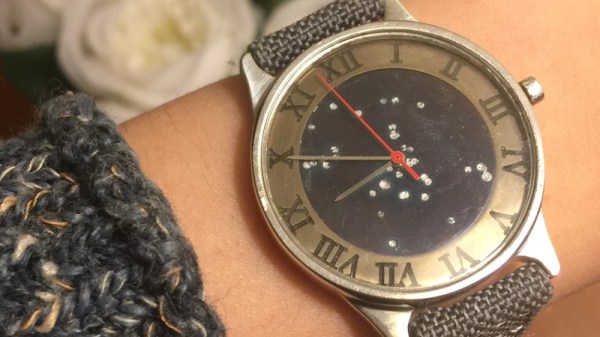
It’s becoming abundantly clear that [Colin Merkel] doesn’t know the definition of “good enough”. Not only has he recently completed his third (and most impressive) wristwatch build, but he also managed to put together one of the most ridiculously romantic gifts ever conceived. While some of us are giving our significant others a gift card to Starbucks, he made his girlfriend a watch with a chart on the face representing the position of the stars at the time and place of their first meeting.
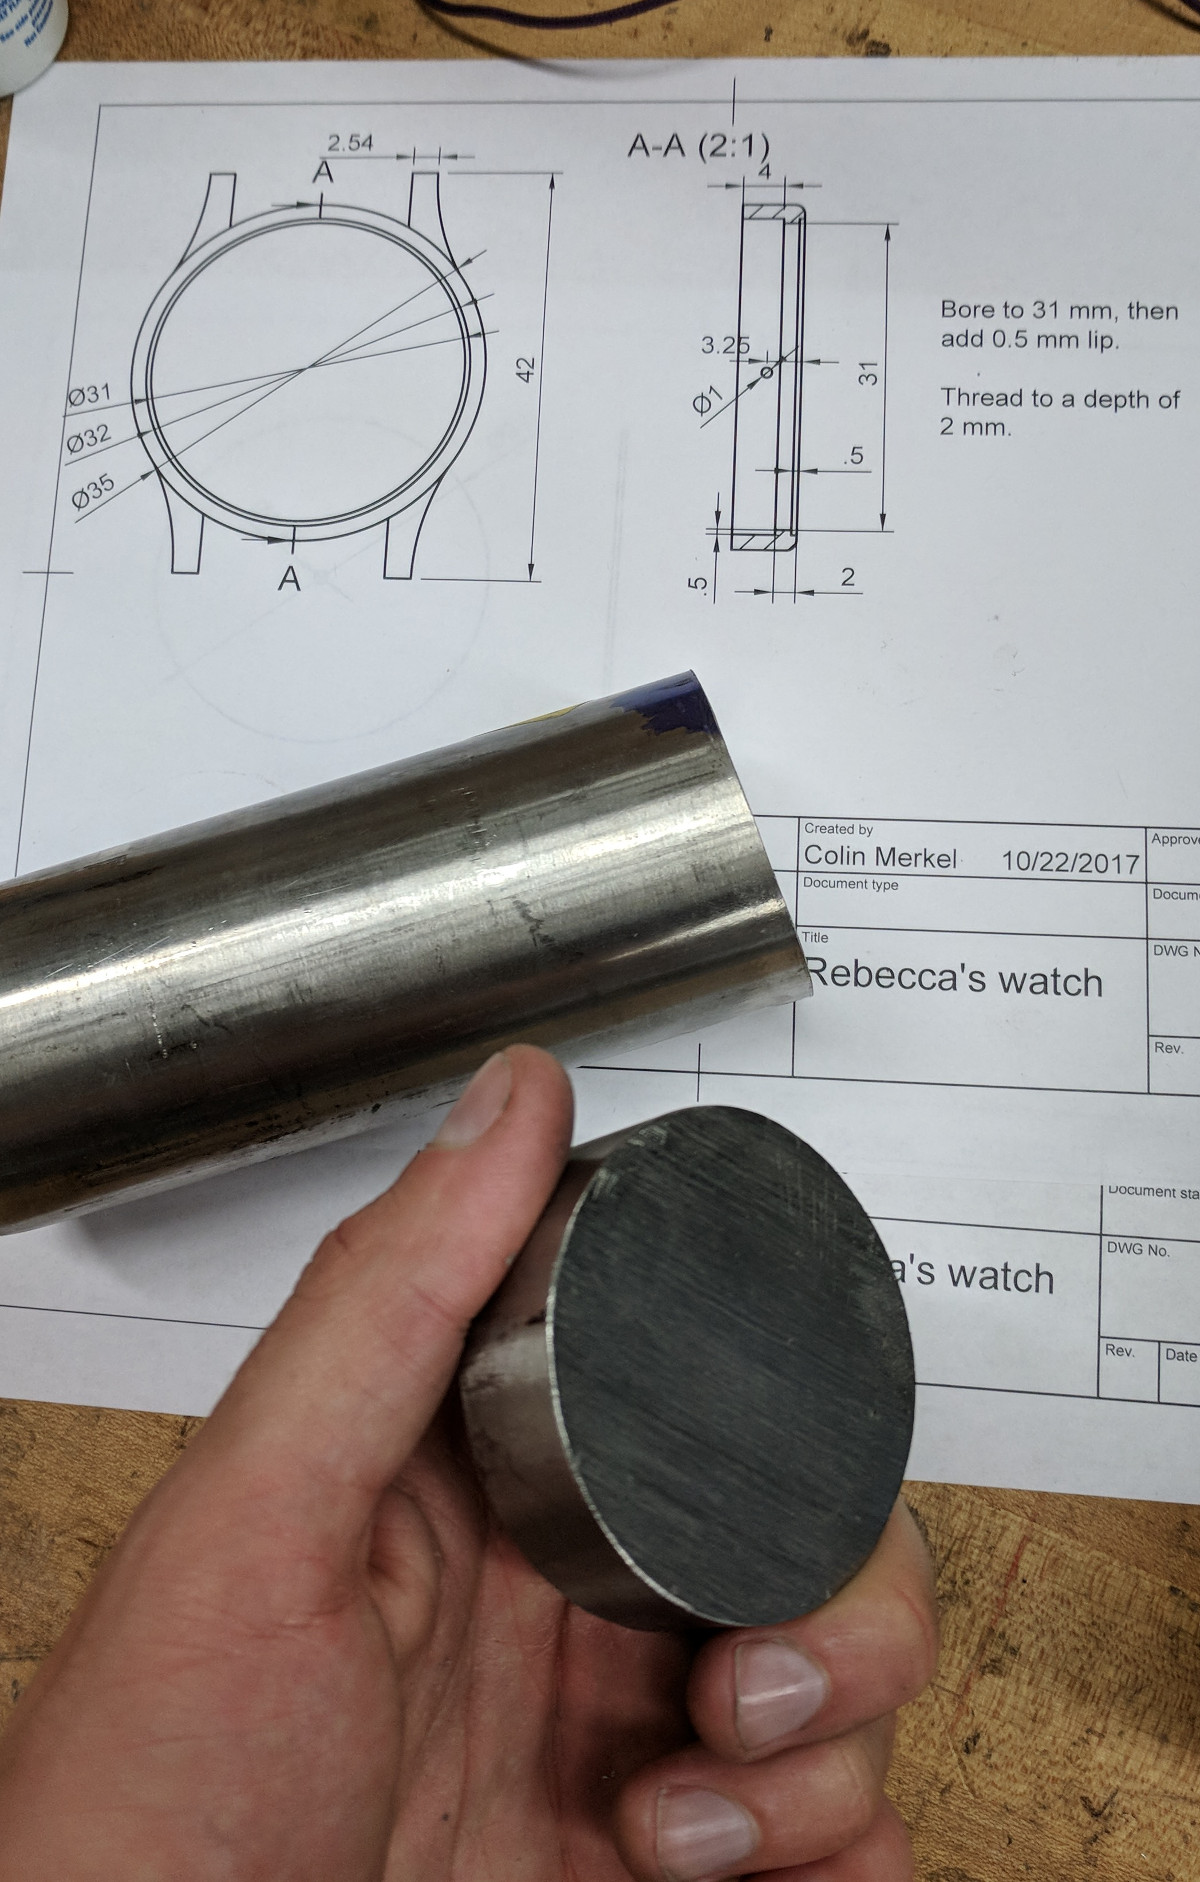
As per his usual style, the documentation on this build is phenomenal. If paging through his gallery of build images doesn’t make you want to get a lathe and start learning metal working, nothing will. A chunk of stainless steel rod miraculously becomes a gorgeous wrist watch over the course of a few dozen images, perfectly encapsulating that old adage of “making it look easy”.
All you have to do is turn this into that. Easy.
Certainly the highlight of this build is the star chart on the face. To make it, he used PyEphem to plot the position of the brightest stars that were visible at the time and place of their first meeting. He then wrote a script to take those stars and convert their positions to G-Code the CNC could use to drill holes in the appropriate locations. The depth of the hole even corresponds to the magnitude (brightness) of each star, giving the chart a subtle 3D effect.
Unfortunately, [Colin] made a couple of mistakes during this build, to the point that he’s not exactly sure how to proceed. He mentions he might even be forced to start over from scratch. It’s hard to imagine how something that looks this good could ever end up being a failure, but the world of watch making is unkind.
To start with, he used 304 stainless instead of 303. This made machining the case much more difficult, and from his very first cut he realized it was going to be a problem. While it was an annoyance he mentions a couple times during the build log, he was at least was able to work through it.
The real problem came at the end, when he put the watch together. He originally made his designs assuming a front glass which was 0.5 mm thick, but in actuality used a piece that is 0.8 mm thick. This slight difference is just enough to cause the seconds hand to rub up on the glass, putting drag on the movement. The end result is that the battery dies extremely quickly, effectively rendering the watch useless.
We can’t imagine the heartbreak [Colin] felt when he realized what happened; we felt bad just reading about it. But given his track record, we have no doubt he’ll get the issue sorted out. It would be a shame to start over completely, but there’s some consolation in knowing it’s part of the learning process: you don’t become a master of your craft without making a couple mistakes along the way.
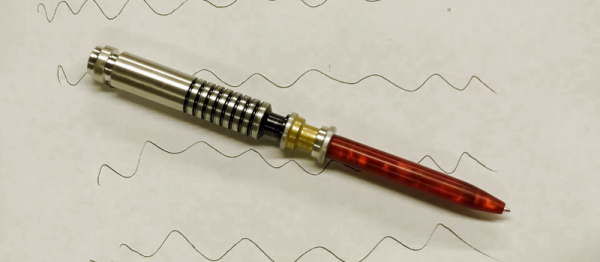
In an increasingly paperless society, writing implements are becoming an obsolete technology for many of us. Certainly not the kind of thing the average person would think to spend more than a couple bucks on, to say nothing of machining one out of a solid piece of aluminum bar stock. But clearly [Bob] is not most people. He recently dropped us a line about a video he uploaded to his aptly-named YouTube channel “Making Stuff”, where he goes through the steps required to turn raw materials into a writing instrument worthy of a Jedi.
Starting with a piece of aluminum chucked up in the lathe, [Bob] cuts out the iconic ribbed profile of Luke’s saber and fills in the gaps with nothing more exotic than a black Sharpie. He then moves on to the more complex shape of the emitter, and then flips the handle over in the lathe and hollows it out so a brass tube can be inserted.
Turning down the acrylic “blade”
Somewhat surprisingly, it seems more effort ends up being put into the acrylic “blade” than the aluminum handle itself. A chunk of acrylic is drilled and tapped so that it can be mounted in the chuck, and then turned down into a long cylinder. A tip is then cut in the end, the length of the blade is hollowed out, and finally it gets polished up to a nice shine.
The build is completed by inserting a standard ink pen cartridge down the center of the now completed saber. Surely the pen aficionados will lament that he didn’t attempt to build his own ink cartridge as well, but we think he gets a pass considering the rest of it was made from scratch.
If even a glorious writing instrument such as this isn’t enough to get you to re-learn how to write your name, fear not. Whether you’re making music or capturing flags, we’ve played home to numerous other saber projects; eye-safe or otherwise.
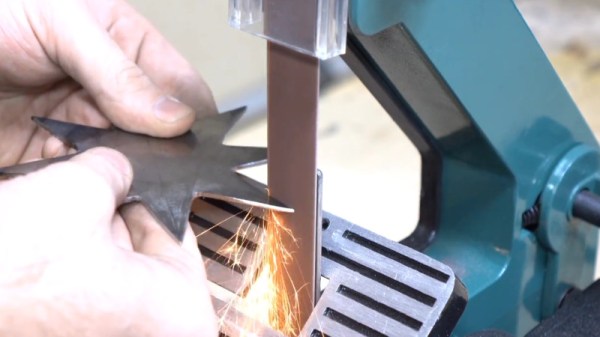
The holidays are nearly upon us, and if you haven’t found the perfect gift for the Mall Ninja in your life yet, this latest hack might be just what you’re looking for. On his YouTube channel, [The Nocturnal Alchemist] demonstrates how to make ninja throwing stars (shuriken) out of an old circular saw blade. One could probably argue that a circular saw itself is close enough to throwing star if your only goal is to wreck some stuff in your backyard, but with this method they’ll have that official samurai look.
To start the process, he hits both sides of the circular saw blade with a grinder to smooth out the surface. He then traces the desired star shapes onto the blade, and cuts the blade into pieces so it’s easier to manage. The rough shape of the stars is cut out with an angle grinder, and a belt sander lets him sharpen the edges.
At this point the stars are effectively finished, but if you want something that’s going to look good on the shelf next to the katana you bought online, you need to do some more finish work. He sands both sides of the stars by hand, starting at 80 grit and working all the way up to 1200 grit wet paper. Once sanded, paste wax is rubbed in with a cloth to give it a protective coating.
With the finish work done, all that’s left to do is throw your new shuriken at cans of soda and watermelons as a demonstration of their power. To this end, he has come prepared with a 1,000 FPS camera; so if you’ve ever wanted to see cans of off-brand soda getting exploded with a throwing star, your Mall Ninja friend isn’t the only one about to get a gift.
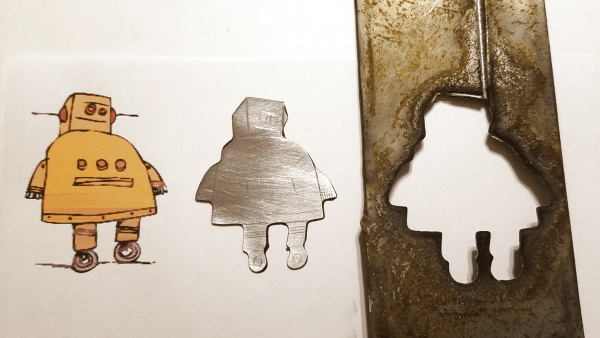
Laser cutters, waterjets, plasma cutters, CNC routers – most hackerspaces and even many dedicated home-gamers seem to have some kind of fancy tool for cutting sheet goods into intricate shapes. But with no access to a CNC machine and a need to cut a complex shape from sheet metal, [AlchemistDagger] cooked up this bare-bones and somewhat dangerous EDM rig to get the job done.
Electric discharge machining has been around for decades and is used a lot for harder metals like titanium and tool steel. The process makes sense to anyone who has seen contacts pitted and corroded by repeated arcing – an electric arc is used to remove metal from the workpiece, with a dielectric fluid used to cool the workpiece and flush away debris. For [AlchemistDagger]’s purposes, a lot of the complicated refinements, like high-frequency power supplies and precise tool positioning, were ignored. He built a simple linear slide to manually control the tool position, and the power supply was just a bridge rectifier connected to the 120-volt mains with some filter capacitors and a big light bulb as a ballast resistor. While the video below shows electrical conduit being notched, [AlchemistDagger] also made a brass cookie-cutter style tool to cut the Instructables logo from steel.
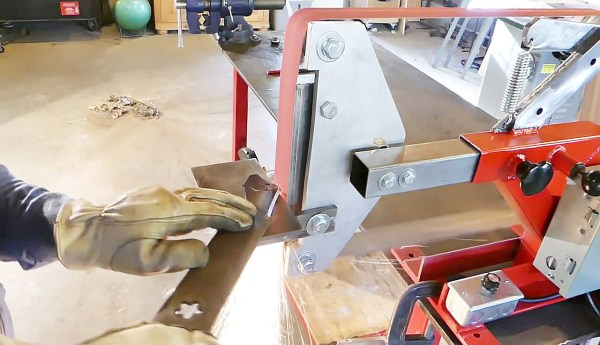
[Mike] had a bunch of disused fitness machines lying around. Being a skilled welder, he decided to take them apart and put them back together in the shape of a belt grinder.
In particular, [Mike] is reusing the height-adjustment guide rail of an old workout bench to build the adjustable frame that holds the sanding belt. A powerful DC motor including a flywheel was scavenged from one treadmill, the speed controller came from another. [Mike] won’t miss the workout bench: Once you’re welding a piece of steel tube dead-center on a flywheel, as happened for the grinder’s drive wheel, you may call yourself a man (or woman) of steel.
The finished frame received a nice paint job, a little switching cabinet, proper running wheels and, of course, a sanding belt. Despite all recycling efforts, about 80 bucks went into the project, which is still a good deal for a rock-solid, variable-speed belt grinder.
Apparently, disused fitness devices make an ideal framework to build your own tools: Strong metal frames, plentiful adjustment guides, and strong treadmill motors. Let us know how you put old steel to good use in the comments and enjoy [Mike’s] build documentation video below!
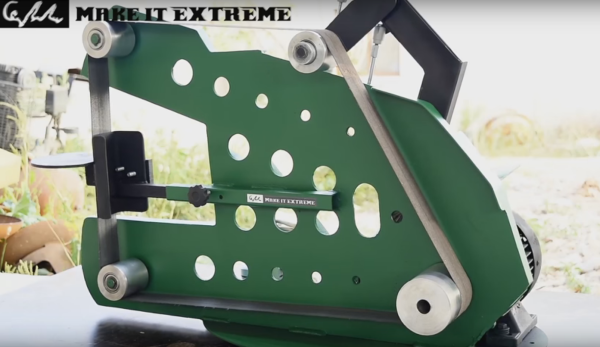
What’s green and black and used all over the shop? It’s [Make It Extreme]’s newest build, a scratch-built belt grinder. And as usual, the build video gets us in the mood to cut metal.
We’ll go out on a limb here and state that the lathe, and not the belt grinder, is the essential metalworking tool. That’s pretty clear from this build – the running gear is machined entirely on a lathe. But as central as the lathe is to machinery making, belt grinders like this one have to rate right up there in terms of shop utility.
You can sharpen with them, quickly remove stock, clean up welds, form chamfers, and remove rust and corrosion. They’re great all-around tools, and with the quick-release idler feature that this one has, fast belt changes for different jobs make it even more flexible. We’d like to see more adjustability in the work table – the ability to angle the table relative to the belt is very handy – but in all this is a great build and a nice tool to have.
On top of it all, watching the [Make It Extreme] builds – like this sandblaster, spot welder, or belt sander – is like high-speed shop class. There’s a lot to learn, although we have to admit that welding in shorts and a T-shirt gives us the willies.