Cluster Your Pi Zeros In Style With 3D Printed Cray-1

From a performance standpoint we know building a homebrew Raspberry Pi cluster doesn’t make a lot of sense, as even a fairly run of the mill desktop x86 machine is sure to run circles around it. That said, there’s an argument to be made that rigging up a dozen little Linux boards gives you a compact and affordable playground to experiment with things like parallel computing and load balancing. Is it a perfect argument? Not really. But if you’re anything like us, the whole thing starts making a lot more sense when you realize your cluster of Pi Zeros can be built to look like the iconic Cray-1 supercomputer.

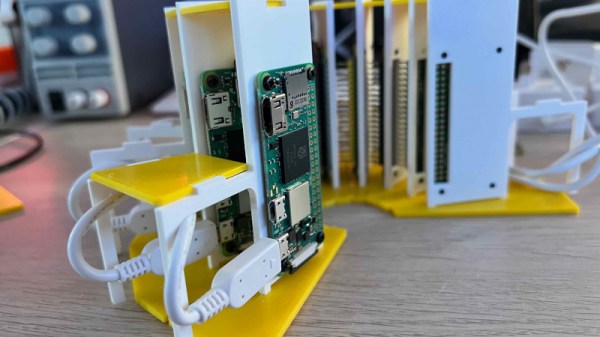
This clever 3D printed enclosure comes from [Kevin McAleer], who says he was looking to learn more about deploying software using Ansible, Docker, Flask, and other modern frameworks with fancy sounding names. After somehow managing to purchase a dozen Raspberry Pi Zero 2s, he needed a way to keep them all in a tidy package. Beyond looking fantastically cool, the symmetrical design of the Cray-1 allowed him to design his miniature version in such a way that each individual wedge is made up of the same identical  set of 3D printed parts.

In the video after the break, [Kevin] explains some of the variations the design went through. We appreciate his initial goal of making it so you didn’t need any additional hardware to assemble the thing, but in the end you’ll need to pick up some M2.5 standoffs and matching screws if you want to build one yourself. We particularly like how you can hide all the USB power cables inside the lower “cushion” area with the help of some 90-degree cables, leaving the center core open.

This isn’t the first time we’ve seen somebody build their own tiny Cray-1. A particularly dedicated hacker built his own 1/10th scale replica of the 1970s supercomputer powered by an FPGA back in 2010, and eventually got to the point of trying to boot original software on it.

Continue reading “Cluster Your Pi Zeros In Style With 3D Printed Cray-1”

Miniature Space Invaders game

Arduino And An OLED Make This Space Invaders Cabinet Tiny

For as simple as it appears now, Space Invaders was one machine from the Golden Age of video games that always seemed to have a long line waiting for a chance to lose a couple of quarters. And by way of celebrating the seminal game’s influence, [Nick Cranch] has executed what might just be the world’s smallest Space Invaders replica.

It appears that this started mainly as an exercise in what’s possible with what’s on hand, which included a couple of quite small OLED displays. For the build photos it looks like there’s an Arduino Nano running the show; [Nick] relates that the chosen hardware proved challenging, and that he had to hack the driver library to make it work. Once he got a working game, [Nick] didn’t rest on his laurels. Rather, he went the extra mile and built a miniature cabinet to house everything in.

The video quality below may be poor, but it’s more than enough to see how much work he put into detailing the cabinet. The graphics of the original US release of the game cabinet are accurately represented, right down to the art on the front glass. The cabinet itself is made from 1.5 mm plywood which he cut by hand. It even looks like he recreated the original scheme of cellophane overlays on the monochrome screen to add a little color to the game. Nice touch!

We really appreciate the attention to detail here, with our only quibble being no schematics or code being posted. Hopefully, we’ll see those later, but for now, this looks like a fun project and a nice trip down memory lane. But if you think it’s too small, no worries — we’ve got a much, much bigger version of the game too.

Continue reading “Arduino And An OLED Make This Space Invaders Cabinet Tiny”

A model roller coaster

3D Printed Model Roller Coaster Accurately Simulates The Real Thing

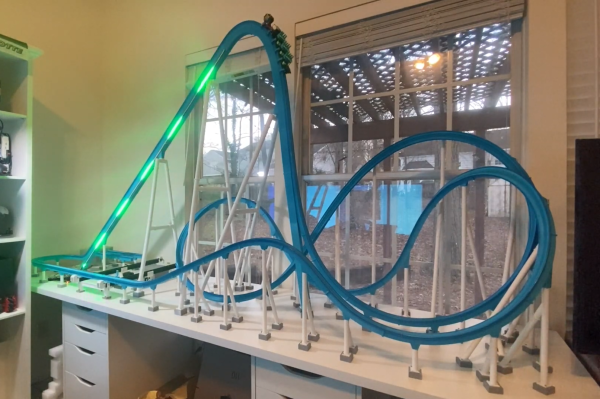
While they don’t give the physical thrill of a real one, model roller coasters are always fun to watch. However, they actually make a poor analog of a full-sized ride, as gravitational force and aerodynamic drag don’t scale down in the same way, model roller coasters usually move way faster than the same design would in the real world. [Jon Mendenhall] fixed this deficiency by designing a model roller coaster that accurately simulates a full-sized ride.

The track and cart are all made of 3D printed pieces, which altogether took about 400 hours to print. The main trick to the system’s unique motion is that the cart is motorized: a brushless DC motor moves it along the track using a rack-and-pinion system. This means that technically this model isn’t a roller coaster, since the cart never makes a gravity-powered drop; it’s actually a small rack railway, powered by a lithium-ion battery carried on board the cart. An ESP32 drives the motor, receiving its commands through WiFi, while the complete setup is controlled by a Raspberry Pi that runs the cart through a predetermined sequence.

The design of the track was inspired by the Fury 325 roller coaster and simulated in NoLimits 2. [Jon] wrote his own software to generate all the pieces to be printed based on outputs from the simulator. This included all the track pieces as well as the large A-frames holding it up; some of these were too long to fit in [Jon]’s 3D printers and had to be built from smaller pieces. The physics simulation also provided the inputs to the controller in the form of a script that contains the proper speed and acceleration at each point along the track.

The end result looks rather slow compared to other model roller coasters, but actually feels realistic if you imagine yourself inside the cart. While it’s not the first 3D printed roller coaster we’ve seen, it’s probably the only one that accurately simulates the real thing. If you’re more interested in a roller coaster’s safety systems, we’ve featured them too.

Continue reading “3D Printed Model Roller Coaster Accurately Simulates The Real Thing”

Baby C-17 Sends Imaginations Soaring

The C-17 Globemaster III is a military cargo jet that can carry what their commercial counterparts can’t, to places those other planes can’t go. The people who keep these planes flying are proud of their capable airlifter, but it’s hard to show them off. Solution: build a scaled-down version more suitable for driving off base for a parade down Main Street and other community events.

While the real thing was built under an expensive and contentious military procurement process, the miniature was built with volunteer labor using castoff materials. The volunteer force included maintenance crew whose job is to know the C-17 inside and out. Combined with fabrication skills that comes with the job, the impressive baby plane faithfully copied many curvatures and details from full-sized originals. (Albeit with some alteration for its cartoony proportions.) Underneath are mechanicals from a retired John Deere Gator utility vehicle. They usually resemble a large golf cart except with a cargo bed and more rugged suspension. Basically they are to golf carts as a C-17 is to a 767. Amusingly, the little plane has its own rear loading ramp, superficially preserving the cargo-carrying capacity of the original Gator chassis.

Interior features continue, though the official picture gallery doesn’t show them. There is a flight deck with control panels and various sights and sounds to keep visitors entertained. Enough details were poured into the exhibit that some people had to ask if the little plane can fly, and the answer is a very definite no. The wings, and the engine pods mounted to them, are only for show carrying The Spirit of Hope, Liberty & Freedom. It is quite a long official name for such a short stubby thing.

We always love to admire impressively put-together miniatures, and not all projects require skill of aircraft mechanics. Like this very approachable miniature forklift project. But there are plenty of other projects whose skills put us in awe, like this remote-control car powered by a miniature V-10 engine.

[via The Museum of Flight]

Movie Magic Hack Chat

Join us on Wednesday, January 20th at noon Pacific for the Movie Magic Hack Chat with Alan McFarland!

If they were magically transported ahead in time, the moviegoers of the past would likely not know what to make of our modern CGI-driven epics, with physically impossible feats performed in landscapes that never existed. But for as computationally complex as movies have become, it’s the rare film that doesn’t still need at least some old-school movie magic, like hand props, physical models, and other practical effects.

To make their vision come to life, especially in science fiction films, filmmakers turn to artists who specialize in practical effects. We’ve all seen their work, which in many cases involves turning ordinary household objects into yet-to-be-invented technology, or creating scale models of spaceships and alien landscapes. But to really sell these effects, adding a dash of electronics can really make the difference.

Enter Alan McFarland, an electronics designer and engineer for the film industry. With a background in cinematography, electronics, and embedded systems, he has been able to produce effects in movies we’ve all seen. He designed electroluminescent wearables for Tron: Legacy, built the lighting system for the miniature Fhloston Paradise in The Fifth Element, and worked on the Borg costumes for Star Trek: First Contact. He has tons of experience making the imaginary look real, and he’ll join us on the Hack Chat to discuss the tricks he keeps in his practical effects toolkit to make movie magic.

https://www.youtube.com/watch?v=e13S0SenmPQ

join-hack-chatOur Hack Chats are live community events in the Hackaday.io Hack Chat group messaging. This week we’ll be sitting down on Wednesday, January 20 at 12:00 PM Pacific time. If time zones have you tied up, we have a handy time zone converter.

Click that speech bubble to the right, and you’ll be taken directly to the Hack Chat group on Hackaday.io. You don’t have to wait until Wednesday; join whenever you want and you can see what the community is talking about.

Continue reading “Movie Magic Hack Chat”

3D Printed Mini MacBook With A Raspberry Pi Heart

Do you like the sleek look of Apple’s laptops? Are you a fan of the Raspberry Pi? Have a particular affinity for hot glue and 3D printed plastic? Then you’re in luck, because this tiny “MacBook” built by serial miniaturizer [Michael Pick] features all of the above (and a good bit more) in one palm-sized package. (Video link, embedded below.)

Getting the LCD panel and Raspberry Pi 4 to fit into the slim 3D printed case took considerable coaxing. In the video after the break, you can see [Michael] strip off any unnecessary components that would stand in his way. The LCD panel had to lose its speakers and buttons, and the Pi has had its Ethernet and USB ports removed. While space was limited, he did manage to squeeze an illuminated resin-printed Apple logo into the lid of the laptop to help sell the overall look.

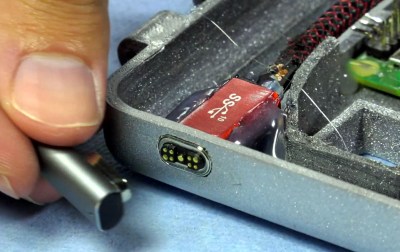
The bottom half of the machine has a number of really nice details, like the fan grill cut from metal hardware cloth and a functional “MagSafe” connector made from a magnetic USB cable. The keyboard PCB and membrane was liberated from a commercially available unit, all [Michael] needed to do was model in the openings for the keys. Since the keyboard already came with its own little trackpad, the lower one is just there for looks.

Speaking of which, to really drive home the Apple aesthetic, [Michael] made the bold move of covering up all the screws with body filler after assembly. It’s not a technique we’d necessarily recommend, but gluing it shut would probably have made it even harder to get back into down the line.

We’ve previously seen [Michael] create a miniature rendition of the iMac and an RGB LED equipped “gaming” computer using many of the same parts and techniques. He’ll have to start branching off into less common machines to replicate soon, which reminds us that we’re about due for another tiny Cray X-MP.

Continue reading “3D Printed Mini MacBook With A Raspberry Pi Heart”

Whimsical Solder Stand Moonlights As Toy 3D Printer

A few Lego pieces provide key functionality, like an articulated dispenser head.

Most of us have bent a length of solder into a more convenient shape and angle when soldering, and just sort of pushed the soldering iron and work piece into the hanging solder instead of breaking out a third hand. Well, [yukseltemiz] seems to have decided that a solder dispenser and a miniature 3D printer model can have a lot in common, and created a 1/5 scale Ender 3 printer model that acts as a solder stand and dispenser. The solder spool hangs where the filament roll would go, and the solder itself is dispensed through the “print head”.

It’s cute, and we do like the way that [yukseltemiz] incorporated a few Lego pieces into the build. A swivel and eyelet guides the solder off the roll and a small Lego ball and socket gives the dispenser its articulation, an important feature for bending solder to a more convenient angle for working. It makes us think that using Lego pieces right alongside more traditional hardware like M3 nuts and bolts might be an under-explored technique. You can see the unit in action in the brief assembly video, embedded below.

Continue reading “Whimsical Solder Stand Moonlights As Toy 3D Printer”