To ordinary people electronics is electronics. However, we know that the guy you want wiring your industrial furnace isn’t the guy you want designing a CPU. Neither of those guys are likely to be the ones you want building an instrumentation amplifier. However, one of the darkest arts of the electronic sects is dealing with electromagnetic fields. Not only is it a rare specialty, but it requires a lot of high-powered math. Enter OpenEMS, a free and open electromagnetic field solver.
We would like to tell you that OpenEMS makes doing things like antenna analysis easy. But that’s like saying Microsoft Word makes it easy to write a novel. In one sense, yes, but you still need to know what you are doing. In fairness, though, the project does provide a good set of tutorials, ranging from a simple wave guide to a sophisticated phased array of patch antennas. Our advice? Start with the waveguide and work your way up from there.
The software uses Octave or MATLAB for scripting, plotting, and support. You can download it for Windows or Linux.
If you want to start with something more intuitive for electromagnetic field visualization, this might help. If you prefer your models more concrete and less abstract, perhaps you should work at Lincoln Lab.
Accountants and MBAs use spreadsheets to play “what if” scenarios with business and financial data. Can you do the same thing with electronic circuits? The answer–perhaps not surprisingly–is yes.
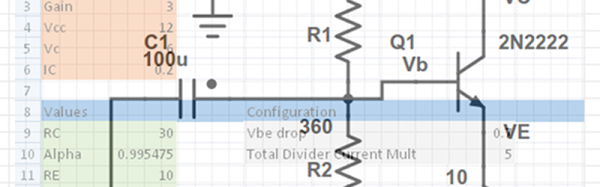
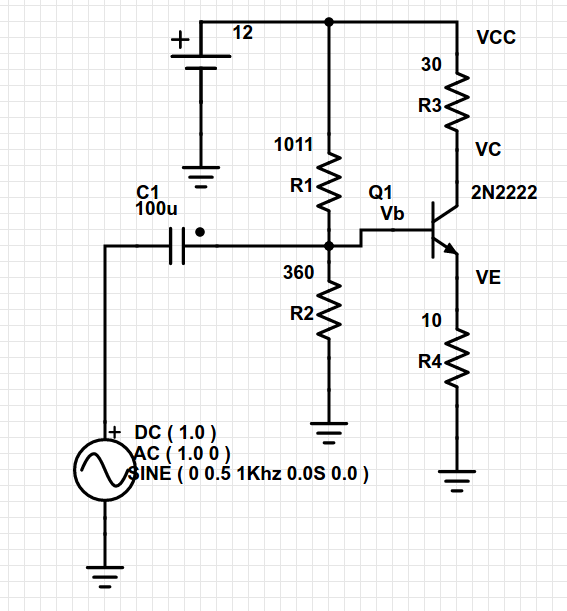
Consider this simple common emitter amplifier (I modeled it in PartSim, if you’d like to open it):
In this particular case, there are several key design parameters. The beta of the transistor (current gain) is 220. The amplifier has an overall voltage gain of about 3 (30/10). I say about, because unless the transistor is ideal, it won’t be quite that. The supply voltage (Vcc) is 12 volts and I wanted the collector voltage (VC) to idle at 6V to allow the maximum possible positive and negative swing. I wanted the collector current (IC) to be 200mA.
There’s nothing wrong with the rough experiments like hanging a 1 L bottle of water from the end of a rectangular test print to compare strengths. We also have our rules-of-thumb, like expecting the print to perform at 30% of injection molded strength. But these experiments are primitive and the guidelines are based on hearsay. Like early metallurgy or engineering; 3D printing is full of made-up stuff.
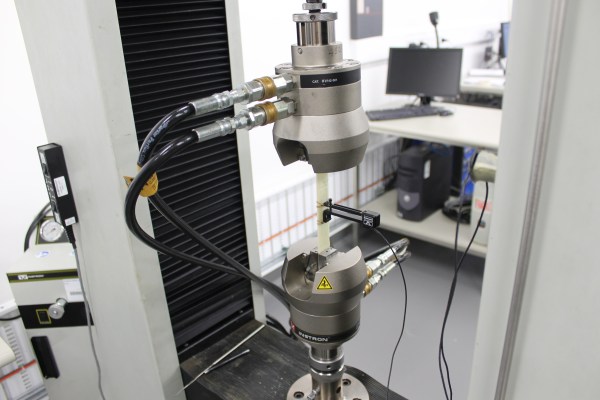
What [Sam] has done here is really amazing. He’s produced a model of a printed ABS part and experimentally verified it to behave close enough to the real thing. He’s also set a method for testing and proposed a new set of questions. If it couldn’t be better, he also included his full research notebook. Make sure to read the FDMProperties-report (PDF) in the files section of Hackaday.io.
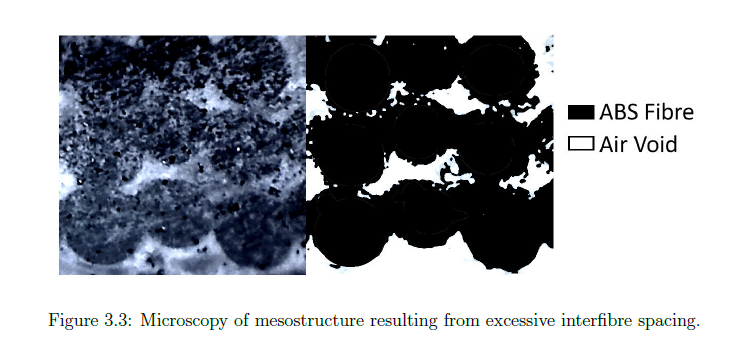
Sam finally answered a question we’ve had of what it looks like when the printer over extrudes.
If research like this is being done elsewhere, it’s either internal to a large 3D printer manufacturer, or it’s behind a paywall so thorough only the Russians can help a regular peasant get through to them. Anyone with access to a materials testing lab can continue the work (looking at you every single engineering student who reads this site) and begin to help everyone achieve an understanding of 3D printed parts that could lead to some really cool stuff one day.
I was in a fit of nerd glee the first time I used tooling board. I’d used MDF for similar purposes before, and I doubt I ever will again. Called Renshape, Precision Board Plus, or that green stuff people on another continent buy; it’s all the same extremely useful, unfortunately expensive, stuff. It’s hard to pin down exactly what tooling board is. Most of the blends are proprietary. It is usually a very dense polyurethane foam, sometimes by itself, sometimes with a fine fiber filler.
What makes tooling board so good is its absolute dimensional stability and its general apathy to normal temperature swings. (It even comes in versions that can go through curing ovens.) It is impervious to humidity. It has good surface finish, and it machines perfectly without wearing down tools.
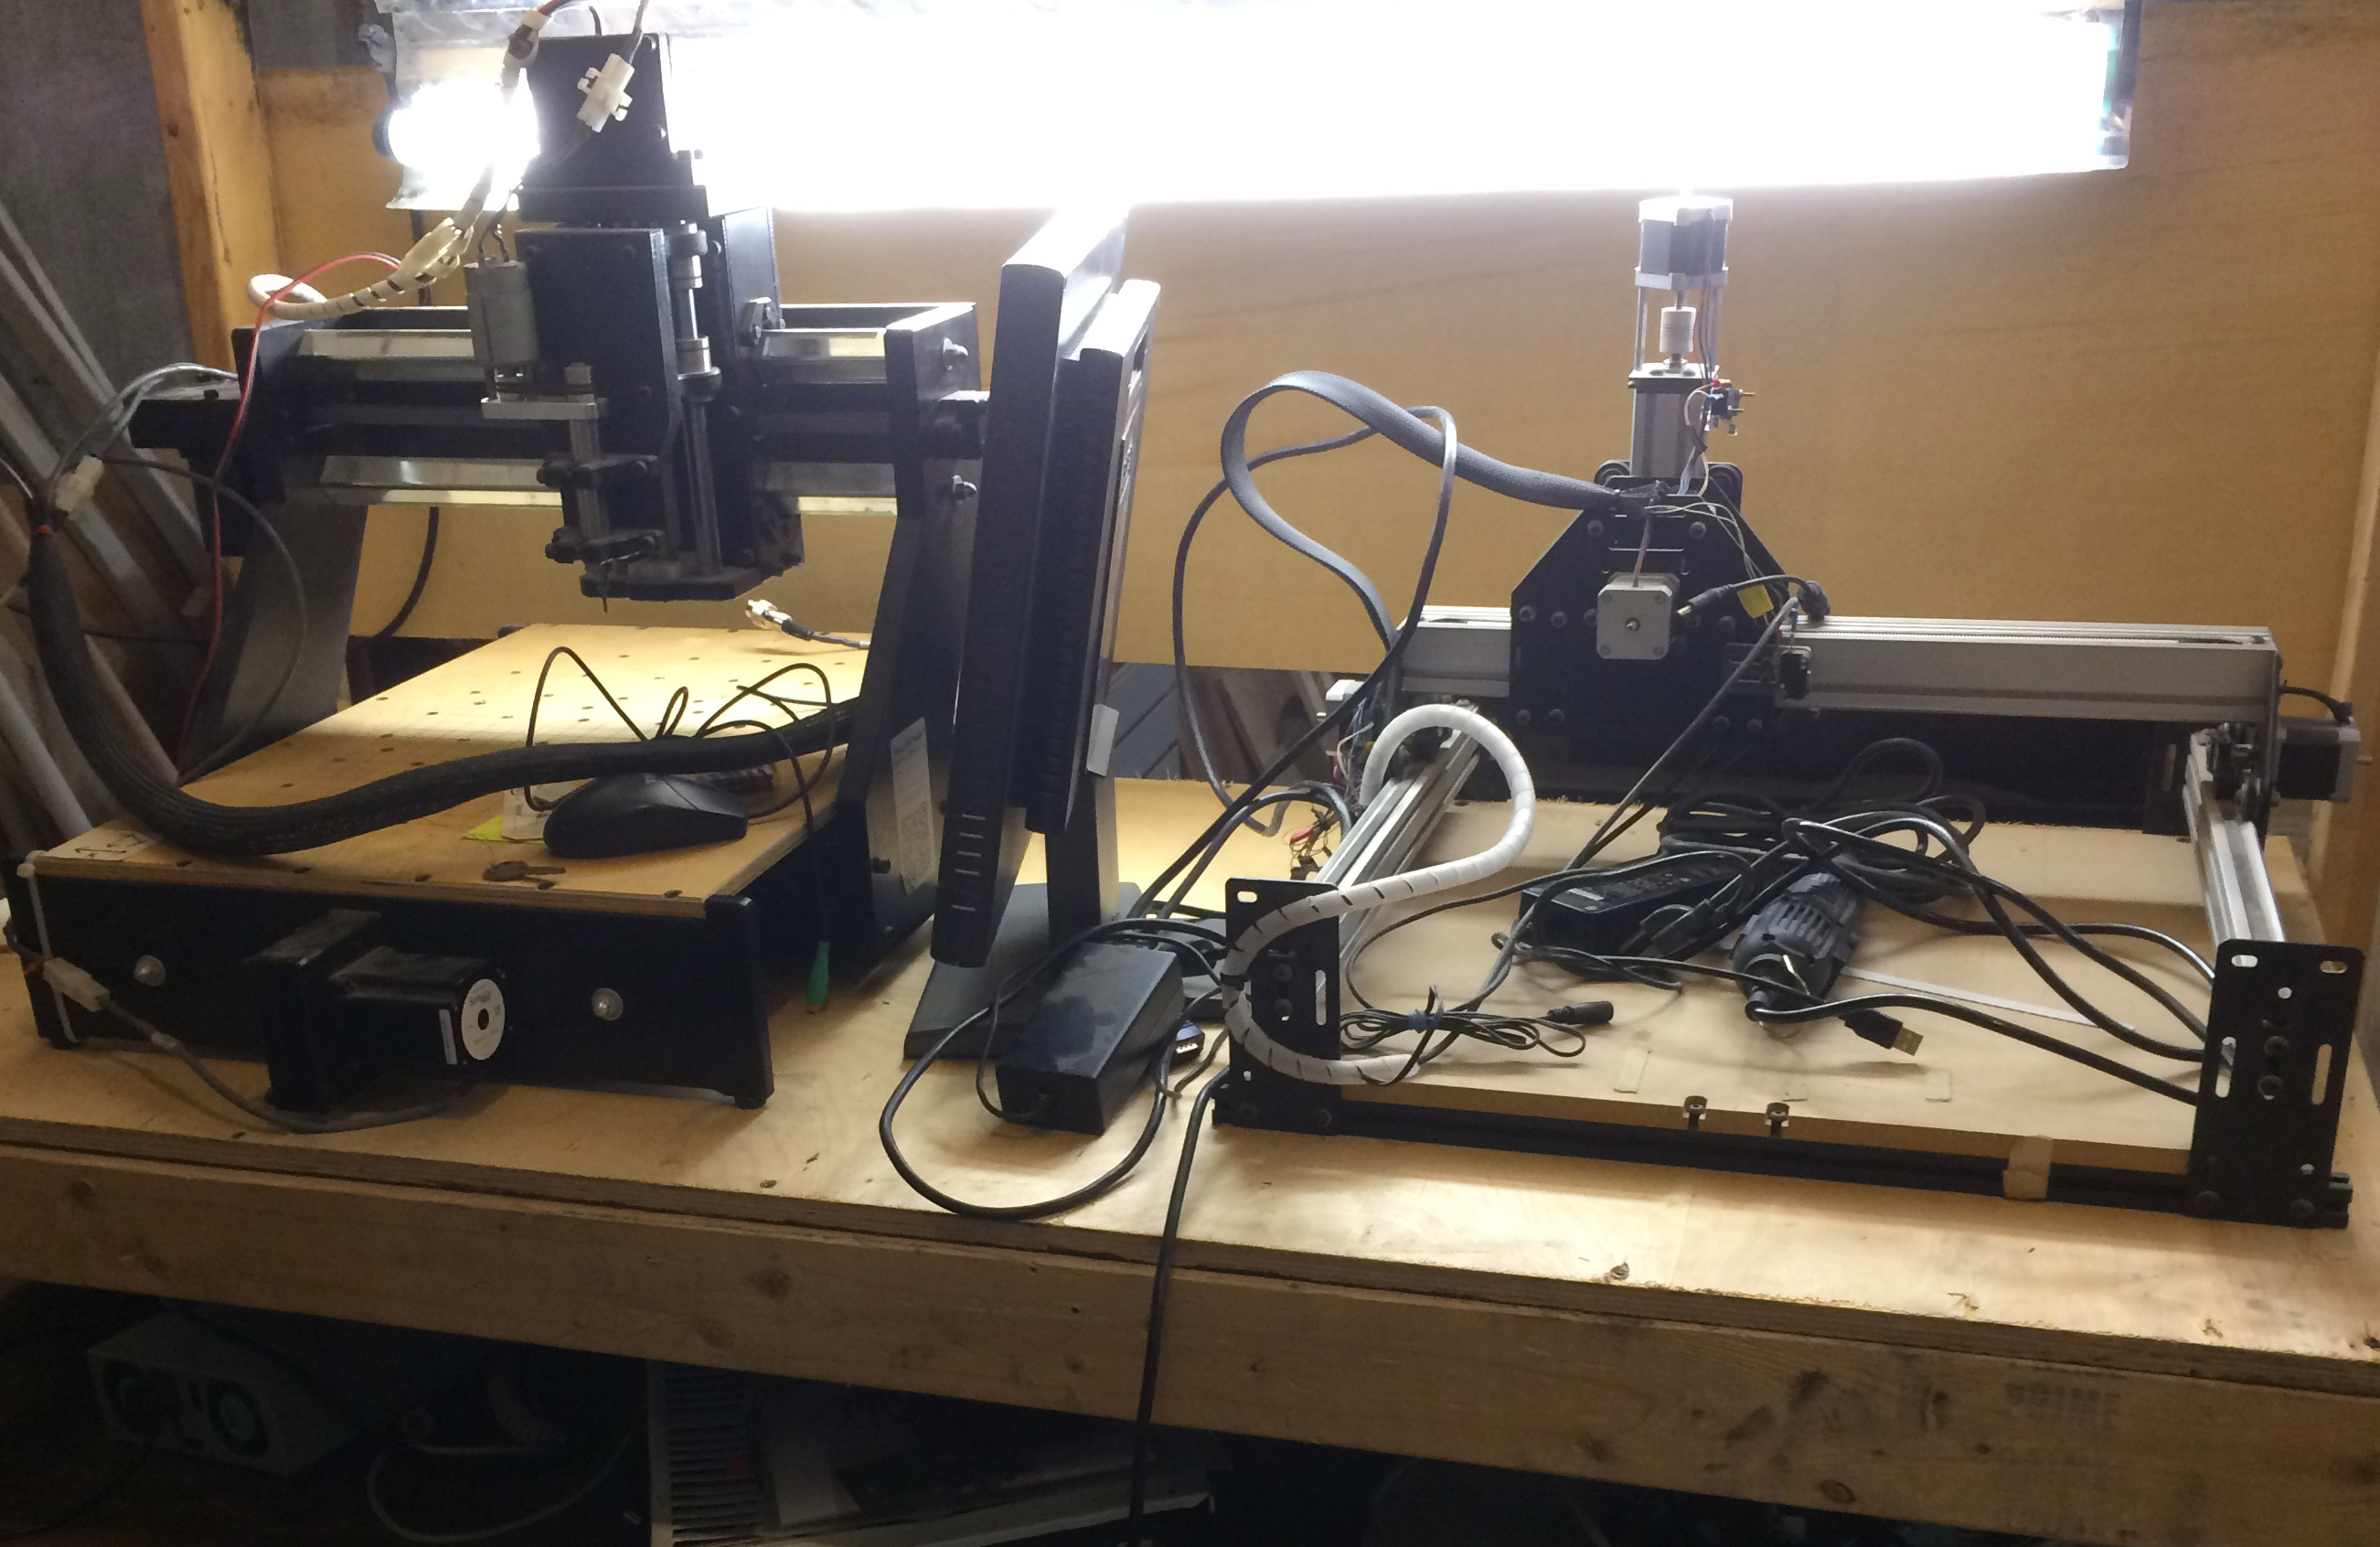
The CNC set-up I coaxed precision molds out of.
This stuff is really tops as far as machining goes. I got super precise molds out of a very basic CNC machine at the LVL1 hackerspace. Renshape cut easily at a high spindle speed, and put practically no load on the machine. Climb and conventional milling were equal load wise with no immediately perceivable difference in finish. In the end I hit the precision range of my cheap digital calipers: +-.005mm, when the temperature is right, the battery is a charged, and the planets align.
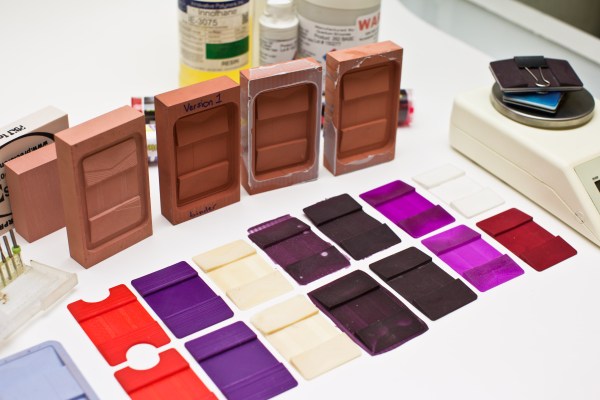
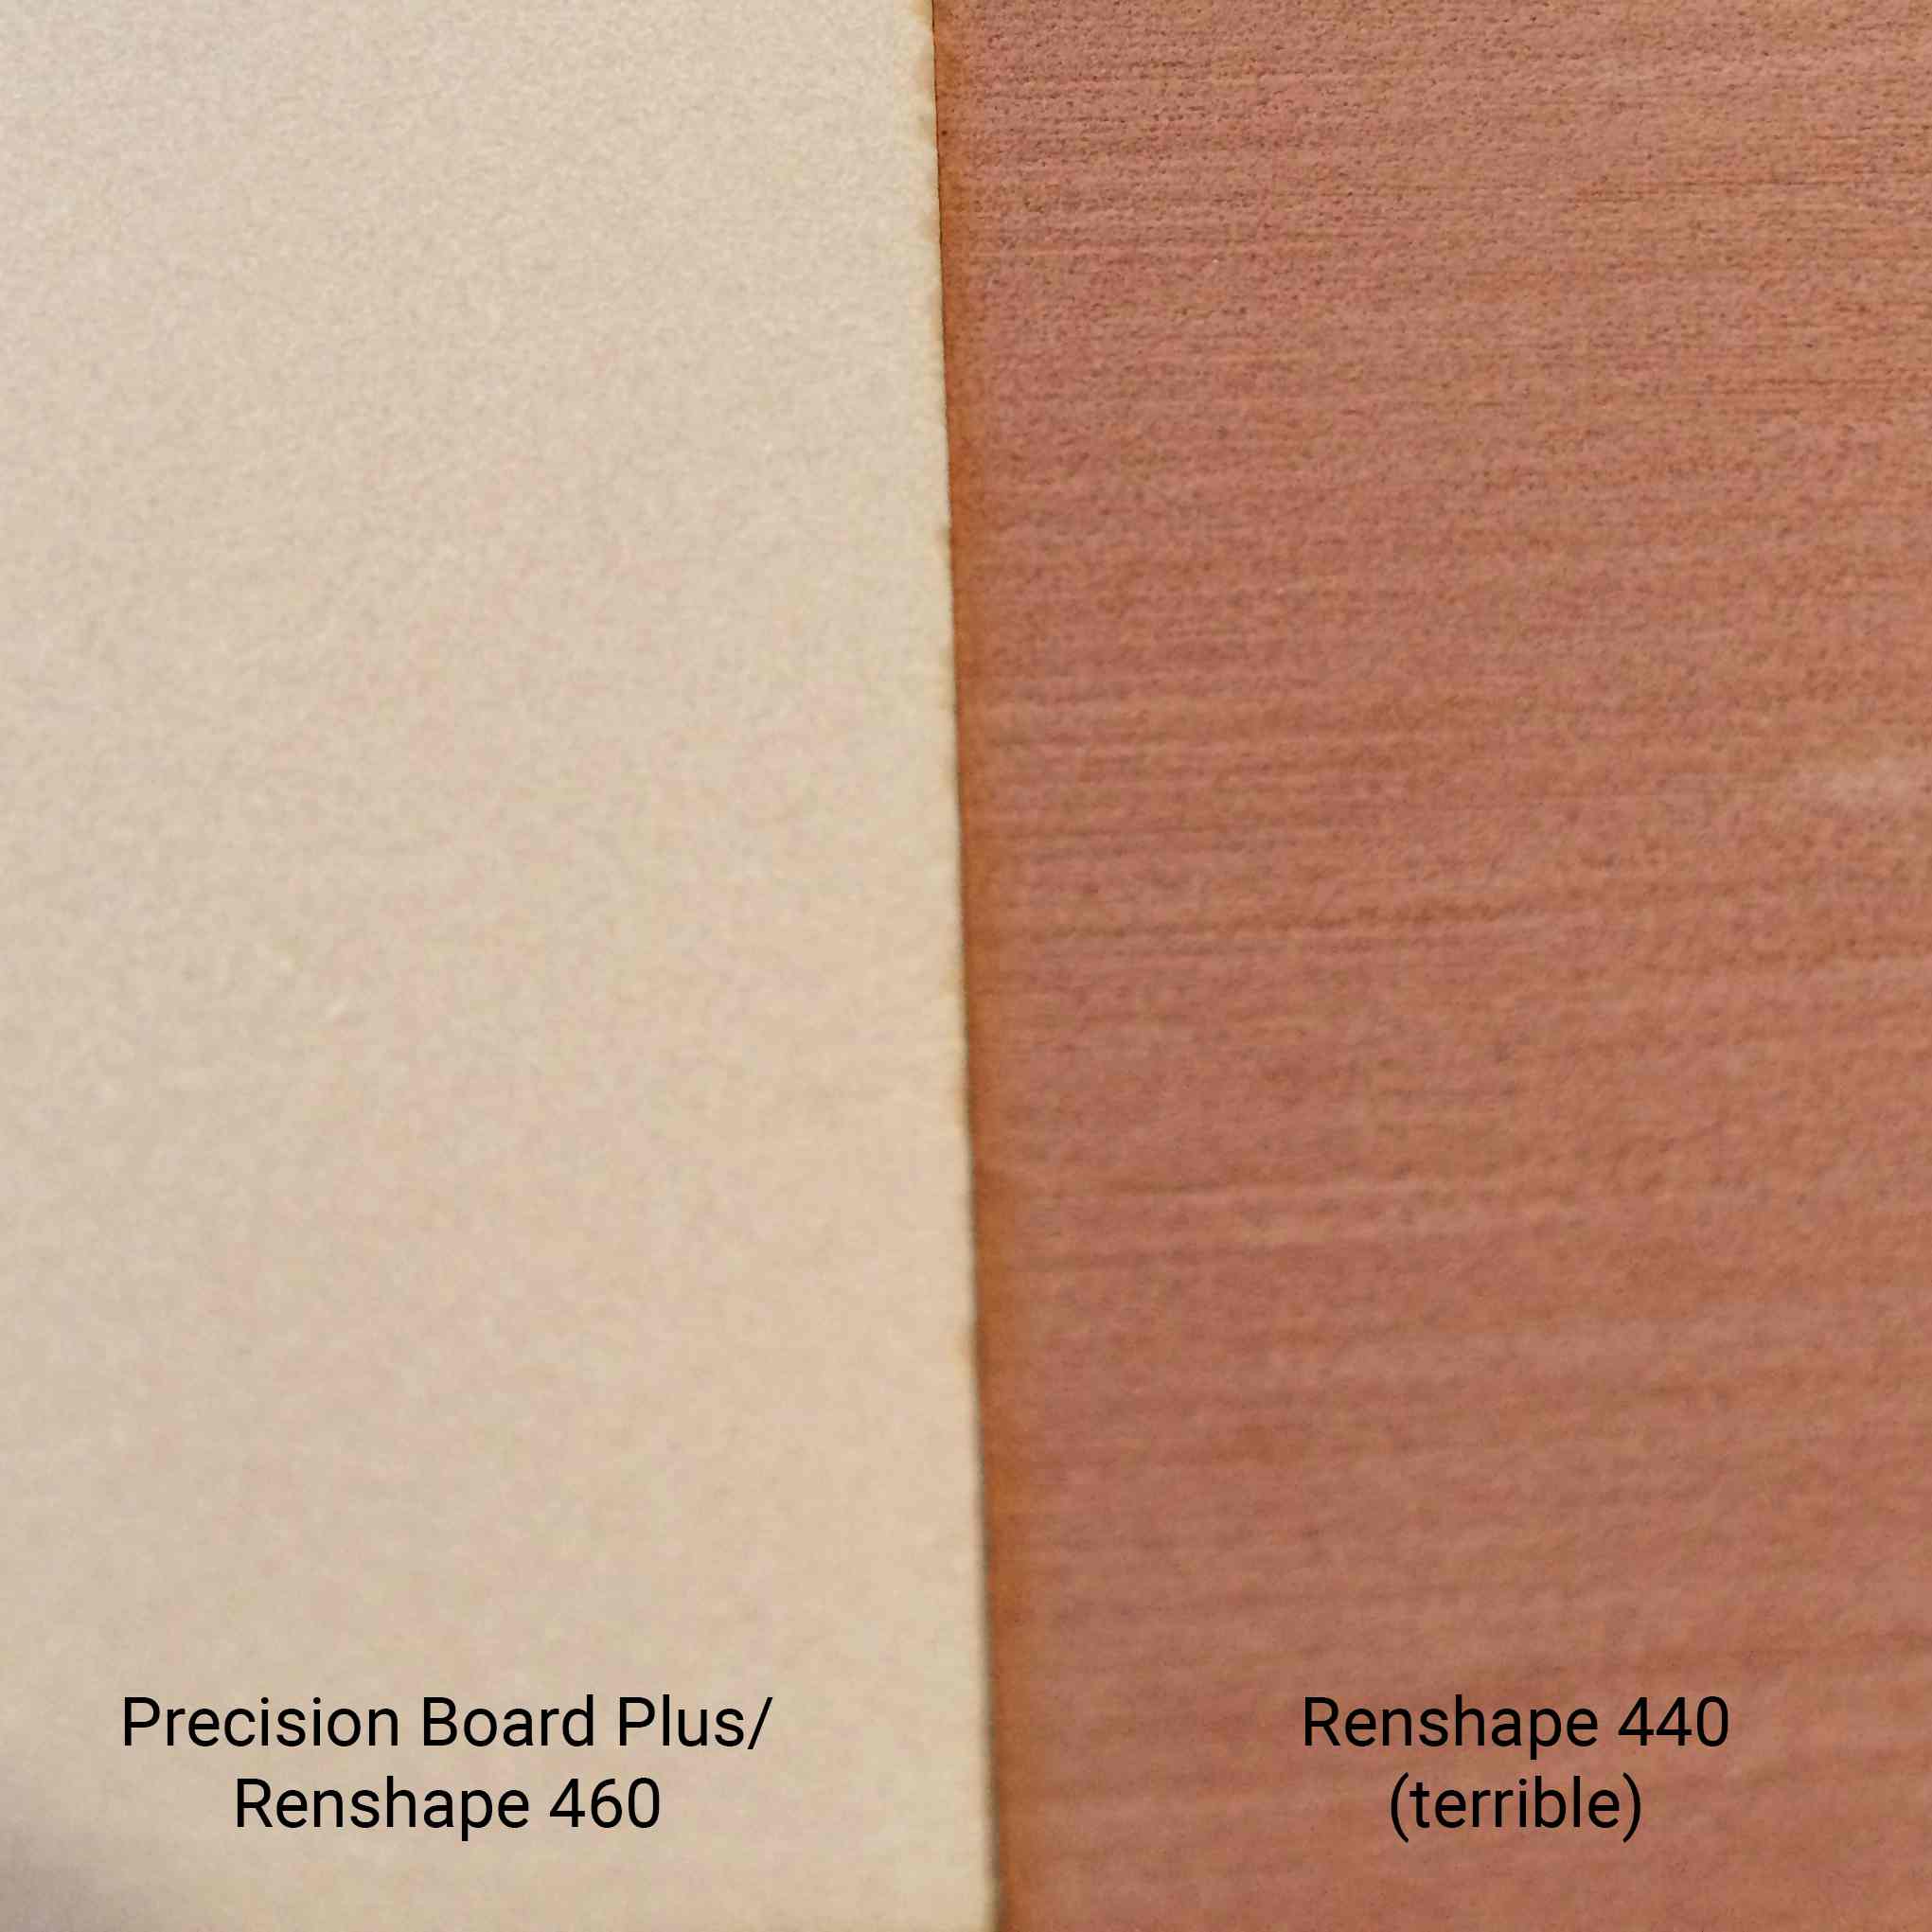
I like to do resin casting when I get serious about a part. If you are making a master mold, there’s nothing better than tooling board. I’ve used both Renshape 460 and Precision Board Plus. Both impart a very light matte pattern, equivalent to a light bead blast on an injection mold. There’s no finishing required, though I mistakenly bought Renshape 440 at first and had to sand it a little to get the finish I wanted.
Tooling board is great for masters in metal casting, and is often used in the industry for just that, especially if quick and accurate prototypes are needed. It’s also tough enough to last through a few rounds of metal stamping in the home shop.
If you are doing lay-up for carbon fiber, fiberglass, or leather, this is also a very good choice. It will be unaffected by the chemicals, heat, and vacuum you may use in the process. It is tough enough hold alignment pins for proper set-up without premature ovaling. It is also a very good choice for vacuum forming.
Tooling board is, unsurprisingly, really good for tooling. It’s a great material for soft-jaws, alignment fixtures, and assembly fixtures, especially if you are doing delicate precision assemblies.
If you’re made of money, tooling board can be used for models, signs and props. It sands, shapes, and files extremely well. It bonds well to a lot of substances. It also takes paint very well with none of the absorption properties of wood or MDF. Most professional model shops will use it. The one big flaw of tooling board is its price — this stuff is expensive. There’s no good DIY version that I’ve scrounged up so far. If you’re making a mold master, a fixture, or anything where you need tooling board’s properties and you are likely to get a few uses out of the board, then it’s probably worth it. Also, be careful of sellers selling plain “Renshape” it is probably going to be the lower grade Renshape 440 and not the more expensive Renshape 460 (or equivalent), where you start to really see the surface finish advantage of the material.
Tooling board is an industrial material. Typically you can call up a supplier and tell them what you’d like to do with it and they will be able to help. If you are making tools for carbon fiber quadcopter frame lay-up, let them know and they’ll have a formulation for that. If you are resin casting, there’s a formulation that gives superior surface finish.
It’s a pretty common material in the industrial scene, but I don’t see it a lot on the hobby scene. This is almost certainly due to its cost, as well as a shortage of small quantity re-sellers. (If someone starts selling assorted sizes on eBay for a reasonable price you have at least one buyer in me.) However, after using it in the niches it is designed for, I really don’t use anything else. I used to hack MDF to fit, but MDF is awful to paint, has no dimensional stability, and dulls tools really fast.
Are you a fan of tooling board? Have a good source? If you have anything to add, let us know in the comments.
We’ve seen Portal gun builds, a few cute turret replicas, and even a miniaturized version of GLaDOS, but [John]‘s Portal radio replica is the first physical version of this oft-forgotten Portal item.
Interestingly, the entire radio is made from scrap. The spheroid body shell is made from the foam insulation from a commercial freezer, carefully sculpted, Bondoed, and painted over the course of 300 hours. The radio guts are taken from an upcycled radio, and powered by either an internal battery or a wall wart DC adapter – perfect for carrying around a test chamber with a portal gun.
Right now, there’s an AM/FM receiver inside the radio along with an audio input so an iPod or such can be plugged in. While we would have loved to see a loop of theuptempo version Still Alive, we’re guessing [John] hasn’t found an easy way to do that with junked parts yet.
If you’re like us, you’ve been infatuated with the small RC helicopter you picked up on Amazon up until the point where it careened off a wall and broke its blades. Now that you’re wondering about what to do with that small pile of plastic, metal, and electronics, why not print some helicopter blades on your 3D printer?
[Taylor] printed these blades on his Utilimaker, but we don’t see why they couldn’t be printed on a Makerbot or other RepRap. The first set of printed blades worked on the top rotor, but they were too heavy when all four blades were replace. The parts were edited in netfabb using a 0.08mm layer height and now they’re working perfectly. As far as free tools go, Slic3r is the new hotness for .STL to Gcode conversion and now that [Taylor] put the files up on Thingiverse, anyone can print a set of spare blades.
Check out [Taylor] comparing his printed blades to the stock ones that came with his awesome heli after the break.
Google just announced the release of SketchUp 7. SketchUp is a 3D modeling program with a fairly robust free version. They’ve added quite a few features and the one that caught our eye in particular was dynamic components. Dynamic components have behavior specific to the object. The example in the video above shows a staircase changing the number of steps as its height is increased instead of distorting the overall staircase shape. The new version also allows for interaction, so model properties change based on user actions.
Google has always encouraged sharing of objects created in SketchUp. Thingiverse launched today with a similar emphasis. The site is built to encourage the exchange of plans for physical objects. It supports many different file types from plain images, AutoCAD dxfs to Eagle schematics. Many of the designs already posted are made to be cut out by a laser cutter or built by a 3D printer.