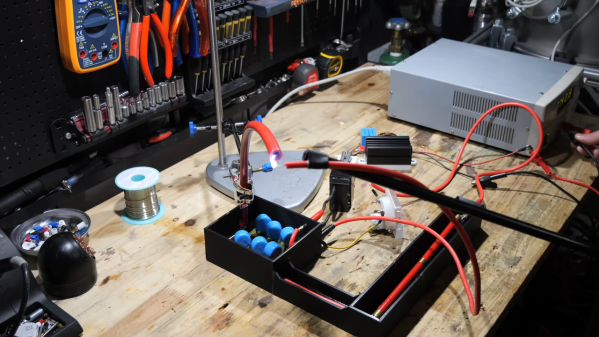
An Adjustable High-Voltage Power Supply Built With Safety In Mind

It’s not entirely clear why [Advanced Tinkering] needs a 50,000-volt power supply, but given the amount of work he put into this one, we’re going to guess it will be something interesting.

The stated specs for this power supply are pretty simple: a power supply that can be adjusted between 20kV and 50kV. The unstated spec is just as important: don’t kill yourself or anyone else in the process. To that end, [Advanced] put much effort into making things as safe as possible. The basic architecture of the supply is pretty straightforward, with a ZVS driver and an AC flyback transformer. Powered by a 24-volt DC supply and an adjustable DC-DC converter, that setup alone yields something around 20kV — not too shabby, but still far short of the spec. The final push to the final voltage is thanks to a three-stage Cockcroft-Walton multiplier made with satisfyingly chunky capacitors and diodes. To ensure everything stays safe in the high-voltage stage, he took the precaution of potting everything in epoxy. Good thing, too; tests before potting showed arcing in the CW multiplier despite large isolation slots in the PCB.

Aside from the potting, some really interesting details went into this build, especially on the high-voltage side. The 3D-printed and epoxy-filled HV connector is pretty cool, as is the special wire needed to keep arcs at bay. The whole build is nicely detailed, too, with care taken to bond each panel of the rack-mount case to a common ground point.

It’s a nice build, and we can’t wait to see what [Advanced Tinkering] does with it. In the meantime, if you want to get up to speed on handling high voltage safely, check out our HV primer.

Continue reading “An Adjustable High-Voltage Power Supply Built With Safety In Mind”

DIY Ionizer Clears The Air On A Budget

Have you ever had a good, deep breath of the air near a waterfall, or perhaps after a thunderstorm? That unmistakably fresh smell is due to ionized air, specifically negative ions, and many are the claims concerning their health benefits. A minor industry has sprung up to capitalize on the interest in ionized air, and while [Amaldev] wanted to clean up the Mumbai air coming into his home, he didn’t want to pay a lot for a commercial unit. So he built his own air ionizer for only about $10.

When [Amaldev] dropped this in the Hackaday tip line, he indicated that he’d been taking some heat for the design from Instagram followers. We imagine a fair number of the complaints stem from the cluster of sewing needles that bristle from one end of the PCB and are raised to 6,000 volts by a fifteen-stage Cockcroft-Walton multiplier. That’s sure to raise eyebrows, or possible the hair on one’s head if you happen to brush by the emitters. Or perhaps [Amaldev]’s critics are dubious about the benefits of ionized air; indeed, some commenters on the video below seem to think that the smoke in the closed jar was not precipitated by the ion stream as [Amaldev] claims, but rather somehow was settled by heat or some other trickery.

Neither of those bothers us as much as the direct 230-volt mains connection, though. We’d have preferred to see at least an isolation transformer in there, or perhaps a battery-powered flyback circuit to supply the input to that multiplier. Still, the lesson on cascade multipliers was welcome, and we found the smoke-clearing power of ionized air pretty amazing.

Continue reading “DIY Ionizer Clears The Air On A Budget”

PCIe Multiplier Expands Raspberry Pi 4 Possibilities

It probably goes without saying that hardware hackers were excited when the Raspberry Pi 4 was announced, but it wasn’t just because there was a new entry into everyone’s favorite line of Linux SBCs. The new Pi offered a number of compelling hardware upgrades, including an onboard PCI-Express interface. The only problem was that the PCIe interface was dedicated to the USB 3.0 controller; but that’s nothing a hot-air rework station couldn’t fix.

We’ve previously seen steady-handed hackers remove the USB 3.0 controller on the Pi 4 to connect various PCIe devices with somewhat mixed results, but [Colin Riley] has raised the bar by successfully getting a PCIe multiplier board working with the diminutive Linux computer. While there are still some software kinks to work out, the results are very promising and he already has  a few devices working.

Getting that first PCIe port added to the Pi 4 is already fairly well understood, so [Colin] just had to follow the example set by hackers such as [Tomasz Mloduchowski]. Sure enough, when he plugged the port multiplier board in (after a bit of what he refers to as “professional wiggling”), the appropriate entry showed up in lspci.

But there was a problem. While the port multiplier board was recognized by the kernel, nothing he plugged into it showed up. Checking the kernel logs, he found messages relating to bus conflicts, and one that seemed especially important: “devices behind bridge are unusable because [bus 02] cannot be assigned for them“. To make a long story short, it turns out that the Raspbian kernel is specifically configured to only allow a single PCI bus.

Fortunately, it’s an easy fix once you know what the problem is. Using the “Device Tree Compiler” tool, [Colin] was able to edit the Raspbian Device Tree file and change the PCI “bus-range” variable from <0x0 0x1> to <0x0 0xff>. From there, it was just a matter of plugging in different devices and seeing what works. Simple things such as USB controllers were no problem, but getting ARM Linux support for the NVIDIA GTX 1060 he tried will have to be a topic for another day.

[Thanks to Paulie for the tip.]

X-Rays And High Voltage Hack Chat

Join us on Wednesday at noon Pacific time for the X-rays and high-voltage Hack Chat!

Fran Piernas likes to push the envelope a bit with projects that others might shy away from. A quick glance at his Hackaday.io profile reveals a few of the exciting projects he’s been working on recently, including a DIY X-ray machine and the high-voltage driver needed to run it. Not only that, he’s recently taken his home-brew X-ray rig to the next level – a computed tomography (CT) scanner. His YouTube channel also has some exciting stuff using potentially lethal voltages and ionizing radiation.

Please join us for this Hack Chat, in which we’ll cover:

  • How one safely works with high voltage and ionizing radiation;
  • Sourcing uncommon components like X-ray tubes;
  • How Fran decided to start playing at the edge of the danger zone; and
  • What sort of experiments he has in mind for the future.

You are, of course, encouraged to add your own questions to the discussion. You can do that by leaving a comment on the X-rays and high-voltage Hack Chat and we’ll put that in the queue for the Hack Chat discussion.

join-hack-chatOur Hack Chats are live community events on the Hackaday.io Hack Chat group messaging. This week we’ll be sitting down on Wednesday, February 20, at noon, Pacific time. If time zones have got you down, we have a handy time zone converter.

Click that speech bubble to the right, and you’ll be taken directly to the Hack Chat group on Hackaday.io. You don’t have to wait until Wednesday; join whenever you want and you can see what the community is talking about.


Lightning Generator From Electric Lighter

Generating high voltages isn’t too hard. A decent transformer will easily get you into the 100s of kilovolts, provided you’re a power company and have access to millions of dollars and a substation to put it. If you want to go above that then things start getting difficult, and most tend to look in other places for high voltages such as voltage multipliers.

These devices use nothing but capacitors and diodes, as [Jay] from [Plasma Channel] shows us how to build a small desktop version of a voltage multiplier that can produce almost 70 kV. That’s enough to throw a substantial spark, powered by nothing but a rechargable battery found in an electric lighter. They can also be cheaper than transformers to a point, since they require less insulation and less copper and iron. The voltage multiplier works in stages, with each stage boosting the voltage to a critical level above the stage before it similar to a Marx generator.

Similar designs are used by laboratories to simulate lightning strikes, and can generate millions of volts. They’re a cost-effective way of generating huge voltage pulses and studying everything from the effects of lightning on various equipment to generating X-rays in fusion power tests. We’ve even seen them in use in lasers.

Continue reading “Lightning Generator From Electric Lighter”

Make Math Real With This Analog Multiplier Primer

Remember learning all about functions in algebra? Neither do we. Oh sure, most of us remember linear plots and the magic of understanding y=mx+b for the first time. But a lot of us managed to slide by with only a tenuous grasp of more complex functions like exponentials and conic sections. Luckily the functionally challenged among us can bolster their understanding with this demonstration using analog multipliers and op amps.

[devttys0]’s video tutorial is a great primer on analog multipliers and their many uses. Starting with a simple example that multiplies two input voltages together, he goes on to show circuits that output both the square and the cube of an input voltage. Seeing the output waveform of the cube of a ramped input voltage was what nailed the concept for us and transported us back to those seemingly wasted hours in algebra class many years ago. Further refinements by the addition of an op amp yield a circuit that outputs the square root of an input voltage, and eventually lead to a voltage controlled resistor that can attenuate an input signal depending on its voltage. Pretty powerful stuff for just a few chips.

The chip behind [devttys0]’s primer is the Analog Devices AD633, a pretty handy chip to have around. For more on this chip, check out [Bil Herd]’s post on analog computing.

Continue reading “Make Math Real With This Analog Multiplier Primer”

Bil Herd: Computing With Analog

When I was young the first “computer” I ever owned was an analog computer built from a kit. It had a sloped plastic case which had three knobs with large numerical scales around them and a small center-null meter. To operate it I would dial in two numbers as indicated by the scales and then adjust the “answer” by rotating the third dial until the little meter centered. Underneath there was a small handful of components wired on a terminal strip including two or three transistors.

In thinking back about that relic from the early 1970’s there was a moment when I assumed they may have been using the transistors as logarithmic amplifiers meaning that it was able to multiply electronically. After a few minutes of thought I came to the conclusion that it was probably much simpler and was most likely a Wheatstone Bridge. That doesn’t mean it couldn’t multiply, it was probably the printed scales that were logarithmic, much like a slide rule.

Did someone just ask what a slide rule was? Let me explain further for anyone under 50. If you watch the video footage or movies about the Apollo Space Program you won’t see any anyone carrying a hand calculator, they didn’t exist yet. Yet the navigation guys in the first row of Mission Control known aptly as “the trench”, could quickly calculate a position or vector to within a couple of decimal places, and they did it using sliding piece of bamboo or aluminum with numbers printed on them.

Continue reading “Bil Herd: Computing With Analog”