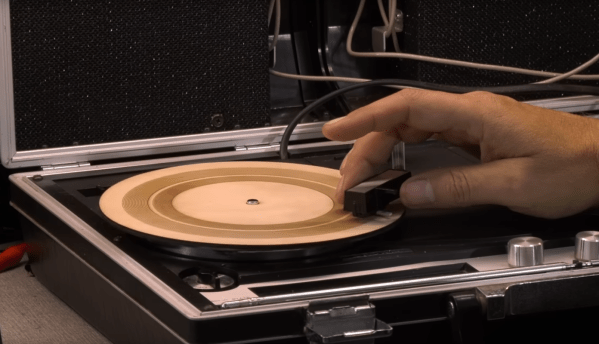
Building An Old Guitar From A New One

Anyone who’s ever played guitar to at least the skill level required to form a terrible garage band knows the names of the most legendary guitars. The driving sound of the Gibson Les Paul played by Jimmy Page, the upside-down and smooth Fender Stratocaster from Jimi Hendrix, or the twangy Rickenbacker made famous by George Harrison are all lusted-after models. The guitar that [Frank] really wanted was a Danelectro DC59 and since they’ve been steadily creeping up in price, he decided to build his own.

The body of the clone guitar is hollow and made from effectively scrap wood, in this case plywood. As the original guitars were in fact famous for using the least expensive materials possible, this makes it a great choice for a clone. [Frank] made the guitar using almost exclusively hand tools and glued everything together, but did use a few donor parts from a modern Stratocaster-type guitar. With most of the rough shape of the guitar finished, it was time to add the parts that make the guitar sound the way that a real Danelectro should: the lipstick-style pickups. He purchased these completely separately as they are the most important part to get right to emulate the tone and feel of the original.

With everything finally soldered and assembled, [Frank] got right to work recording a sample audio track which is included at the end of the video. It certainly sounds like the original to our untrained ears, and for around $100 it’s not a bad value either. If you’d like to see a guitar built from the ground up without using another as a clone, take a look at this build which brings a completely original guitar into existence, entirely from scratch.

Continue reading “Building An Old Guitar From A New One”

Making A Tape Echo The Traditional Way

[Juan Nicola] has taken inspiration from the musician hackers of old and re-purposed a reel-to-reel tape recorder into a tape-echo for his guitar with a built-in valve amplifier (video in Spanish).

The principle is to record the sound of the guitar onto a piece of moving magnetic tape, then to read it back again a short time later.  This signal is mixed with the live input and re-recorded back onto the tape further back.  The effect is heard as an echo, and this approach was very popular before digital effects became readily available.

[Juan] installed a new read-head onto his Grundig TK40 and managed to find a suitable mechanical arrangement to keep it all in place.  He has since updated the project by moving to a tape loop, allowing an infinite play-time by re-using the same piece of tape over and over.

Turning tape machines into echo effects is not a new idea, and we’ve shown a few of them over the years, but every one is slightly different!

Both versions are shown after the break.  YouTube closed-caption auto-translate might come in handy here for non-Spanish speakers.

Continue reading “Making A Tape Echo The Traditional Way”

Touch Tone MIDI Phone And Vocoder Covers Daft Punk

[poprhythm]’s Touch Tone MIDI Phone is a fantastic conversion of an old touch tone phone into a MIDI instrument complete with intact microphone, but this project isn’t just about showing off the result. [poprhythm] details everything about how he interfaced to the keypad, how he used that with an Arduino to create a working MIDI interface, and exactly how he decided — musically speaking — what each button should do. The LEDs on the phone are even repurposed to blink happily depending on what is going on, which is a nice touch.

Of course, it doesn’t end there. [poprhythm] also makes use of the microphone in the phone’s handset. Since the phone is now a MIDI instrument with both a microphone and note inputs, it’s possible to use them together as the inputs to vocoder software, which he demonstrates by covering Around the World by Daft Punk (video).

We love how [poprhythm] explains how he interfaced to everything because hardware work is all about such details, and finding the right resources. Here’s the GitHub repository for the Arduino code and a few links to other resources.

We have seen MIDI phone projects before, and each one is always unique in its own way: here’s a different approach to converting a keypad phone to MIDI, and this rotary pulse-dial phone went in a completely different direction with the phone itself completely unmodified, using only external interfacing.

You can admire [poprhythm]’s Touch Tone MIDI Phone in action in the short videos embedded below, with each one showing off a different aspect of the build. It’s great work!

Continue reading “Touch Tone MIDI Phone And Vocoder Covers Daft Punk”

Reactive Load For Amplifiers Teaches Lessons About Inductors

The sound produced by any given electric guitar is shaped not just by the instrument itself but by the amplifiers chosen to make that sound audible. Plenty of musicians swear by the warm sound of amplifiers with vacuum tube circuits, but they do have some limitations. [Collin] wanted to build a reactive load for using tube amps without generating a huge quantity of sound, and it resulted in an interesting project that also taught him a lot about inductors.

The reactive load is essentially a dummy load for the amplifier that replaces a speaker with something that won’t produce sound. Passive loads typically use resistor banks but since this one is active, it needs a very large inductor to handle the amount of current being produced by the amplifier. [Colin] has also built a headphone output into this load which allows it to output a much smaller quantity of sound to a headset while retaining the sound and feel of the amplifier tubes, and it additionally includes a widely-used tone control circuit as well.

There’s a lot going on in the design of the circuitry for this amplifier load, including a lot of research into low-frequency inductors that can handle a significant amount of current. [Collin] eventually ended up winding his own, but the path he took to it was long and winding. There’s a lot of other circuit theory discussed as well especially with regards to the Baxandall EQ that he built into it as well. And, if you’d like to learn more about tube amplifiers in general, take a look at this piece which notes one of the best stereo amps ever produced.

Arduino Drum Platform Is Fast

Drums are an exciting instrument to learn to play, but often prohibitive if there are housemates or close neighbors involved. For that problem there are still electronic drums which can be played much more quietly, but then the problem becomes one of price. To solve at least part of that one, [Jeremy] turned to using an Arduino to build a drum module on his own, but he still had to solve yet a third problem: how to make the Arduino fast enough for the drums to sound natural.

Playing music in real life requires precise timing, so the choice of C++ as a language poses some problems as it’s not typically as fast as lower-level languages. It is much easier to work with though, and [Jeremy] explains this in great detail over a series of blog posts detailing his drum kit’s design. Some of the solutions to the software timing are made up for with the hardware on the specific Arduino he chose to use, including an even system, a speedy EEPROM, hardware timers, and an ADC that can sample at 150k samples per second.

With that being said, the hardware isn’t the only thing standing out on this build. [Jeremy] has released the source code on his GitHub page for those curious about the build, and is planning on releasing several more blog posts about the drum kit build in the near future as well. This isn’t the only path to electronic drums, though, as we’ve seen with this build which converts an analog drumset into a digital one.

Continue reading “Arduino Drum Platform Is Fast”

Doodlestation Is Beautifully Musical Furniture

Whether you’re a modular synth enthusiast or simply love the idea of rad electronic jams, we can all get behind the idea of crazy electronic instruments with buttons, dials, and patch cables galore. The Doodlestation is a wonderful example of that, built by [Love Hulten].

There’s a custom 37-key keyboard that lets one input musical notes in the typical way, along with a hilarious animated MIDI visualizer with a man that uses his mouth to shoot rainbows. There’s a theremin built into the chassis, too, allowing your hands to control the sound via the magic of the æther. Even better, there’s a custom-built tape echo in the upright section, and you even get to see the mechanical parts working and the mag ribbon wiggling about. That’s fun.

The custom hardware is joined by a series of off-the-shelf devices that add their own functionality to the mix. It includes a Sequential OB-6 analog synthesizer, a Moog DFAM drum module, and a Hologram Microcosm loop & glitch box for more noodling possibilities.

We love a good musical project around these parts; we’ve featured some great other projects for live electronic jams before, too. Video after the break.

Continue reading “Doodlestation Is Beautifully Musical Furniture”

Behold The Mighty Floppotron 3.0

If anyone has been struggling to get hold of a 3.5″ floppy drive lately, we think we’ve got a clue as to why — behold, the mighty floppotron 3.0 by [Paweł Zadrożniak.] With an utterly bonkers 512 floppy drives, four flatbed scanners and sixteen hard disks of various sizes, the floppotron 3.0 MIDI synthesiser is possibly the biggest such retro hardware synthesiser so far. Since every part of the system is motor-based, nobody is going to be surprised that to power the show is quite an undertaking, with nearly twenty switched-mode PSU modules needed to keep up with the demand, averaging 300W but rated at 1.2kW peak!

A full custom MIDI-to-RS485 gateway based around the nRF52xx series MCU deals with the communication to the collection of instrument controllers. These controllers are generic enough to take RS485 input and control a dedicated driver for either an array of floppy drives (up to 192), an array of hard drives or the handful of scanners. The way the floppy drives are grouped is quite neat. Rather than using each drive to generate a specific tone, the software uses the whole column for each note. By varying the number of drives moving simultaneously over time, the sound volume varies, simulating the note envelope and giving a richer sound. Multiple columns driving in parallel give the system a 16-note polyphony. The floppies cover the low notes, with the four flatbed scanners covering the higher notes. MIDI drum sounds are mapped to the hard disks, operating in a, well, percussive manner, with different case shapes giving unique sounds. Even the firmware can be updated over MIDI! So, checkout the demo video after the break for a sweet rendition of the very familiar “Entry of the gladiators” by Czech composer Julius Fučík.

If you think this looks familiar, you’re not mistaken, we’ve covered an earlier floppotron before, but we reckon nobody has attempted to do it with ye olde eight-inch drives yet!

Continue reading “Behold The Mighty Floppotron 3.0”