CNC Toolpath Visualisation With OpenCV

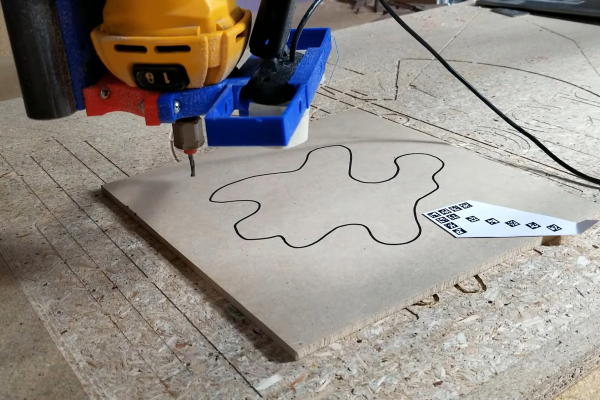
[Tony Liechty] has been having a few issues getting into CNC machining — starting with a simple router, he’s tripped over the usual beginners’ problems, you know, things like alignment of the design to the workpiece shape, axis clipping and workpiece/clamp collisions. He did the decent hacker thing, and turned to some other technologies to help out, and came up with a rather neat way of using machine vision with OpenCV to help preview the toolpath against an image of the workpiece in-situ (video, embedded below.)

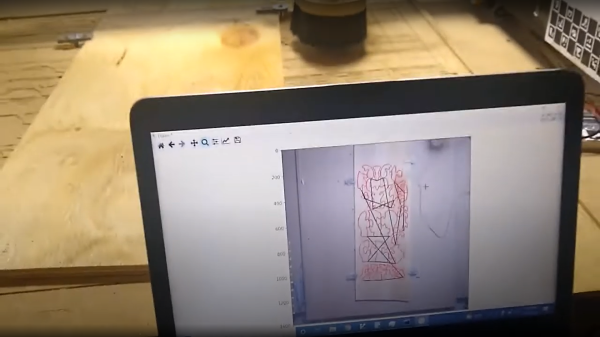
ChArUco (a combined chessboard and ArUco marker pattern) boards taped to the machine rails were used to give OpenCV a reference of where points in space are with respect to the pattern field, enabling identification of pixel locations within the image of the rails. A homography transformation is then used to link the two side references to an image of the workpiece. This transformation allows the system to determine the physical location of any pixel from the workpiece image, which can then be overlaid with an image of the desired toolpath. Feedback from the user would then enable adjustment of the path, such as shifts, or rotates to be effected in order to counter any issue that can be seen. The reduction of ‘silly’ clamping, positioning and other such issues, means less time wasted and fewer materials in scrap bin, and that can only be a good thing.

[Tony] says this code and setup is just a demo of the concept, but such ‘rough’ code could well be the start of something great, we shall see. Checkout the realWorldGcodeSender GitHub if you want to play along at home!

We’ve seen a few uses of OpenCV for assisting with CNC applications, like this cool you draw it, i’ll cut it hack, and this method for using machine vision to zero-in a CNC mill onto the centre of a large hole.

Continue reading “CNC Toolpath Visualisation With OpenCV”

You Draw It, CNC Cuts It

[Jamie] aka [vector76] hit us with a line-tracing plugin for OctoPrint that cuts out whatever 2D shape you draw on a piece of wood. The plugin lets you skip the modeling step entirely, going straight from a CNC-mounted webcam that reads your scribbles and gives you a Gcode toolpath in return. The code is on GitHub and there’s a demo video embedded below.

Under the hood, OpenCV is doing a lot of the image processing, including line detection, and the iterative “find the line” and “move the toolhead” steps really show off what computer vision can do. It starts off with a fiducial arrow for scale and orientation, then it mores the webcam around the scene. The user can enter the usual milling parameters: speeds, feeds, depth of cut, tool offset, milling direction, etc. And then it gets to work.

Right now, it’s limited to paths with non-crossing lines, and probably with good contrast and a nice dark line — all the usual CV restrictions. But mounting a webcam to a CNC toolhead and using it for various pathing problems really opens up tons of possibilities: visual homing, workpiece edge finding, copying parts, custom fitting odd shapes, and more. This project is clearly an invitation to keep on hacking, an appetizer. Once you see the girl pirate robot that [Jamie]’s daughter made, you’ll get the idea.

We’ve seen a similar OpenCV approach used for center-finding bore holes, but while we’ve seen a few webcams used with laser cutters, the CNC mill applications seem largely untapped. Let us know in the comments if you’ve got some other good examples.

Continue reading “You Draw It, CNC Cuts It”

OpenCV Brings Pinch To Zoom Into The Real World

Gesture controls arrived in the public consciousness a little over a decade ago as touchpads and touchscreens became more popular. The main limitation to gesture controls, a least as far as [Norbert] is concerned, is that they can only control objects in a virtual space. He was hoping to use gestures to control a real-world object instead, and created this device which uses gestures to control an actual picture.

In this unique augmented reality device, not only is the object being controlled in the real world but the gestures are being monitored there as well, thanks to a computer vision system watching his hand which is running OpenCV. The position data is fed into an algorithm which controls a physical picture mounted on a slender robotic arm. Now, when [Norbert] “pinches to zoom”, the servo attached to the picture physically brings it closer to or further from his field of view. He can also use other gestures to move the picture around.

While this gesture-controlled machine is certainly a proof-of-concept, there are plenty of other uses for gesture controls of real-world objects. Any robotics platform could benefit from an interface like this, or even something slightly more mundane like an office PowerPoint presentation. Opportunity abounds, but if you need a primer for OpenCV take a look at this build which tracks a hand in minute detail.

Continue reading “OpenCV Brings Pinch To Zoom Into The Real World”

ElectronBot: A Sweet Mini Desktop Robot That Ticks All The Boxes

[Peng Zhihui] seems to have found some spare time and energy to crack out another sweet robot build, this time it’s a much smaller, and cuter emoji-bot (Original GitHub Link,) with the usual production-ready levels of attention to detail. With a lot of fine details in the 3D printed models, this is one for SLS printing in nylon, but that can be done for a reasonable outlay, in China at least. The electronics package consists of a few full custom, and tiny, PCBs designed with Altium Designer, with off-the-shelf modules for the circular LCD and camera. The main board hosts an STM32F405 and deals with the display and SD card, The reason for this choice of STM32 was due to the requirement for connecting to an external USB3300 high-speed USB PHY. There is a sensor PCB which handles the gesture sensor, a USB hub, MPU6050 9-axis sensor, and also the USB camera module. This board attaches to the USB-C connector in the base, via a FFC cable, allowing the robot to rotate on its base.

Cunning two-servo shoulder mechanism

[Peng] clearly has exacting standards as to how things should work, and we guess wanted to have the arms back-driveable in a way that enabled the host computer to track and record the motor positions for replaying later on. The connection back to the controller is via I2C, allowing all five servos to hang on the same bus, saving previous resources. Smart! Getting a processor and motor driver in such a tiny space was a bit of challenge, but a walk in the park for [Peng] as is demonstrates in the video embedded below (We believe English subtitles are pending!) The arm mechanism is particularly interesting, and rather elegantly executed, and he does seem rather proud of this part of the design, and so he should! Like with [Peng’s] other projects, there is a lot to see, and plenty of scope for feature explosion. It was nice to see the ‘bot being used as an input device, not only with gesture sensing via the dedicated sensor, but also using the camera with OpenCV to track user posture and act accordingly. This thing could act as genuinely useful AI device, as was a being darn cute at the same time!

We know you come to Hackaday for your cute robot fix, and we’re not going to disappoint. Here’s a cute robot lamp, an obligatory spot (a robot dog) type project, and if you’re more of a cat person, then we got that base covered as well.

Continue reading “ElectronBot: A Sweet Mini Desktop Robot That Ticks All The Boxes”

Forget Sudoku, Build Yourself A Minimalist Rubik’s Solver Robot

Some people like crossword puzzles, some are serious sudoku ninjas, but [Andrea Favero] likes to keep himself sharp, by learning coding and solving control problems, and that is something we can definitely relate to. When learning a new platform, it’s a very good idea to have a substantial project or goal in mind, and learn what is needed on the way there. [Andrea] chose to build an autonomous Rubik’s cube solver, and was kind enough to document exactly how how to do it, and we’re glad of it!

The result of the openCV processing chain

Working in python with OpenCV, [Andrea] uses the methodology by [Oussama Barkouki] to process each face image and convert it into a table of the colours of individual facelets. The basics of that, are first to convert the image to grayscale, then use a gaussian blur to denoise the image. Edges are identified using the canny algorithm, the result of which is then dilated and passed into a contour detector. The contours are sent into a cunning filter that identifies square contours, and those the wrong size are filtered off. What you’re left with are the outlines of the actual coloured facelets. Once you have a list of squares, these can be used to form image masks, and thence select the average colour from each square. The colour is then quantised and stored as a labelled colour from the standard Western Rubik’s cube colour scheme. Finally, once all face images are captured and facelets colours identified, the data are passed into a Rubik’s cube solving algorithm developed by [Hegbert Kociemba,] a guide to which is available on the speedsolving site. The result of the solving step is a sequence of descrambling moves, in the move notation developed by [David Singmaster]. Fascinating stuff, if you ask us! Continue reading “Forget Sudoku, Build Yourself A Minimalist Rubik’s Solver Robot”

OpenCV Knows Where Your Hand Is

We have to say, [Murtaza]’s example game in his latest video isn’t very exciting. However, the OpenCV technique he uses to track a hand and determine its distance from a single camera is pretty interesting. The demo shows a random button on the screen and you have to use your hand to press the button which then moves so you can try again. The hand measurement seems accurate to a few centimeters which is good enough for many applications.

The Python code is actually quite straightforward. Essentially, the software tracks your hand and by estimating its relative size to determine how far away it is. Of course, your hand might also rotate, and [Murtaza] works through all the cases step-by-step. If we wanted to know a distance, we’d probably turn to ultrasonics or a time of flight sensor. The problem is, those sensors can’t tell your hand from anything else that happens to be in front of it. The use of a single camera to track and locate is pretty impressive.

If you haven’t used OpenCV before, the channel has a lot of tutorials and they are all worth watching. Computer vision is a great technique and can replace a lot of things in some applications. GPS, for example. Or, try this creepier tracking application next Halloween.

Continue reading “OpenCV Knows Where Your Hand Is”

Box with a hole. Camera and Raspberry Pi inside.

A Label Maker That Uses AI Really Poorly

[8BitsAndAByte] found herself obsessively labeling items around her house, and, like the rest of the world, wanted to see what simple, routine tasks could be made unnecessarily complicated by using AI. Instead of manually identifying objects using human intelligence, she thought it would be fun to offload that task to our AI overlords and the results are pretty amusing.

She constructed a cardboard enclosure that housed a Raspberry Pi 3B+, a Pi Camera Module V2, and a small thermal printer for making the labels. The enclosure included a hole for the camera and a button for taking the picture. The image taken by the Pi is analyzed by the DeepAI DenseCap API which, in theory, should create a label for each object detected within the image. Unfortunately, it doesn’t seem to do that very well and [8BitsAndAByte] is left with labels that don’t match any of the objects she took pictures of. In some cases it didn’t even get close, for example, the model thought an apple was a person’s head and a rotary dial phone was a cup. Go figure. It didn’t really seem to bother her though, and she got a pretty good laugh from the whole thing.

It appears the model detects all objects in the image, but only prints the label for the object it was most certain about. So maybe part of her problem is there were just too many objects in the background? If that were the case, you could probably improve the accuracy of the model by placing the object against a neutral background. That may confuse the AI a lot less and possibly give you better results. Or maybe try a different classifier altogether? Or don’t. Then you could just use it as a fun, gag project at your next get-together. That works too.

Cool project [8BitsAndAByte]! Hey, maybe this is a sign the world will still need some human intelligence after all. Who knows?

Continue reading “A Label Maker That Uses AI Really Poorly”