Automatically Serving Up Canned Cat Food

If there’s any one benefit to having a cat as a pet instead of a dog, it’s that they’re a bit more independent and able to care for themselves for many days without human intervention. The only thing that’s really needed is a way to make sure they get food and water at regular intervals, but there are plenty of off-the-shelf options for these tasks. Assuming your cat can be fed dry food, that is. [Ben Heck]’s cat has a health problem that requires a special canned wet food, and since there aren’t automatic feeders for this he built his own cat-feeding robot.

Unlike dry food that can dispense a measured amount from a hopper full of food, the wet food needs to be opened and dispensed every day. To accomplish this, his robot has a mechanism that slowly slides a wedge under the pull tab on the can, punctures the can with it, and then pulls it back to remove the lid. From there the food is ejected from the feeder down a ramp to a waiting (and sometimes startled) cat. The cans are loaded into 3D-printed cartridges and then stacked into the machine on top of each other, so the machine can dispense food cans until it runs out. This design has space for six cans.

Although there are many benefits to having pets of any sort, one of the fun side quests of pet ownership is building fun things for them to enjoy or to make caring for them easier. We even had an entire Hackaday contest based on this premise. And, if biological life forms aren’t your cup of tea, there are always virtual pets to care for as well.

Thanks to [Michael C] for the tip!

Continue reading “Automatically Serving Up Canned Cat Food”

Hackaday Links Column Banner

Hackaday Links: April 13, 2025

It’s been a while since we’ve dunked on an autonomous taxi foul-up, mainly because it seemed for a while there that most of the companies field testing driverless ride-sharing services had either ceased operation or curtailed them significantly. But that appears not to be the case after a Waymo robotaxi got stuck in a Chick-fil-A drive-through. The incident occurred at the chicken giant’s Santa Monica, California location at about 9:30 at night, when the autonomous Jaguar got stuck after dropping off a passenger in the parking lot. The car apparently tried to use the drive-through lane to execute a multi-point turn but ended up across the entrance, blocking other vehicles seeking their late-evening chicken fix. The drive-through-only restaurant ended up closing for a short time while Waymo figured out how to get the vehicle moving again.

Continue reading “Hackaday Links: April 13, 2025”

An Inexpensive Way To Break Down Plastic

Plastic has been a revolutionary material over the past century, with an uncountable number of uses and an incredibly low price to boot. Unfortunately, this low cost has led to its use in many places where other materials might be better suited, and when this huge amount of material breaks down in the environment it can be incredibly persistent and harmful. This has led to many attempts to recycle it, and one of the more promising efforts recently came out of a lab at Northwestern University.

Plastics exist as polymers, long chains of monomers that have been joined together chemically. The holy grail of plastic recycling would be to convert the polymers back to monomers and then use them to re-make the plastics from scratch. This method uses a catalyst to break down polyethylene terephthalate (PET), one of the more common plastics. Once broken down, the PET is exposed to moist air which converts it into its constituent monomers which can then be used to make more PET for other uses.

Of course, the other thing that any “holy grail” of plastic recycling needs is to actually be cheaper and easier than making new plastic from crude oil, and since this method is still confined to the lab it remains to be seen if it will one day achieve this milestone as well. In the meantime, PET can also be recycled fairly easily by anyone who happens to have a 3D printer around.

An Automatic Cat Feeder Built With A 4060 Binary Counter

We’ve seen a great many cat feeders over the years. Some rely on the Internet of Things, and some rely on fancy microcontrollers. [Larry Cook], on the other hand, built his using a simple 4060 binary counter chip.

The feeder is built out of old plywood, and the whole thing runs off an old 12-volt DC wall wart and a lead-acid battery to keep it going in a power outage. The dry cat food is stored in hopper above a drum, with the drum  rotated by a 12-volt DC gearmotor. The gearmotor is activated on a schedule—either every 4 hours, or every 5.5 hours, depending on setting. There’s then a four-digit 7-segment display for counting the total number of feedings.

The manner of operation is simple. The 4060 binary counter slowly counts up to 8,196 on a 1.11 Hz or 0.83 Hz clock, for four hour or 5.5 hour operation respectively. When it hits that threshold, it fires the gear motor. The gear motor then rotates the drum for one revolution, dumping a preset amount of food. At the end of a revolution, it triggers a hall sensor which resets the circuit.

The best thing about this design? It’s been in service for ten years. [Larry’s] original video is a big contrast to his latest one, but it shows the same feeder doing the same job, all this time.

We love a good cat feeder, and it’s great to see one built with simple old-school parts, too. Video after the break.

Continue reading “An Automatic Cat Feeder Built With A 4060 Binary Counter”

Open Source Tracker Keeps An Eye On Furry Friends

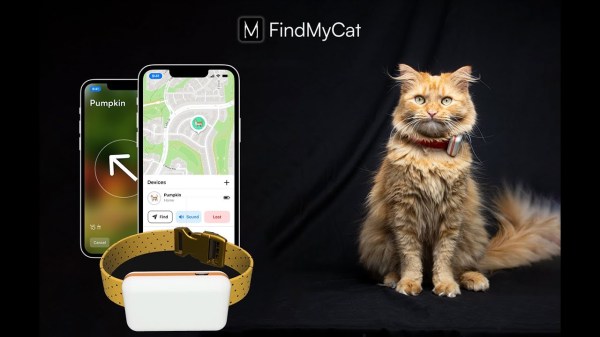
Most of the time, you’ll know where your cats are — asleep on the bed about 23.5 hours a day and eating or pooping the rest of the time. But some cats are more active than others, so there’s commercial options for those who want to keep tabs on their pet. Unfortunately, [Sahas Chitlange] didn’t like any of them, so he designed and built his own open source version: FindMyCat.io.

The system is in two parts: a module that fits onto a cat collar, and a home station that, well, stays at home. It offers a variety of tracking modes. In home mode, the home station signals the collar every 10 seconds, which stays in a deep sleep most of the time. If the collar doesn’t get a signal from the home station, it switches to ping mode, where it will wait for a signal from the FindMyCat over the LTE-M connection and report its location.

Finally, the app can set the collar to Lost Kitteh mode, where the collar will send a location to the app every seven minutes or thirty seconds. The collar also supports a direction-finding feature, using the ultra wideband (UWB) feature of recent Apple iPhones to point you in the direction and distance of the tracked cat.

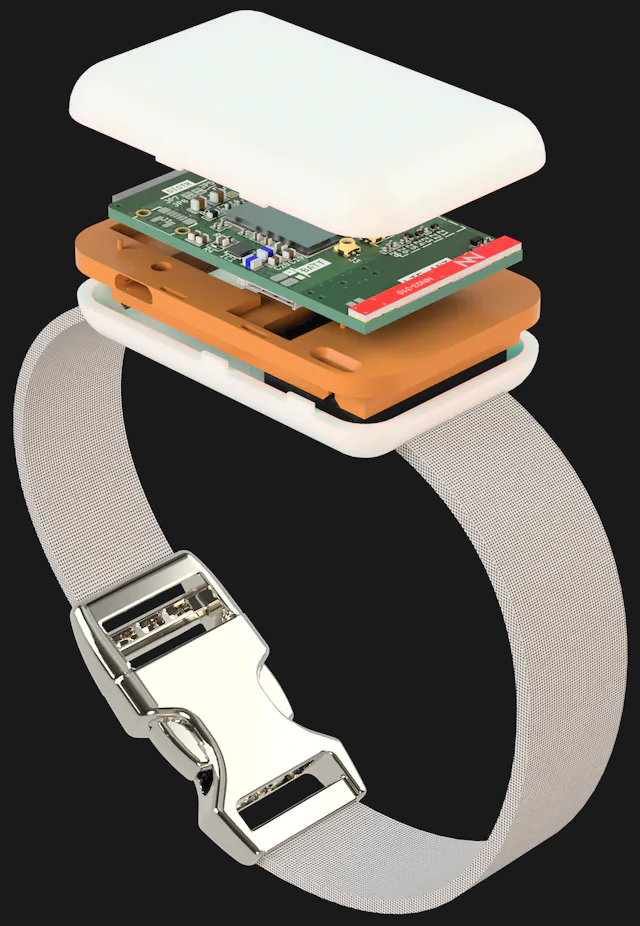
The collar is built around a Nordic Semiconductor NRF-9160, a System in a Package (SiP) that does most of the heavy lifting as it includes GPS, an LTE-M modem, and an ARM processor. One interesting feature here: [Sahas] doesn’t make his antennas on the PCB, but instead uses an Ignion NN03-310, an off-the-shelf antenna that is already qualified for LTE-M use. That means this system can be connected to almost any LTE-M network without getting yelled at for using unqualified hardware and making the local cell towers explode.

The collar also includes a DWM3001CDK ultrawideband (UWB) module used for the locator feature. The accompanying app uses this and Apple’s UWB support to show the user which direction the cat is in, and how far away it is. The app isn’t in the Apple App Store yet, so you’ll need to sign up for an Apple Developer account to use it. We’d love to hear from anyone who takes it for a test drive with their own pet.

Continue reading “Open Source Tracker Keeps An Eye On Furry Friends”

Inside The PET Keyboard

These days, you have a certain expectation for computer keys on a keyboard. Of course, there are variations and proponents of different mechanisms and noise levels. However, back in the late part of the 20th century, it was a different world. Computers came with a bewildering and sometimes befuddling array of keyboards. Since the IBM Selectric was the king of typewriters, we assumed the IBM PC keyboard would be spectacular, but it wasn’t. The PC Jr was even worse! Atari experimented with flat keyboards to save costs, and many computers had keys more reminiscent of calculator keys than you would imagine. The market voted. In general, a keyboard that wasn’t really a keyboard was the kiss of death for a computer. Case in point: the Commodore PET with its infamous chicklet keyboard, which gets a detailed examination in a recent post from [Norbert Landsteiner].

The PET keyboard gets some bad rap due to software limitations. Because of this, some games would use their own scan routines, and [Norbert] has worked on emulation able to accommodate software that wants to read the hardware directly. The resulting insights into the old keyboard is very interesting. For example, you can press more than one key at once. The result? The answer to that question takes up about half the post.

Continue reading “Inside The PET Keyboard”

Building A MiniPET Is Better With Friends

[Taylor and Amy] love taking on retro computer projects. This week they’re building a MiniPET from Tynemouth and The Future is 8 Bit.  It’s a pretty awesome kit which sadly isn’t available anymore. Taylor bought one of the last ones as part of a charity sale at the 2023 Vintage Computer Festival Southwest.

If you haven’t seen their YouTube channel yet, check it out! The two have been best friends since 1984. Their channel has just the right mix of education and comedy, with pacing fast enough to keep things interesting. It’s really refreshing to see two people enjoying a project together.

The MiniPET is of course a reproduction of the hardware in the Commodore PET, the machine which predated the VIC-20 and of course the Commodore 64. The kit starts with installing a few discrete parts — resistors,  capacitors, and diodes.  Then come the IC sockets. [Taylor and Amy] ran into a bit of trouble when it came time to install the chips. While installing the 40-pin 65C21 Peripheral Interface Adapter (PIA), one pin bent under the socket. [Taylor] popped the chip back out, and replaced it — which resulted in 3 bent pins!

Anyone who’s installed new DIP parts has been through this. The pins are always bent out a bit from the factory. The old “Bend it in using a table” method usually works — but if you want perfect pins, try a pin straightener. These versatile tools can even be 3D printed.

Once the pin problems are solved, it’s time to power up the kit and see if it will work.  That’s when we get to see that magic moment when a project first comes to life. Check out the video – you’ll see what we mean.

Continue reading “Building A MiniPET Is Better With Friends”