A Fruity Approach To CNC Design

[Frank Howarth] found himself in need of a lamp for his dining room. Being of the maker persuasion, store-bought simply wouldn’t do. With a serious wood shop at his disposal, [Frank] took a trip down to the supermarket for inspiration.

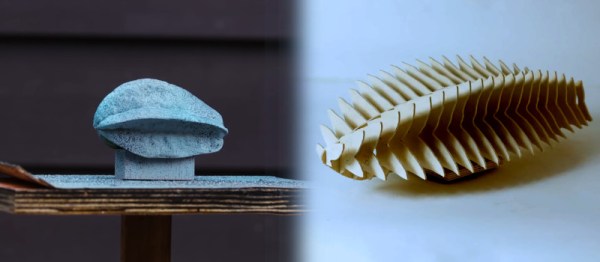
Having picked out a particularly well-formed starfruit for his project, [Frank] didn’t want to spend an inordinately long time attempting to recreate the organic lumps and bumps in modelling software, Instead, Meshroom was used to create a model through photogrammetry. After several failed attempts, success was achieved by using a textured rotating table as a background, with the starfruit painted in matte grey and a final dusting of black speckle. This gave the software enough visual cues to accurately model the fruit’s geometry.

With a 3D model to hand, Fusion Slicer was then used to generate a model that could be constructed out of flat lasercut pieces. The cutting outlines were then generated and passed to Rhino for final tweaking. With everything ready, parts were cut out of plywood and a small mockup of a potential lamp design was created. [Frank] is currently workshopping the design with the inhabitants of the dining room, prior to the final build.

Photogrammetry and modern CAD tools make working with natural forms quick and easy. We’ve also seen the technology used for other purposes too, with [Eric Strebel] providing a great example on how to use it for reverse engineering.

The starfruit tag on Hackaday is pretty sparse, so if you’ve got a project, let us know. Video after the break.

Continue reading “A Fruity Approach To CNC Design”

For Better Photogrammetry, Just Add A Donut

If you don’t have access to a 3D scanner, you can get a lot done with photogrammetry. Basically, you take a bunch of pictures of an object from different angles, and then stitch them together with software to create a 3D model. For best results, you need consistent, diffuse lighting, an unchanging background, and a steady camera.

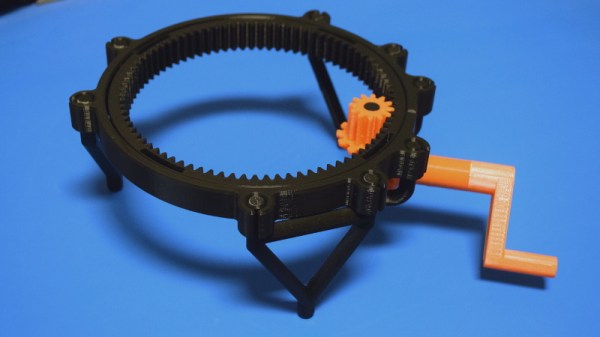
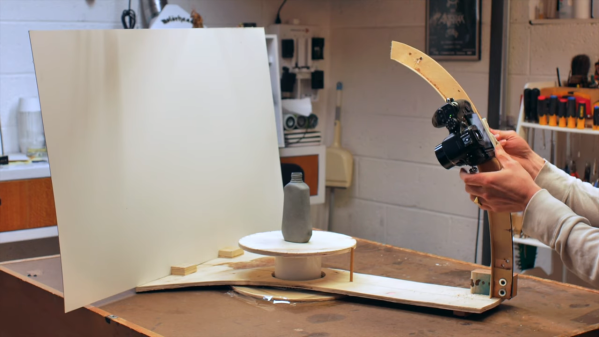
Industrial designer [Eric Strebel] recently made an Intro to Photogrammetry video wherein he circled an object taking photos with his bare hands. One commenter suggested a different method: build a donut-shaped turntable that circles the object, which sits on a stationary platform. Attach the camera to the donut, counterbalance the weight, and Bob’s your proverbial uncle. [Eric] thought it was a brilliant idea (because it is), and he built a proof of concept. This is that video.

[Eric] can move the camera up and down the arc of the boom to get all the Z-positions he wants. The platform has a mark every 10° and there’s a pointer in the platform to line them up against for consistent camera positioning. He was pleasantly surprised by the results, which we agree are outstanding.

We always learn a lot from [Eric]’s videos, and this one’s no exception. Case in point: he makes a cardboard mock-up by laying out the pieces, and uses that to make a pattern for the recycled plywood and melamine version. In the photogrammetry video, he covers spray paint techniques to make objects reflect as little light as possible so the details don’t get lost.

If you prefer to rotate your objects, get an Arduino out and automate the spin.

Continue reading “For Better Photogrammetry, Just Add A Donut”

Hackaday Podcast 014: Keeping Raspberry’s SD Card Alive, We Love MRRF, And How Hot Are Flip Chips?

Elliot Williams and Mike Szczys take a look at advances in photogrammetry (building 3D models out of many photographs from a regular camera), a delay pedal that’s both aesthetically and aurally pleasing, and the power of AI to identify garden slugs. Mike interviews Scotty Allen while walking the streets and stores of the Shenzhen Electronics markets. We delve into SD card problems with Raspberry Pi, putting industrial controls on your desk, building a Geiger counter for WiFi, and the sad truth about metal 3D printing.

Take a look at the links below if you want to follow along, and as always, tell us what you think about this episode in the comments!

Take a look at the links below if you want to follow along, and as always, tell us what you think about this episode in the comments!

Direct download (60 MB or so.)

Continue reading “Hackaday Podcast 014: Keeping Raspberry’s SD Card Alive, We Love MRRF, And How Hot Are Flip Chips?”

Get Great 3D Scans With Open Photogrammetry

Not long ago, photogrammetry — the process of stitching multiple photographs taken from different angles into a 3D whole — was hard stuff. Nowadays, it’s easy. [Mikolas Zuza] over at Prusa Printers, has a guide showing off cutting edge open-source software that’s not only more powerful, but also easier to use. They’ve also produced a video, which we’ve embedded below.

Basically, this is a guide to using Meshroom, which is based on the AliceVision photogrammetry framework. AliceVision is a research platform, so it’s got tremendous capability but doesn’t necessarily focus on the user experience. Enter Meshroom, which makes that power accessible.

Meshroom does all sorts of cool tricks, like showing you how the 3D reconstruction looks as you add more images to the dataset, so that you’ll know where to take the next photo to fill in incomplete patches. It can also reconstruct from video, say if you just walked around the object with a camera running.

The final render is computationally intensive, but AliceVision makes good use of a CUDA on Nvidia graphics cards, so you can cut your overnight renders down to a few hours if you’ve got the right hardware. But even if you have to wait for the results, they’re truly impressive. And best of all, you can get started building up your 3D model library using nothing more than that phone in your pocket.

If you want to know how to use the models that come out of photogrammetry, check out [Eric Strebel]’s video. And if all of this high-tech software foolery is too much for you, try a milk-based 3D scanner.

Continue reading “Get Great 3D Scans With Open Photogrammetry”

3D Scanning Via DIY Photogrammetry

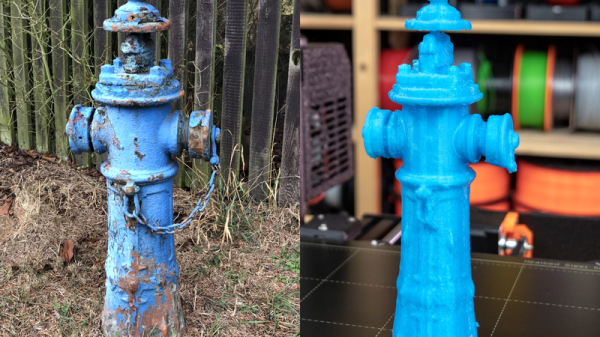
For those with 3D printers, taking a 3D model and spitting out a physical object is so routine as to be blasé. The reverse is something a little different. There are many ways to create a digital 3D model of a physical object, of varying complexity. [Eric Strebel] favors photogrammetry, and has shared a useful guide for those interested in using this technique.

In its most basic sense, photogrammetry refers to taking measurements from photographs. In the sense being discussed here, it more precisely refers to the method of creating a 3D model from a series of photographs of a physical object. By taking appropriate images of an object, and feeding them through the right software, it’s possible to create a digital representation of the object without requiring any special hardware other than a camera.

[Eric] shares several tips and tricks for getting good results. Surface preparation is key, with the aim being to create a flat finish to avoid reflections causing problems. A grey primer is first sprayed on the object, followed by a dusting of black spots, which helps the software identify the object’s contours. Camera settings are also important, with wide apertures used to create a shallow depth-of-field that helps the object stand out from the background.

With the proper object preparation and camera technique taken care of, the hard work is done. All that’s then required is to feed the photos through the relevant software. [Eric] favors Agisoft Metashape, though there are a variety of packages that offer this functionality.

We first reported on photogrammetry back in 2016. If cameras aren’t your thing, you can always give lasers a try. Video after the break.

Continue reading “3D Scanning Via DIY Photogrammetry”

Automated Turntable For 3D Scanning

Those just starting out in 3D printing often believe that their next major purchase after the printer will be a 3D scanner. If you’re going to get something that can print a three dimensional model, why not get something that can create said models from real-world objects? But the reality is that only a small percentage ever follow through with buying the scanner; primarily because they are notoriously expensive, but also because the scanned models often require a lot of cleanup work to be usable anyway.

While this project by [Travis Antoniello] won’t make it any easier to utilize scanned 3D models, it definitely makes them cheaper to acquire. So at least that’s half the battle. Consisting primarily of a stepper motor, an Arduino, and a EasyDriver controller, this is a project you might be able to assemble from the parts bin. Assuming you’ve got a pretty decent camera in there, anyway…

The general idea is to place a platform on the stepper motor, and have the Arduino rotate it 10 degrees at a time in front of a camera on a tripod. The camera is triggered by an IR LED on one of the Arduino’s digital pins, so that it takes a picture each time the platform rotates. There are configurable values to give the object time to settle down after rotation, and a delay to give the camera time to take the picture and get ready for the next one.

Once all the pictures have been taken, they are loaded into special software to perform what’s known as photogrammetry. By compiling all of the images together, the software is able to generate a fairly accurate 3D image. It might not have the resolution to make a 1:1 copy of a broken part, but it can help shave some modeling time when working with complex objects.

We’ve previously covered the use of photogrammetry to design 3D printed accessories, as well as a slightly different take on an automated turntable a few years ago. The process is still not too common, but the barriers to giving it a try on your own are at least getting lower.

Continue reading “Automated Turntable For 3D Scanning”

Visible Light CT Scanner Does Double Duty

If you’ve ever experienced the heartbreak of finding a seed in your supposedly seedless navel orange, you’ll be glad to hear that with a little work, you can protect yourself with an optical computed tomography scanner to peer inside that slice before popping it into your mouth.

We have to admit to reading this one with a skeptical eye at first. It’s not that we doubt that a DIY CT scanner is possible; after all, we’ve seen examples at least a couple of times before. The prominent DSLR mounted to the scanning chamber betrays the use of visible light rather than X-rays in this scanner — but really, X-ray is just another wavelength of light. If you choose optically translucent test subjects, the principles are all the same. [Jbumstead]’s optical CT scanner is therefore limited to peeking inside things like slices of tomatoes or oranges to look at the internal structure, which it does with impressive resolution.

This scanner also has a decided advantage over X-ray CT scanners in that it can image the outside of an object in the visible spectrum, which makes it a handy 3D-scanner in addition to its use in diagnosing Gummi Bear diseases. In either transmissive or reflective mode, the DSLR is fitted with a telecentric lens and has its shutter synchronized to the stepper-driven specimen stage. Scan images are sent to Matlab for reconstruction of CT scans or to Photoscan for 3D scans.

The results are impressive, although it’s arguably more useful as a scanner. Looking to turn a 3D-scan into a 3D-print? Photogrammetry is where it’s at.

Continue reading “Visible Light CT Scanner Does Double Duty”