Power Meter

Solar Panel System Monitoring Device Using Arduino

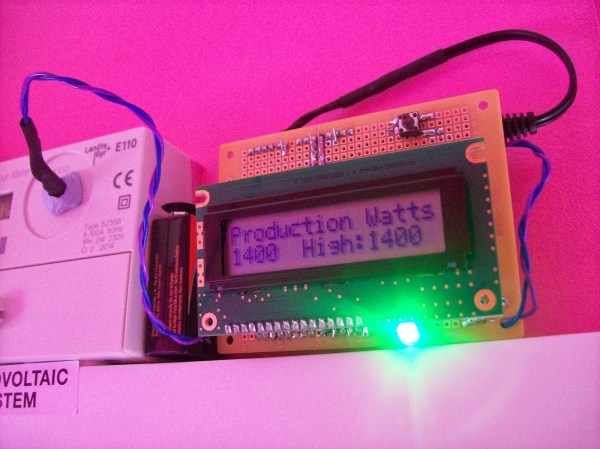
[Carl] recently upgraded his home with a solar panel system. This system compliments the electricity he gets from the grid by filling up a battery bank using free (as in beer) energy from the sun. The system came with a basic meter which really only shows the total amount of electricity the panels produce. [Carl] wanted to get more data out of his system. He managed to build his own monitor using an Arduino.

The trick of this build has to do with how the system works. The panel includes an LED light that blinks 1000 times for each kWh of electricity. [Carl] realized that if he could monitor the rate at which the LED is flashing, he could determine approximately how much energy is being generated at any given moment. We’ve seen similar projects in the past.

Like most people new to a technology, [Carl] built his project up by cobbling together other examples he found online. He started off by using a sketch that was originally designed to calculate the speed of a vehicle by measuring the time it took for the vehicle to pass between two points. [Carl] took this code and modified it to use a single photo resistor to detect the LED. He also built a sort of VU meter using several LEDs. The meter would increase and decrease proportionally to the reading on the electrical meter.

[Carl] continued improving on his system over time. He added an LCD panel so he could not only see the exact current measurement, but also the top measurement from the day. He put all of the electronics in a plastic tub and used a ribbon cable to move the LCD panel to a more convenient location. He also had his friend [Andy] clean up the Arduino code to make it easier for others to use as desired.

Auto-Meter Reader Feeder Keeps Meter-Maids At Bay

Planting your car just about anywhere almost always comes at a price; and, if you’re overdue for your return, odds are good that you’ll end up paying a much steeper price than intended. Parking meters are wonderful devices at telling the authorities just how much time you have left until you’re ticketworthy. [Zack] figured that five–even ten minutes late—is an absurd reason to pay a fine, so he’s developed a tool that will preload a meter with a few extra coins when the authorities get too close.

The law-enforcement detection system puts together of number of tools and techniques that we’re intimately familiar with: 3D printing, Arduino, a photoresistor, and a proximity (PIR) sensor. At the code level, [Zack] filters his analog photo resistor with a rolling average to get a clean signal that triggers both by day and by night. The trigger? Two possibilities. The PIR sensor detects curious law enforcement officers while the filtered photoresistor detects the periodic twirling siren lights. Both events will energize a solenoid to drop a few extra coins through a slide and into the meter slot.

For a collection of well-known components, [Zack] could’ve packed his contraption into a Altoids Tin and called it a day. Not so. As an interaction designer, looks could make or break the experience. For this reason, he opts for a face-hugging design with a steampunk twist. Furthermore, to achieve compatibility across a range of devices, [Zack’s] CAD model is the result of adjusting for various meter profiles from images he snapped in the urban wilderness. The result? A clean, authentic piece of equipment compatible with a family of meters.

For the shrewd-eyed observers, [Zack’s] first video post arrived online in 2011, but his work later resurfaced at a presentation in the 2015 Tangible, Embedded, and Embodied Conference by his former design instructor [Eric Paulos], who was eager to show off [Zack’s] work. For a deeper dive into the upcoming second edition, head on over to [Zack’s] image feed.

Continue reading “Auto-Meter Reader Feeder Keeps Meter-Maids At Bay”

Power Meter

Electricity Usage Monitor Is Linked To Google Spreadsheets

If you want to make your home more energy-efficient, chances are you will need a way to monitor your electricity usage over time. There are off-the-shelf solutions for this of course, but hackers like us tend to do things our own way. Take [Karl] for example. He recently built himself a solution with only a few smart components. We’ve seen similar projects in the past, but none quite like this.

[Karl’s] home has a power meter that blinks an LED to indicate the current amount of used electricity in Watt-hours. He knew all he needed was a way to electronically detect the blinking LED and he’d be able to accurately track his usage without modifying the meter.

The primary components used in this project were a CC3200 development kit and a photoresistor module. The dev kit contained a WiFi module built-in, which allows the system to upload data to Google spreadsheets as well as sync the built-in clock with an accurate time source. The photoresistor module is used to actually detect the blinking LED on the power meter. Everything else is done easily with code on the dev kit.

Tricked-out Arduino-controlled Time-Lapse Is More Than Just A Timer

arduinoPhotoRig

[Hlesliebole] wanted a finer degree of remote control over his time-lapse shots, so he decided to build an Arduino-driven infrared shutter. He ended up creating this killer Arduino-controlled photography rig that does a whole lot more.

This hack was built for [Hlesliebole]’s Nikon D3100, but he says it should work with any DSLR and remote shutter. This initial build uses an LED as a stand-in for the remote shutter that he ordered.  He intends to update the post once it arrives and he integrates it.

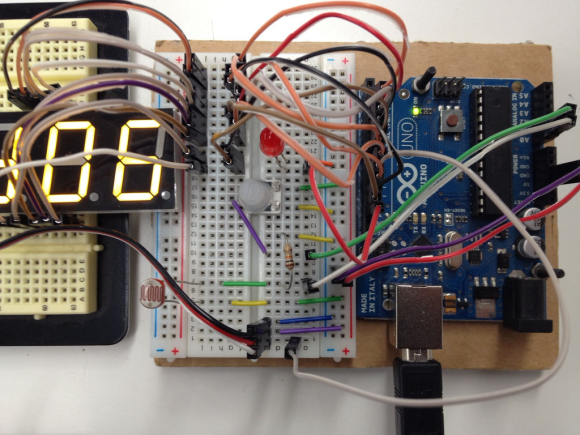
[Hlesliebole] wired a 7-segment display to show the current time delay between photos. This can be set on the fly with a potentiometer, so there’s no need to stop and reprogram the Arduino. And while you’re grabbing a beer and watching the sun slowly sink, the rig can better capture that sunset because of a photoresistor. It detects the ambient light level and minimizes the number of throwaway dark shots.

If that weren’t enough, he’s built servo functionality into the code to support remote control over the camera’s physical position, allowing for panning or rotation over a scene. [Hlesliebole] doesn’t go into detail, but he assures us that there are many tutorials out there.  If you think you’re man enough, you could always work in this outstanding versatile motion dolly hack.

Continue reading “Tricked-out Arduino-controlled Time-Lapse Is More Than Just A Timer”

An “ill” Logical PWM Control

illogicalPWMcontrol

[James] recently finished up a gigantic seven segment display for Nottingham Hackerspace, and although it looks great, the display isn’t the interesting part. The PWM dimmer control implemented in logic is the true head-turner. That’s right: this is done without a programmable controller.

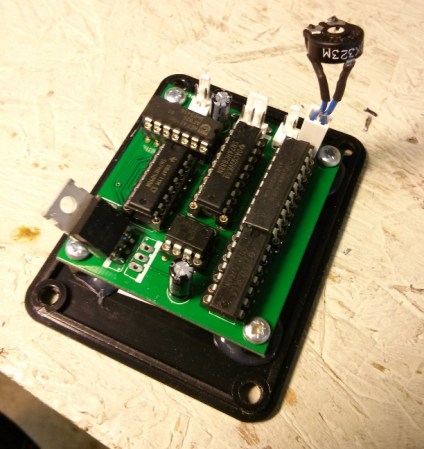
Unsatisfied with the lack of difficulty he faced when slapping together the rest of the electronics, [James] was determined to complicate the auto-dimmer by foregoing all sensible routes. He started by building an 8-bit timer made from a 555 timer fed into a 12-bit 4040 counter. He then used an 8-bit ADC IC to read a photoresistor. The outputs from both the ADC and from the scratch-built 8-bit timer plug into an 8-bit comparator; If the values match, the comparator outputs LOW for a single clock period.

Though this set the groundwork for PWM control, [James] had to add a couple of additional logic gates into the mix to nail everything down. You can find a diagram and the details behind flip-flopping out a duty cycle on his project blog. Clever builds like this one are a rarity when a few lines of code and a microcontroller can give you numerous shortcuts. [James] doesn’t recommend that you over-engineer your PWM controller, but we’re glad he did.  Meanwhile, Moore’s Law marches on; check out what people are doing with Low-Energy Bluetooth these days.

Hacking McDonald’s Minion Toy To Be An Electric Slidewhistle

mcdonalds_toy_hacking

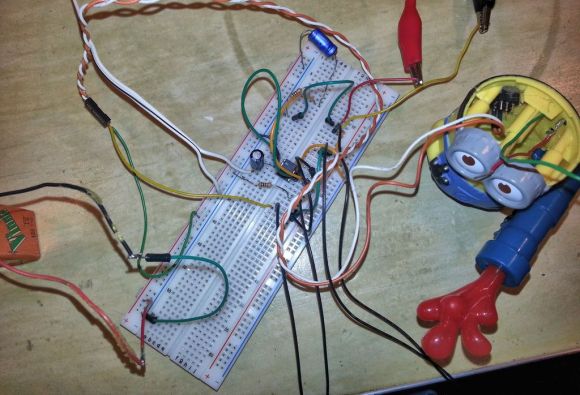
This is a look at the brain surgery which [Tim] performed on a Happy Meal Toy. The McDonald’s package meal perk comes with one of several different Despicable Me 2 characters. But [Tim] wasn’t a fan of this one since you had to blow in it to make noise. He grabbed a 555 timer and added his own circuit to the toy which turns it up to 11 (seriously, turn your volume down before playing the video).

Disassembly includes removing a screw which needs a 3-sided screwdriver (protip: use a bench grinder and a cheap screw driver to make your own). There’s also some prying to get into the skull and then its time to work on the slide whistle. The blue tube is a regular slide whistle which you blow into from the back and pull on the red goo to change the pitch. [Tim] added a photoresistor to the mouthpiece and an LED on the slide. Moving the light source changes the intensity which is one of the adjustments to make 555 circuit howl.

We love the Happy Meal toy hacks because they seem so visceral. A couple years ago it was parts harvesting from Avatar toys. which in turn inspired a tripwire hack with a Penguin toy.

Continue reading “Hacking McDonald’s Minion Toy To Be An Electric Slidewhistle”

Light Programming For A Clock

+

So at first glance we were thinking there wasn’t much special about this clock. It’s based on an Arduino and displays the time using a character LCD screen. But then we realized that there’s no battery-backed RTC and no buttons. How the heck do you set the time on this thing? [Mossblaser] is using a light programmer to set the time using a computer screen.

We’ve tried nearly the same data transfer technique before, using a white and black flashing computer screen to push Manchester encoding to a light dependent resistor. We were met with limited success, but you can see that [Mossblaser’s] rig is much more reliable and we think there’s a few reasons behind this. First, he’s only sending five bits per seconds, a very slow speed when it comes to digital transmissions. This helps to make up for slow LCD screen refresh. Also, the LDR is surrounded by material on the back of the case that will help to block out ambient light. And finally, he’s using a smaller part of the screen instead of flashing the whole thing. This may result in more accurate timing. You’ve got to admit, this is pretty slick!

Continue reading “Light Programming For A Clock”