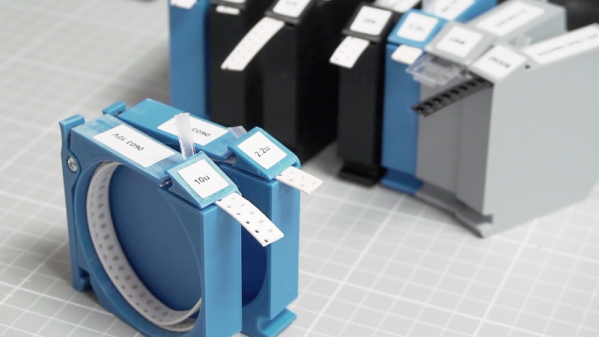
Hackaday Links Column Banner

Hackaday Links: May 26, 2019

Thinkpads are great, especially the old ones. You find a T420, and you can have a battery hanging off the back, a battery in the optical drive bay, and for some old Thinkpads, there’s a gigantic ‘slice’ battery that doubles the thickness of your laptop. Here’s the most batteries in a Thinkpad ever, with the requisite reddit post. It’s 27 cells, with an all-up capacity of 212 Watt-hours. There are two interesting takeaways from the discussion here. First, this may, technically, be allowed on a commercial flight. The FAA limit is 100 Watt-hours per battery, and the Ultrabay is a second battery. You’re allowed two additional, removable batteries on a carry on, and this is removable and reconfigurable into some form that the TSA should allow it on a plane. Of course no TSA agent is going to allow this on a plane so that really doesn’t matter. Secondly, the creator of this Frankenpad had an argument if Hatsune Miku is anime or not. Because, yeah, of course the guy with a Thinkpad covered in Monster energy drink stickers and two dozen batteries glued on is going to have an opinion of Miku being anime or not. That’s just the way the world works.

Prices for vintage computers are now absurd. The best example I can call upon is expansion cards for the Macintosh SE/30, and for this computer you have a few choice cards that have historically commanded a few hundred dollars on eBay. The Micron XCEED Color 30 Video Card, particularly, is a special bit of computer paraphernalia that allows for grayscale on the internal monitor. One of these just sold for two grand. That’s not all, either: a CPU accelerator just sold for $1200. These prices are double what they were just a few years ago. We’re getting to the point where a project to reverse engineer and produce clones of these special cards may make financial sense.

The biggest news in consumer electronics this week is the Playdate. It’s a pocket game console that has a crank. Does the crank do anything? No, except that it has a rotary encoder, so this can nominally be used for games. It will cost $150, and there are zero details on the hardware other than the industrial design was done by Teenage Engineering. There’s WiFi, and games will be delivered wireless on a weekly basis. A hundred thousand people are on the wait list to buy this.

If you want a pick and place in your garage workshop, there aren’t many options. There’s a Neoden for about ten grand, but nothing cheaper or smaller. The Boarditto is a two thousand dollar pick and place machine that fits comfortably on your desk. It has automatic tape feeders, a vision system, and for the most part it looks like what you’d expect a small, desktop pick and place machine to be. That’s all the information for now, with the pre-order units shipping in December 2019.

Pick And Place For Toys

Toys are great for keeping the kids amused at play time, but oftentimes its difficult to get them to understand the importance of tidying up after themselves. It would naturally be ideal to have some manner of robot to help in this regard, and [Paco Garcia] might just be leading the charge in this area.

[Paco]’s project involves combining a robotic arm with computer vision tools in order to allow it to pick and place small objects – in this example, toys. The robot arm is of a gantry type, built on an aluminium frame with 3D printed components. The computer vision side of things is handled by a Raspberry Pi, fitted with the standard camera and running OpenCV software for object recognition. This then passes commands to an Arduino which runs the stepper motors controlling the arm.

[Paco] notes that the hardest part of the build was learning how to generate real-world coordinates from a single camera feed in OpenCV. With that mastered, the rest of the dominoes began to fall. With trigonometry and kinematics knowledge in hand, the robot has grown capable of reliably picking and placing small objects across its range of motion. Future work aims to improve the robot’s abilities to rotate and otherwise manipulate its end effector for more versatility.

Naturally, we typically see pick and place machines used for PCB production – and this build is no exception. Video after the break.

Continue reading “Pick And Place For Toys”

Dainty Delta Is About As Small As A Robot Can Be

There’s something mesmerizing about delta robots. Whether they are used at a stately pace for a 3D-printer or going so fast you can barely see them move in a pick and place machine, the way that three rotary actuators can work together to produce motion in three axes is always a treat to watch. Especially with a delta robot as small as this one.

[KarelK16] says this is one of those “just because I can” projects with no real application. And he appears to have been working on it for a while; the video below is from eight years ago. Regardless, the post is new, and it’s pretty interesting stuff. The tiny ball joints used in the arms are made from jewelry parts; small copper crank arms connect the three upper arms to micro-servos. The manipulator [KarelK16] attached is very clever, too – rather than load down the end of the arms with something heavy, a fourth servo opens an closes a flexible plastic grasper through a Bowden cable. It’s surprisingly nimble, and grasps small objects firmly.

There are certainly bigger deltas – much bigger – and more useful ones, too, but we really like this build. And who knows – perhaps model robotics will join model railroading as a hobby someday. If it does, [KarelK16]’s diminutive delta might be the shape of things to come.

Continue reading “Dainty Delta Is About As Small As A Robot Can Be”

Monoprice Mini Converted To Pick And Place (Kinda)

Would you believe that you can take a cheap 3D printer and easily convert it into a full function pick and place machine to help assemble your PCBs? No? Well good, because you can’t. A real pick and place needs all kinds of sensors and logic to identify parts, rotate them, make sure everything is aligned, etc, etc. There’s no way you could just bolt all that onto a cheap 3D printer, and let’s not even talk about the lack of closed loop control.

But if you have a very specific use case, namely a PCB that only has a relatively large single part that doesn’t need to be rotated, [Connor Nishijima] might have a solution for you. He bought a $150 USD Monoprice Mini, and with the addition of a few printed parts, was able to build a machine that drastically cuts down the time it takes for him to build his LED boards. Best of all the modification doesn’t involve any permanent changes to the printer, he can just pop off the vacuum attachment when he wants to print something.

Beyond the 3D printed parts (which were made on the printer itself), the only thing you need to make the modification is the vacuum pump. [Connor] is using a hot air station that includes a vacuum pump for picking up SMD components, but he mentions that you’d probably better off just modifying an aquarium pump and using that. A printed holder snaps over the cooling fan of the Monoprice Mini to hold the vacuum pickup tool, and another printed piece holds the strip of LEDs and the PCB. It’s worth noting that the machine has no ability to control the vacuum pump, and doesn’t need to. The pickup tool is so weak that when the LED lands in the solder paste it sticks to the board well enough that the tool can’t lift it back off.

The real genius in this build comes from the manually written G-Code. You load it from the printer’s built in menu system as if it was a normal 3D print, and it instructs the printer to move the vacuum tool over the line of LEDs, pick one up, and drop it in place on the PCB. It then uses a small peg built into the vacuum tool holder to advance the line of LEDs before starting the cycle all over again. Incredibly, it does this whole complex dance 20 times for each PCB without ever having any kind of feedback or alignment check. It only works because [Connor] was willing to go through the trial and error of getting the calibration and G-Code down as close to perfect as can be expected for such a cheap machine.

This isn’t the first time we’ve seen the Monoprice Mini converted into something a bit more impressive than a cheapo 3D printer. Seems that for whatever the machine lacks in the printing department, it more than makes up for in hackability.

Continue reading “Monoprice Mini Converted To Pick And Place (Kinda)”

Acrylic Stencils Help With Component Placement For SMD Assembly

Surface mount is where the action is in the world of DIY PCBs, and deservedly so. SMDs are so much smaller than through-hole components, and fewer holes to drill make surface-mount PCBs easier to manufacture. Reflow soldering is even a snap now thanks to DIY ovens and solder stencils you can get when you order your boards.

So what’s the point of adding another stencil to the surface-mount process? These component placement stencils are [James Bowman]’s solution for speeding up assembly of boards in production runs too small to justify a pick and place robot. [James] finds that placing small components like discrete resistors and caps easy, but struggles with the placement of the larger components, like QFN packaged microcontrollers. Getting such packages lined up exactly is hard when the leads are underneath, and he found repositioning led to smeared solder paste. His acrylic stencils, which are laser-cut from SVGs derived directly from the Eagle files with a script he provides, sandwich the prepped board and let him just drop the big packages into their holes. The acrylic pops off after placement, leaving the components stuck to the solder paste and ready for their trip to the Easy Bake.

[James] claims it really speeds up hand placement in his biggish runs, and it’s a whole lot cheaper than a dedicated robot. But as slick as we think this idea is, a DIY pick and place is still really sweet.

A Pick-And-Place That Is A Work Of Art

It’s a Holy Grail among hackerspaces, the possession of a pick-and-place machine. These robotic helpers for placing surface-mount components on PCBs are something of a gateway to electronic production, but they can carry a fearsome cost. Happily for the cash-strapped would-be electronic manufacturer, it is possible to build a pick-and-place for yourself. [Mcuoneclipse] has demonstrated this with a rather impressive build that works with the freely available OpenPnP software.

Superficially it shares much with what you might expect from a small CNC mill, in that it has a frame made from extruded aluminium that carries rails that trace an X and a Y axis supporting a tool head. But instead of a blade it has a box made from laser-cut ply that contains a camera and a vacuum pick-up tool that can collect a component from the tapes and deposit it in the correct point on the board. At the machine’s heart is a Smoothieboard, and the work is done by an assortment of solenoid valves and actuators. A huge amount of attention to detail has been paid to this build, with a holder for all the interchangeable nozzles for different component sizes, laser-cut mountings for all the motorised components, and automatic feeders for the SMD tapes all being carefully designed and built. Several iterations of the design are presented, in particular around the head itself which has passed through more than one form to remove as much vibration as possible. But don’t take it from us, have a look at the video we’ve pasted in below the break.

This isn’t the first pick-and-place machine we’ve brought you here at Hackaday. If you already have a 3D printer, would you consider this upgrade?

Continue reading “A Pick-And-Place That Is A Work Of Art”

PCB Holder Quick-fix Turns Out To Be Big Improvement

When something needs improving, most hacks often make a small tweak to address a problem without changing how things really work. Other hacks go a level deeper, and that’s what [Felix Rusu] did with his 3D printed magnetic holders. Originally designed to address a shortcoming with the PCB holders in his LE40V desktop pick-and-place machine, they turned out to be useful for other applications as well, and easily modified to use whatever size magnets happen to be handy.

The problem [Felix] had with the PCB holders on his pick-and-place was that they hold the board suspended in midair by gripping the sides. The board is held securely, but the high density of parts on panelized PCB designs leads to vibrations in the suspended board as the pick-and-place head goes to work. Things are even worse when the board is v-scored for the purpose of easily snapping apart the smaller boards later; they sometimes break along the score lines due to the stress.

Most people would solve this problem by putting a spacer underneath the board to stabilize things, but [Felix] decided to go a level deeper and change the mounting system altogether with a simple mod. The boards now lie on a flat metal plate, and his magnetic holders are simple to make and easily do the job of holding any size PCB secure. As a bonus, it turns out that the holders also do a passable job of holding work materials down on a laser cutter’s honeycomb table. A video overview is embedded below, and the design files are available on Thingiverse.

Continue reading “PCB Holder Quick-fix Turns Out To Be Big Improvement”