It’s hard to watch [Mark Zuckerberg]’s 2018 Congressional testimony and not come to the conclusion that he is, at a minimum, quite a bit different than the average person. Of course, having built a multibillion-dollar company that drastically changed everything about the way people communicate is pretty solid evidence of that, but the footage at least made a fun test case for this AI truth-detecting algorithm.
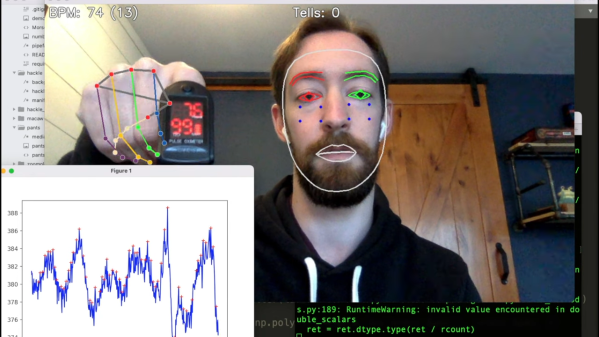
Now, we’re not saying that anyone in these videos was lying, and neither is [Fletcher Heisler]. His algorithm, which analyzes video of a person and uses machine vision to pick up cues that might be associated with the stress of untruthfulness, is far from perfect. But as the first video below shows, it is a lot of fun to see it at work. The idea is to capture data like pulse rate, gaze direction, blink rate, mouth posture, and even hand position and use them as a proxy for lying. The second video, from [Fletcher]’s recent DEFCON talk, has much more detail.
The key to all this is finding human faces in a video — a task that seemed to fail suspiciously frequently when [Zuck] was on camera — using OpenCV and MediaPipe’s Face Mesh. The subject’s pulse is detected by watching for subtle changes in the color of a subject’s cheeks as blood flows through them, which we’ve heard about plenty of times but never before seen presented so clearly and executed so simply. Gaze direction, blinking, and lip compression are fairly easy to detect too. [Fletcher] also threw in the FER library for facial expression recognition, to get an idea of the subject’s mood. Together, these cues form a rough estimate of the subject’s truthiness, which [Fletcher] is quick to point out is just for entertainment purposes and totally shouldn’t be used on your colleagues on the next Zoom call.
Does [Fletcher]’s facial mesh look familiar? It should, since we once watched him twitch his way through a coding interview.
Continue reading “Truthsayer Uses Facial Recognition To See If You’re Telling The Truth”