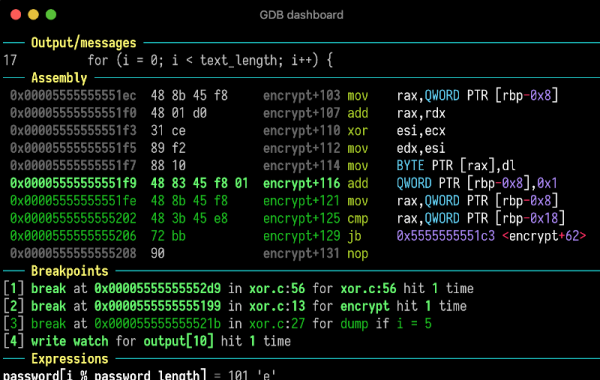
Reverse Engineering A Topfield VFD Front Panel

Hackers love the warm glow of a vacuum fluorescent display (VFD), and there’s no shortage of dead consumer electronics from which they can be pulled to keep our collective parts bins nicely stocked. Unfortunately, figuring out how to actually drive these salvaged modules can be tricky. But thanks to the efforts of [Lauri Pirttiaho], we now have a wealth of information about a VFD-equipped front panel used in several models of Topfield personal video recorders.

The board in question is powered by a Hynix HMS99C52S microcontroller and includes five buttons, a small four character 14-segment display, a larger eight character field, and an array of media-playback related icons. There’s also a real-time clock module onboard, as well as an IR receiver. [Lauri] tells us this same board is used in at least a half-dozen Topfield models, which should make it relatively easy to track one down.

After determining what goes where in the 6-pin connector that links the module with the recorder, a bit of poking with a logic analyzer revealed that they communicate over UART. With the commands decoded, [Lauri] was able to write a simple Python tool that lets you drive the front panel with nothing more exotic than a USB-to-serial adapter. Though keep in mind, you’ll need to provide 17 VDC on the appropriate pin of the connector to fire up the VFD.

What’s that? You don’t need the whole front panel, and just want to pull the VFD itself off the board? Not a problem. Our man [Lauri] was kind enough to document how data is passed from the Hynix microcontroller to the display itself; critical information should you want to liberate the screen from its PVR trappings.

If you manage to get your hands on one of these modules, it would be an ideal addition to a custom media streamer. Though we suppose simply turning it into a network-controlled clock would be a suitable alternative if you’re looking for something a bit easier.

Continue reading “Reverse Engineering A Topfield VFD Front Panel”

Python Your Keyboard Hack Chat With Adafruit

Join us on Wednesday, July 21 at noon Pacific for the Python Your Keyboard Hack Chat with the Adafruit crew!

Especially over the last year and a half, most of us have gotten the feeling that there’s precious little distinction between our computers and ourselves. We seem welded together, inseparable even, attached as we are day and night to our machines as work life and home life blend into one gray, featureless landscape where time passes unmarked except by the accumulation of food wrappers and drink cans around our work areas. Or maybe it just seems that way.

Regardless, there actually is a fine line between machine and operator, and in most instances it’s that electromechanical accessory that we all love to hate: the keyboard. If you buy off the shelf, it’s never quite right — too clicky, not clicky enough, wrong spacing, bad ergonomics, or just plain ugly design. The only real way around these limitations is to join the DIY keyboard crowd and roll your own, specifically customized to your fingers and your needs — at least until you realize that it’s not quite perfect, and need to modify it again.

Hitting this moving target is often as much a software problem as it is a hardware issue, but as is increasingly the case these days, Python is ready to help. To go into depth on how Python can be leveraged for the custom keyboard builder, our good friends at Adafruit, including Limor “Ladyada” Fried, Phillip Torrone, Dan HalbertKattni Rembor, and Scott Shawcroft will stop by the Hack Chat. We suspect they’ll have some cool stuff to show off, in addition to sharing their tips and tricks for making DIY keyboards just right. If you’re building custom keebs, or even if you’re just “keyboard curious”, you won’t want to miss this one.

join-hack-chatOur Hack Chats are live community events in the Hackaday.io Hack Chat group messaging. This week we’ll be sitting down on Wednesday, July 21 at 12:00 PM Pacific time. If time zones have you tied up, we have a handy time zone converter.

This Horrifying Robot Is Here To Teach You A Lesson

No, despite what it might look like, this isn’t some early Halloween project. The creepy creation before you is actually a tongue-in-cheek “robot” created by the prolific [Nick Bild], a topical statement about companies asking their remote workers to come back into the office now that COVID-19 restrictions are being lifted. Why commute every day when this ultra realistic avatar can sit in for you?

OK, so maybe it’s not the most impressive humanoid creation to ever grace the pages of Hackaday. But if you’re looking to spin up a simple telepresence system, you could do worse than browsing through the Python source code [Nick] has provided. Using a Raspberry Pi 4, a webcam, and a microphone, his client-server architecture combines everything the bot sees and hears into a simple page that can be remotely accessed with a web browser.

Naturally this work from home (WFH) bot wouldn’t be much good if it was just a one-way street, so [Nick] has also added a loudspeaker that replays whatever he says on the client side. To prevent a feedback loop, his software includes a function that toggles which direction the audio stream goes in by passing the appropriate commands to the bot over SSH; a neat trick to keep in mind for your own, less nightmarish, creations.

If you’re looking for something a bit more capable and have some cardboard laying around, this DIY telepresence mount for your phone might be a good place to start.

Continue reading “This Horrifying Robot Is Here To Teach You A Lesson”

PiNet — One Small Project Grows Unexpectedly

A few years ago, [Gregory Sanders] aka [Dr Gerg] had one simple wish in mind when he started what is now the PiNet project — to know whether his garage door was open or closed. Instead of searching out off-the-shelf solutions, he looked at the project as a learning opportunity. After picking up Python, he built a system from a Raspberry Pi, a 12V gel cell battery, and a power supply / charger circuit. Thus project Overhead Door (ohd) was complete (see the ohd GitHub repository) and [Dr Gerg] was done.

Or so he thought. After getting a swimming pool installed, he got the itch again, and started a new project called Pool Controls, because:

The controls for your average backyard in-ground pool are pathetic. I felt like I could do better with a Raspberry Pi, a relay board and some Python. And so I did, and frankly, it’s awesome.

Then he built his own weather station to replaced a commercial one which had died twice in as many years, followed by his own web-based UI framework. Next was the integration of an outdoor security camera system. And finally, although we don’t believe it’s really final, he ripped out the cloud-based controls from his shop air conditioner and added his own Raspberry Pi-based solution. All of these projects are available on his GitHub page.

[Dr Gerg]’s goal in posting all this work is not necessarily so people can duplicate it, although that is okay as well. Instead, he hopes that people will realize that they can build these types of projects on their own, perhaps leaning some things and picking up new skills along the way — have fun doing it. We like the way you think, [Dr Gerg]. Do you know of any small projects which grew and grew and took on a life of their own?

Gorgeous Specimen Is The Final Word In Word Clocks

At this point, it’s safe to say that word clocks aren’t quite as exciting as they once were. We’ve seen versions that boil the concept down to what amounts to a parts bin build, which for better or for worse, takes a lot of the magic out of it. You just get an array of LEDs, put some letters in front of it, write some code, and you’re done.

But then [Mark Sidell] sent in his build, and we remembered why we collectively fell in love with these clocks in the first place. It wasn’t the end result that captivated us, although the final clock is indeed gorgeous, but the story of its painstaking design and construction. The documentation created for this project is unquestionably some of the best we’ve seen in a very long time, and whether or not you have any desire to build a word clock of your own, you won’t regret sitting down and reading through it.

If you can somehow come away from reading through that build log and not be impressed, surely the clock’s feature set will put you over the edge. The ability to show time in just five minute increments makes this one of the most practical word clocks we’ve seen, and the quality of life features such as automatic brightness control based on ambient light level, and a smartphone-controlled web interface for configuring the clock are just a few of its standout features.

Incidentally the glow behind the clock, provided by a dedicated array of WS2812 RGB LEDs, isn’t just for ambiance. It indicates the position of the sun in the sky as calculated by the Python astral package, as well as mimicking the colors of the sunrise and sunset. There’s even a compass onboard to make sure the LEDs are properly aligned with their astronautical counterpart.

[Mark] actually made several of these clocks, most of which were given away as gifts. Some of the lucky recipients lived far enough away that the clock had to be shipped, so he designed a custom shipping case to hold everything securely during the trip. It also meant he had to come up with a way of remotely maintaining the code on these clocks without user intervention, so he created a firmware update and telemetry gathering backend with Amazon Web Services that they check into periodically. Honestly, the attention to detail put into every element of this project is just staggering.

If you’re interested in seeing what all the fuss is about with these word clocks, but aren’t quite at [Mark]’s level, don’t worry. As we said earlier, you can build a small version with little more than an LED array and a microcontroller. Just don’t blame us if it ends up turning into an obsession.

Continue reading “Gorgeous Specimen Is The Final Word In Word Clocks”

Raspberry Pi Zero Takes The Wheel In Miniature Fighting Robot

Looking to capitalize on his familiarity with the Raspberry Pi, [Sebastian Zen Tatum] decided to put the diminutive Pi Zero at the heart of his “antweight” fighting robot, $hmoney. While it sounds like there were a few bumps in the road early on, the tuxedoed bot took home awards from the recent Houston Mayhem 2021 competition, proving the year of Linux on the battle bot is truly upon us.

Compared to using traditional hobby-grade RC hardware, [Sebastian] says using the Pi represented a considerable cost savings. With Python and evdev, he was able to take input from a commercial Bluetooth game controller and translate it into commands for the GPIO-connected motor controllers. For younger competitors especially, this more familiar interface can be seen as an advantage over the classic RC transmitter.

A L298N board handles the two N20 gear motors that provide locomotion, while a Tarot TL300G ESC is responsible for spinning up the brushless motor attached to the “bow tie” spinner in the front. Add in a Turnigy 500mAh 3S battery pack, and you’ve got a compact and straightforward electronics package to nestle into the robot’s 3D printed chassis.

In a Reddit thread about $hmoney, [Sebastian] goes over some of the lessons his team has learned from competing with their one pound Linux bot. An overly ambitious armor design cost them big at an event in Oklahoma, but a tweaked chassis ended up making them much more competitive.

There was also a disappointing loss that the team believes was due to somebody in the audience attempting to pair their phone with the bot’s Pi Zero during the heat of battle, knocking out controls and leaving them dead in the water. Hopefully some improved software can patch that vulnerability before their next bout, especially since everyone that reads Hackaday now knows about it…

While battles between these small-scale bots might not have the same fire and fury of the televised matches, they’re an excellent way to get the next generation of hackers and engineers excited about building their own hardware. We wish [Sebastian] and $hmoney the best of luck, and look forward to hearing more of their war stories in the future.

An Exercise In Firmware Dumping With The GreatFET

Looking to hone his hardware hacking skills, [James Chambers] recently set out to reverse engineer a common cheap wireless keyboard: the Logitech K360. The chipset it uses has already been fairly well explored (and exploited) by security researchers, but the goal here was more about gaining some practical hands-on experience than it was breaking any new ground.

The first post in what we’re sure will be a fascinating series deals with dumping the board’s firmware using the GreatFET. We actually haven’t seen too many projects that showcase the capabilities of this highly capable open hardware multi-tool, so the post serves as a nice demonstration of how one goes about writing the necessary Python scripts to put it to work in a practical scenario.

Some promising bytes.

Of course, even with the best of tools, there’s always a few stumbling blocks. After identifying what was clearly some kind of programming header on the K360’s diminutive PCB, it took a few failed attempts at reading the firmware before [James] realized he needed to tap into more pins on the keyboard’s nRF24LE1 microcontroller. Once everything was physically wired up, he wrote some code for the GreatFET that would perform the proper incantations on the chip’s PROG and RESET pins to enable its programming interface.

[James] goes on to explain how you can pull some extended chip information out of the hardware and verify the contents of the firmware dump with Gihdra, but any more advanced analysis will have to wait until the next post in the series. In the meantime, if you like reading about hardware hacking from this “over the shoulder” viewpoint, you should check out some of the fantastic work that [wrongbaud] has sent in over the last year or so.