Raspberry Pi Zero Powers Spotify Streaming IPod

Even those critical of Apple as a company have to admit that they were really onto something with the iPod. The click wheel was a brilliant input device, and the simplicity of the gadget’s user interface made it easy to get to the music you wanted with a minimum of hoop jumping. Unfortunately it was a harbinger of proprietary software and DRM, but eventually there were a few open source libraries that let you put songs on the thing without selling your soul to Cupertino.

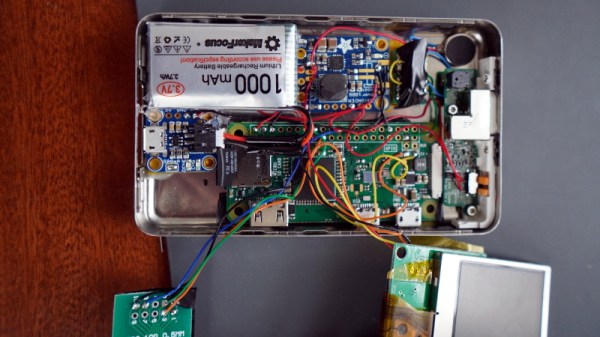
Of course, modern users expect a bit more than what the old hardware can deliver. Which is why [Guy Dupont] swapped the internals of his iPod Classic with a Raspberry Pi Zero W. This new Linux-powered digital audio player is not only capable of playing essentially any audio format you throw at it, but can also tap into streaming services such as Spotify. But such greatness doesn’t come easy; to pull this off, he had to replace nearly every component inside the player with the notable exception of the click wheel itself. Good thing the Classics were pretty chunky to begin with.

In addition to the Pi Zero running the show, he also had to fit a 1000 mAh battery, its associated charging and boost modules, a vibration motor for force feedback, and a 2″ LCD from Adafruit. The display ended up being almost the perfect size to replace the iPod’s original screen, and since it uses composite video, only took two wires to drive from the Pi. To interface with the original click wheel, [Guy] credits the information he pulled from a decade-old Hackaday post.

Of course with a project like this, the hardware is only half the story. It’s one thing to cram all the necessary components inside the original iPod enclosure, but by creating such an accurate clone of its iconic UI in Python, [Guy] really took things to the next level. Especially since he was able to so seamlessly integrate support for Spotify, a feature the Apple devs could scarcely have imagined back at the turn of the millennium. We’re very interested in seeing the source code when he pushes it to the currently empty GitHub repository, and wouldn’t be surprised if it set off a resurgence of DIY iPod clones.

We’ve seen modern hardware grafted onto the original iPod mainboard, and over the years a few hackers have tried to spin up their own Pi-based portable music players. But this project that so skillfully combines both concepts really raises the bar.

Continue reading “Raspberry Pi Zero Powers Spotify Streaming IPod”

Reachy The Open Source Robot Says Bonjour

Humanoid robots always attract attention, but anyone who tries to build one quickly learns respect for a form factor we take for granted because we were born with it. Pollen Robotics wants to help move the field forward with Reachy: a robot platform available both as a product and as a wealth of information shared online.

This French team has released open source robots before. We’ve looked at their Poppy robot and see a strong family resemblance with Reachy. Poppy was a very ambitious design with both arms and legs, but it could only ever walk with assistance. In contrast Reachy focuses on just the upper body. One of the most interesting innovations is found in Reachy’s neck, a cleverly designed 3 DOF mechanism they called Orbita. Combined with two moving antennae at the top of the head, Reachy can emote a wide range of expressions despite not having much of a face. The remainder of Reachy’s joints are articulated with Dynamixel serial bus servos though we see an optional Orbita-based hand attachment in the demo video (embedded below).

Reachy’s € 19,990 price tag may be affordable relative to industrial robots, but it’s pretty steep for the home hacker. No need to fret, those of us with smaller bank accounts can still join the fun because Pollen Robotics has open sourced a lot of Reachy details. Digging into this information, we see Reachy has a Google Coral for accelerating TensorFlow and a Raspberry Pi 4 for general computation. Mechanical designs are released via web-based Onshape CAD. Reachy’s software suite on GitHub is primarily focused on Python, which allows us to experiment within a Jupyter notebook. Simulation can be done within Unity 3D game engine, which can be optionally compiled to run in a browser like the simulation playground. But academic robotics researchers are not excluded from the fun, as ROS1 integration is also available though ROS2 support is still on the to-do list.

Reachy might not be as sophisticated as some humanoid designs we’ve seen, and without a lower body there’s no way for it to dance. But we are very appreciative of a company willing to share knowledge with the world. May it spark new ideas for the future.

[via Engadget]

Continue reading “Reachy The Open Source Robot Says Bonjour”

Industrial Stack Light Keeps An Eye On Prusa Mini

When most people want to keep tabs on what their 3D printer is up to while they’re out and about, they’ll install OctoPrint on a Pi and be done with it. But what if you’re just on the other side of the room? Inspired by the stack lights used on factory floors, [Jeff Glass] decided to add a similar system to his Prusa Mini so he could see what it’s up to at a glance.

It turns out you can get these lights pretty cheaply online from the usual retailers, and as [Jeff] explains in the video after the break, driving them is about as easy as it gets. Rather than being some kind of addressable device, they generally have a single common 12 or 24 volt DC wire and ground lines for each color. With a USB controlled relay board, kicking on the appropriate light is simple from your operating system of choice.

What ended up being a bit harder was finding out what the Prusa Mini was up to. The printer offers up a simple status web page, but it has a few oddball quirks that make it difficult to scrape; such as presenting a little pop-up message that you have to manually close each time you load the page. But after spending some time with the powerful Selenium library for Python, he was able to create a script that worked its way through the UI and pulled the relevant status messages. Obviously the resulting code is Prusa specific, but the general concept would work on other printers assuming you can find a reliable way to pull the device’s current status.

After coming up with a wall mounted enclosure for the electronics that doubles as a mount for the light itself, [Jeff] can now see if his printer needs attention from clear across the room. An especially nice feature when the printer is all buttoned up inside of its enclosure.

Continue reading “Industrial Stack Light Keeps An Eye On Prusa Mini”

Building A Pocket Sized Python Playground

Like many of us, [Ramin Assadollahi] has a certain fondness for the computers of yesteryear. Finding his itch for nearly instant boot times and bare metal programming weren’t being adequately scratched by any of his modern devices, he decided to build the PortablePy: a pocket-sized device that can drop him directly into a Python prompt wherever and whenever the urge hits him.

The device is powered by the Adafruit PyPortal Titano, which combines a ATSAMD51J20, ESP32, an array of sensors, and a 3.5″ diagonal 320 x 480 color TFT into one turn-key unit. The PyPortal is designed to run CircuitPython, but the scripts are usually dropped on the device over USB. That’s fine for most applications, but [Ramin] wanted his portable to be usable without the need for a host computer.

For a truly mobile experience, he had to figure out a way to bang out some Python code on the device itself. The answer ended up being the M5Stack CardKB, a tiny QWERTY board that communicates over I2C. Once he verified the concept was sound, he wrote a simple file management application and minimal Python editor that could run right on the PyPortal.

The final step was packaging the whole thing up into something he could actually take off the bench. He designed a 3D printed clamshell case inspired by the classic Game Boy Advance SP, making sure to leave enough room in the bottom half to pack in a charging board and LiPo pouch battery. He did have to remove some of the connectors from the back of the PyPortal to get everything to fit inside the case, but the compact final result seems worth the effort.

While an overall success, [Ramin] notes there are a few lingering issues. For one thing, the keyboard is literally a pain to type on. He’s considering building a custom keyboard with softer buttons, but it’s a long-term goal. More immediately he’s focusing on improving the software side of things so its easier to write code and manage multiple files.

It sounds like [Ramin] isn’t looking to compromise on his goal of making the PortablePy completely standalone, but if your convictions aren’t as strong, you could always connect a device like this up to your mobile to make things a bit easier.

Continue reading “Building A Pocket Sized Python Playground”

Implementing SENT Sensors On The Raspberry Pi

The SENT protocol, standing for Single Edge Nibble Transmission, is used for sensors that need to send high-resolution data while keeping system costs low. It’s most typically used in the automotive world, where it can be found in such parts as throttle-by-wire pedals and temperature sensors. [Mark Smith] set out to see if he could get the Pi Zero to read such sensors without the use of an intermediate microcontroller.

[Mark]’s initial attempts relied on Python and the RPI.GPIO library. Unfortunately, the overheads introduced made decoding SENT traffic impossible. Undeterred, [Mark] pressed on, leveraging the pigpio library and its callback function which allowed sampling at up to one microsecond. This was fast enough to read the messages from a LX3302A inductive position sensor that uses the protocol.

It’s a project that could prove useful for those trying to work with certain sensors who want to avoid adding complexity to a Raspberry Pi project. Files are available on Github for the curious. We’ve seen other direct sensor builds with the Pi, before too – like this power monitoring system. Video after the break.

Continue reading “Implementing SENT Sensors On The Raspberry Pi”

Remoticon Video: Learn How To Hack A Car With Amith Reddy

There was a time not too long ago when hacking a car more often than not involved literal hacking. Sheet metal was cut, engine cylinders were bored, and crankshafts were machined to increase piston travel. It was all in the pursuit of milking the last ounce performance out of every drop of gasoline, along with a little personal expression in the form of paint and chrome.

While it’s still possible — and encouraged — to hack cars thus, the inclusion of engine control units and other systems to our rides has created an entirely different universe of car hacking options, which Amith Reddy distilled into his very popular workshop at the 2020 Remoticon. The secret sauce behind all the hacks you can accomplish in today’s drive-by-wire cars is the Controller Area Network (CAN), the network used to connect the array of sensors, actuators, and controllers that lie under the metal and plastic of modern cars.

Continue reading “Remoticon Video: Learn How To Hack A Car With Amith Reddy”

TMD-2: A Bigger, Better, More Collaborative Turing Machine

One of the things we love best about the articles we publish on Hackaday is the dynamic that can develop between the hacker and the readers. At its best, the comment section of an article can be a model of collaborative effort, with readers’ ideas and suggestions making their way into version 2.0 of a build.

This collegial dynamic is very much on display with TMD-2, [Michael Gardi]’s latest iteration of his Turing machine demonstrator. We covered the original TMD-1 back in late summer, the idea of which was to serve as a physical embodiment of the Turing machine concept. Briefly, the TMD-1 represented the key “tape and head” concepts of the Turing machine with a console of servo-controlled flip tiles, the state of which was controlled by a three-state, three-symbol finite state machine.

TMD-1

TMD-1 was capable of simple programs that really demonstrated the principles of Turing machines, and it really seemed to catch on with readers. Based on the comments of one reader, [Newspaperman5], [Mike] started thinking bigger and better for TMD-2. He expanded the finite state machine to six states and six symbols, which meant coming up with something more scalable than the Hall-effect sensors and magnetic tiles of TMD-1.

TMD-2 has a camera for computer vision of the state machine tiles

[Mike] opted for optical character recognition using a Raspberry Pi cam along with Open CV and the Tesseract OCR engine. The original servo-driven tape didn’t scale well either, so that was replaced by a virtual tape displayed on a 7″ LCD display. The best part of the original, the tile-based FSM, was expanded but kept that tactile programming experience.

Hats off to [Mike] for tackling a project with so many technologies that were previously new to him, and for pulling off another great build. And kudos to [Newspaperman5] for the great suggestions that spurred him on.