TMD-2: A Bigger, Better, More Collaborative Turing Machine

One of the things we love best about the articles we publish on Hackaday is the dynamic that can develop between the hacker and the readers. At its best, the comment section of an article can be a model of collaborative effort, with readers’ ideas and suggestions making their way into version 2.0 of a build.

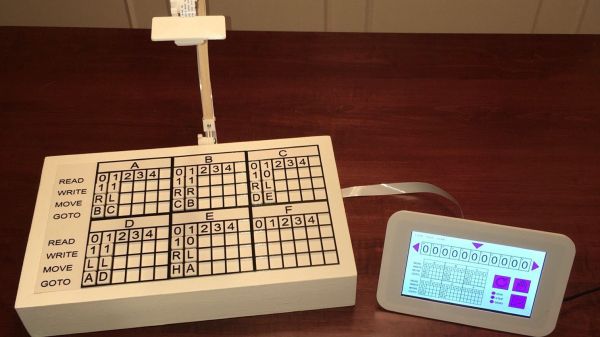
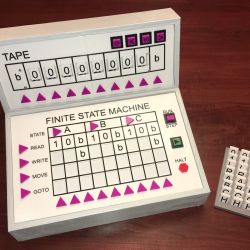
This collegial dynamic is very much on display with TMD-2, [Michael Gardi]’s latest iteration of his Turing machine demonstrator. We covered the original TMD-1 back in late summer, the idea of which was to serve as a physical embodiment of the Turing machine concept. Briefly, the TMD-1 represented the key “tape and head” concepts of the Turing machine with a console of servo-controlled flip tiles, the state of which was controlled by a three-state, three-symbol finite state machine.

TMD-1

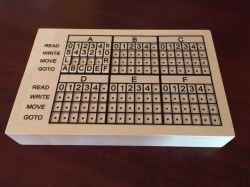
TMD-1 was capable of simple programs that really demonstrated the principles of Turing machines, and it really seemed to catch on with readers. Based on the comments of one reader, [Newspaperman5], [Mike] started thinking bigger and better for TMD-2. He expanded the finite state machine to six states and six symbols, which meant coming up with something more scalable than the Hall-effect sensors and magnetic tiles of TMD-1.

TMD-2 has a camera for computer vision of the state machine tiles

[Mike] opted for optical character recognition using a Raspberry Pi cam along with Open CV and the Tesseract OCR engine. The original servo-driven tape didn’t scale well either, so that was replaced by a virtual tape displayed on a 7″ LCD display. The best part of the original, the tile-based FSM, was expanded but kept that tactile programming experience.

Hats off to [Mike] for tackling a project with so many technologies that were previously new to him, and for pulling off another great build. And kudos to [Newspaperman5] for the great suggestions that spurred him on.

Over-the-Top Cyberdeck Is Really A Geiger-Deck

If you like it when a hack has a little backstory, then you’re going to love this cyberdeck build log, the first half of which reads like a [Tom Clancy] novel. And the build itself looks the part, like something that fell off a military helicopter as the Special Forces operators were fast-roping into a hot LZ. Or something like that.

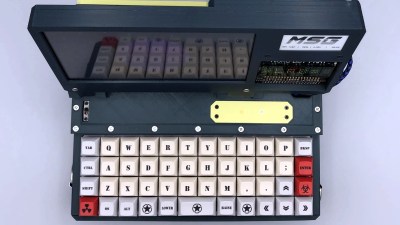
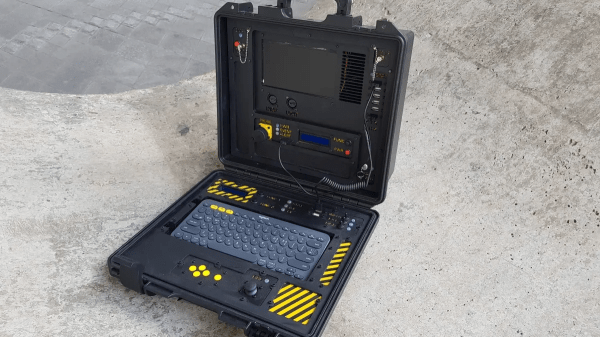
The yarn that [Paul Hoets] spins around his cyberdeck, dubbed RATIS for Remote Assault and Tactical Intelligence System, is pretty good reading and pretty imaginative. The cyberdeck itself looks very much the part, built into a Pelican-style air travel case as such things usually are. Based on a Raspberry Pi 4, the lid of the case serves as a housing for keyboard and controls, while the body houses the computer, an LCD display, and an unusual peripheral: a Geiger counter, which is very much in keeping with the device’s “mission profile”. The handheld pancake probe and stout coiled cord with its MILSPEC connectors really sell the look, too.

Imaginative backstory aside, the construction method here is what really shines. Lacking access to a 3D-printer to produce the necessary greebling, [Paul] instead used a laser cutter to make acrylic panels with cutouts. The contrast between the black panels and the yellow backgrounds makes it all look official, and it’s a technique to keep in mind for builds of a more serious nature, too.

Feel free to look through our fine collection of cyberdeck builds. Some have a fanciful backstory like [Paul]’s, others are intended for more practical purposes. Build whatever you want, just make sure to tip us off when you’re done.

Adventures In Overclocking: Which Raspberry Pi 4 Flavor Is Fastest?

There are three different versions of the Raspberry Pi 4 out on the market right now: the “normal” Pi 4 Model B, the Compute Module 4, and the just-released Raspberry Pi 400 computer-in-a-keyboard. They’re all riffing on the same tune, but there are enough differences among them that you might be richer for the choice.

The Pi 4B is easiest to integrate into projects, the CM4 is easiest to break out all the system’s features if you’re designing your own PCB, and the Pi 400 is seemingly aimed at the consumer market, but it has a dark secret: it’s an overclocking monster capable of running full-out at 2.15 GHz indefinitely in its stock configuration.

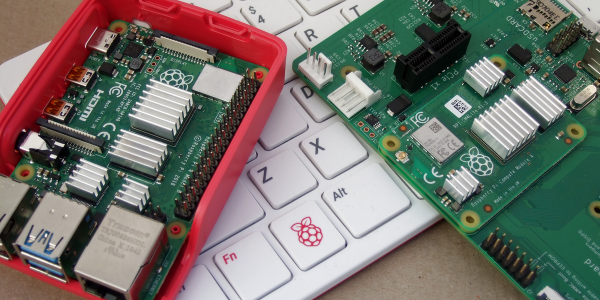
In retrospect, there were hints dropped everywhere. The system-on-a-chip that runs the show on the Model B is a Broadcom 2711ZPKFSB06B0T, while the SOC on the CM4 and Pi 400 is a 2711ZPKFSB06C0T. If you squint just right, you can make out the revision change from “B” to “C”. And in the CM4 datasheet, there’s a throwaway sentence about it running more efficiently than the Model B. And when I looked inside the Pi 400, there was this giant aluminum heat spreader attached to the SOC, presumably to keep it from overheating within the tight keyboard case. But there was one more clue: the Pi 400 comes clocked by default at 1.8 GHz, instead of 1.5 GHz for the other two, which are sold without a heat-sink.

Can the CM4 keep up with the Pi 400 with a little added aluminum? Will the newer siblings leave the Pi 4 Model B in the dust? Time to play a little overclocking!

Continue reading “Adventures In Overclocking: Which Raspberry Pi 4 Flavor Is Fastest?”

Getting Over 4Gbps Out Of A Compute Module 4

For the average home gamer, good old fashioned Ethernet at 100 Mbit/s is only just starting to become a bottleneck as things like 4K video streaming begin to demand more bandwidth. As always, though, there are those who wish to push the limits of what is possible. [Jeff Geerling] is one such operator, who set out to maximise the network throughput on the Raspberry Pi Compute Module 4. 

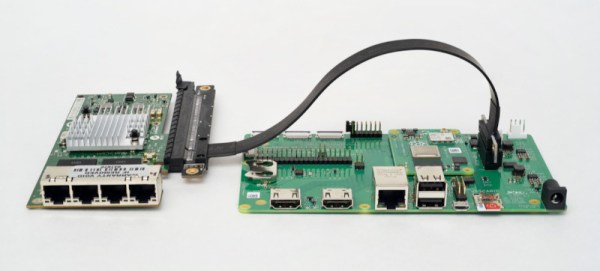
The build began by taking advantage of the PCI-Express 2.0 single lane interface on the new Raspberry Pi Compute Module. Hooked up to an Intel four-port Gigabit Ethernet card, and in combination with the onboard Gigabit-E port, [Jeff] was able to get 3.0 Gbit/s out of the setup without too much fuss. However, he wanted more, and set about finding where he was being held back. It turned out that ksoftirqd, a daemon that handles network packets, can only run on one core on the Raspberry Pi 4, and it was getting maxed out at this data rate. Overclocking the CPU helped, getting the max rate up to 3.4 Gbit/s.

Further analysis showed that the onboard interface was only contributing 200 Mbit/s, with the Intel card maxing out at 3.2 Gbit/s. In the case of the latter, this was due to the limits of the PCI-E interface. In the case of the former, however, [Jeff] knew that more was available. The trick turned out to be recompiling the Linux kernel to allow the internal interface to be able to set to use a higher Maximum Transmission Unit. This allows each network transmission to carry more data without extra CPU load. With the internal interface and the external card all set to an MTU of 9000, the Pi was able to spit out a scorching 4.15 Gbit/second. Details of the hack are available on Github for the curious.

It’s a hack that doesn’t offer a lot to the average user, though [Jeff] states he has some interesting applications in mind. He’s also contemplating what can be achieved with a 10 Gbit card, which we can’t wait to see. If you want to learn more about the Compute Module’s features, including a couple of tips for laying out yor own board, check out our review. Video after the break.

Continue reading “Getting Over 4Gbps Out Of A Compute Module 4”

New Raspberry Pi 400 Is A Computer In A Keyboard For $70

The newest Raspberry Pi 400 almost-all-in-one computer is very, very slick. Fitting in the size of a small portable keyboard, it’s got a Pi 4 processor of the 20% speedier 1.8 GHz variety, 4 GB of RAM, wireless, Ethernet, dual HDMI outputs, and even a 40-pin Raspberry Standard IDE-cable style header on the back. For $70 retail, it’s basically a steal, if it’s the kind of thing you’re looking for because it has $55 dollars worth of Raspberry Pi 4 inside.

In some sense, it’s getting dangerously close to fulfilling the Raspberry Pi Dream. (And it’s got one more trick up it’s sleeve in the form of a huge chunk of aluminum heat-sinked to the CPU that makes us think “overclocking”.)

We remember the founding dream of the Raspberry Pi as if it were just about a decade ago: to build a computer cheap enough that it would be within everyone’s reach, so that every school kid could have one, bringing us into a world of global computer literacy. That’s a damn big goal, and while they succeeded on the first count early on, putting together a $35 single-board computer, the gigantic second part of that master plan is still a work in progress. As ubiquitous as the Raspberry Pi is in our circles, it’s still got a ways to go with the general population.

By Gareth Halfacree  CC BY-SA 2.0

The Raspberry Pi Model B wasn’t, and isn’t, exactly something that you’d show to my father-in-law without him asking incredulously “That’s a computer?!”. It was a green PCB, and you had to rig up your own beefy 5 V power supply, figure out some kind of enclosure, scrounge up a keyboard and mouse, add in a monitor, and only then did you have a computer. We’ve asked the question a couple of times, can the newest Raspberry Pi 4B be used as a daily-driver desktop, and answered that in the affirmative, certainly in terms of it having adequate performance.

But powerful doesn’t necessarily mean accessible. If you want to build your own cyberdeck, put together an arcade box, screw a computer into the underside of your workbench, or stack together Pi Hats and mount the whole thing on your autonomous vehicle testbed, the Raspberry Pi is just the ticket. But that’s the computer for the Hackaday crowd, not the computer for everybody. It’s just a little bit too involved.

The Raspberry Pi 400, in contrast, is a sleek piece of design. Sure, you still need a power supply, monitor, and mouse, but it’s a lot more of a stand-alone computer than the Pi Model B. It’s made of high-quality plastic, with a decent keyboard. It’s small, it’s light, and frankly, it’s sexy. It’s the kind of thing that would pass the father-in-law test, and we’d suggest that might go a long way toward actually realizing the dream of cheaply available universal (open source) computing. In some sense, it’s the least Hackaday Raspberry Pi. But that’s not saying that you might not want one to slip into your toolbag.

Continue reading “New Raspberry Pi 400 Is A Computer In A Keyboard For $70”

Raspberry PI 4 Now Supported By Risc OS In Latest Update

Students of ARM history will know that the origins of the wildly popular processor architecture lie in the British computer manufacturer Acorn (the original “A” in “ARM”). The first mass-market ARM-based products were their Archimedes line of desktop computers. A RISC-based computer in a school or home was significantly ahead of the curve in the mid 1980s and there was no off-the-shelf software, so alongside the new chips came a new operating system that would eventually bear the name Risc OS.

It’s since become one of those unexpected pieces of retrocomputing history that refuses to die, and remains in active development with a new version 5.28 of its open-source variant just released. Best of all, after supporting the Raspberry Pi since the earliest boards, it now runs on a Raspberry Pi 4. The original ARM operating system has very much kept up with the times, and can now benefit from the extra power of the latest hardware from Cambridge. The new release deals with a host of bugs, as well as bringing speed increases, security fixes, and other improvements. For those whose first experience of a GUI came via the Archimedes in British schools, the news that the built-in Paint package has received a thorough update will bring a smile.

The attraction of Risc OS aside from its history and speed lies in its being understandable in operation for those wishing to learn about how an OS works under the hood. It’s likely that for most of us it won’t replace our desktops any time soon, but it remains an interesting diversion to download and explore. If you’d like to read more about early ARM history then we’d like to point you at our piece on Sophie Wilson, the originator of the ARM architecture.

Using Open Source To Train Your Dog

An open-source canine training research tool was just been released by [Walker Arce] and [Jeffrey Stevens] at the University of Nebraska — Lincoln’s Canine Cognition and Human Interaction Lab (C-CHIL).

We didn’t realize that dog training research techniques were so high-tech. Operant conditioning, as opposed to Pavlovian, gives a positive reward, in this case dog treats, to reinforce a desired behavior. Traditionally operant conditioning involved dispensing the treat manually and some devices do exist using wireless remote controls, but they are still manually operated and can give inconsistent results (too many or too few treats). There weren’t any existing methods available to automate this process, so this team decided to rectify the situation.

They took a commercial treat dispenser and retro-fitted it with an interface board that taps into the dispenser’s IR sensors to detect that the hopper is moving and treats were actually dispensed. The interface board connects to a Raspberry Pi which serves as a full-featured platform to run the tests. In this demonstration it connects to an HDMI monitor, detecting touches from the dog’s nose to correlate with events onscreen. Future researchers won’t have to reinvent the wheel, just redesign the test itself, because [Walker] and [Jeffrey] have released all the firmware and hardware as open-source on the lab’s GitHub repository.

In the short video clip below, watch the dog as he gets a treat when he taps the white dot with his snout. If you look closely, at one point the dog briefly moves the mouse pointer as well. We predict by next year the C-CHIL researchers will have this fellow drawing pictures and playing checkers.

Continue reading “Using Open Source To Train Your Dog”