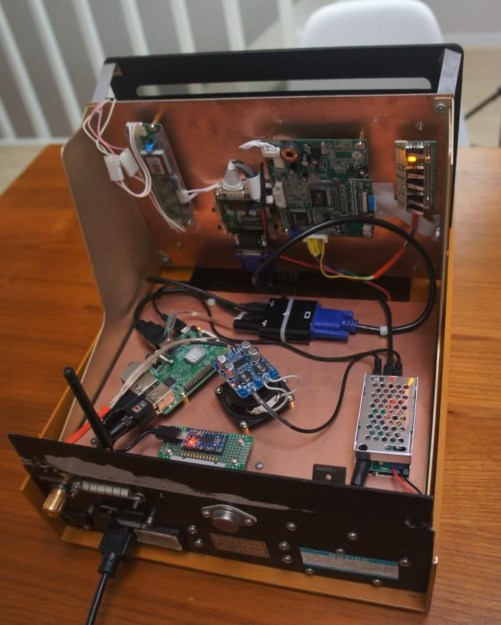
Deploying A Turnkey Raspberry Pi System

If you only do projects for yourself, you are spoiled. After all, you know your environment better than anyone. You know what power you’ll have, the temperature range, and how your network is configured. This last part is especially problematic if you are trying to deploy something that connects to a wireless LAN. How can you configure, say, a Raspberry Pi so that it can connect to an unknown user’s WiFi network? Fixing that problem is the goal of [schollz’s] Raspberry Pi Turnkey project.

The idea is simple. A Raspberry Pi image boots up for the first time and offers a WiFi hotspot itself called ConnectToConnect. The WiFi password is also ConnectToConnect. Once connected, you get configuration options that allow you to tailor the system to your network. Sure, you could have people log in and reconfigure via a serial terminal, wired ethernet (which isn’t always set up right, either), or a USB keyboard But that’s not a great out-of-the-box experience for most customers.

Continue reading “Deploying A Turnkey Raspberry Pi System”

Turning That Old Hoverboard Into A Learning Platform

[Isabelle Simova] is building Hoverbot, a flexible robotics platform using Ikea plastic trays, JavaScript running on a Raspberry Pi and parts scavenged from commonly available hoverboards.

Self-balancing scooters a.k.a. Hoverboards are a great source of parts for such a project. Their high torque, direct drive brushless motors can drive loads of 100 kg or more. In addition, you also get a matching motor controller board, a rechargeable battery and its charging circuit. Most hoverboard controllers use the STM32F103, so flashing them with your own firmware becomes easy using a ST-link V2 programmer.

The next set of parts you need to build your robot is sensors. Some are cheap and easily available, such as microphones, contact switches or LDRs, while others such as ultrasonic distance sensors or LiDAR’s may cost a lot more. One source of cheap sensors are car parking assist transducers. An aftermarket parking sensor kit usually consists of four transducers, a control box, cables and display. Using a logic analyzer, [Isabelle] shows how you can poke around the output port of the control box to reverse engineer the data stream and decipher the sensor data. Once the data structure is decoded, you can then use some SPI bit-banging and voltage translation to interface it with the Raspberry Pi. Using the Pi makes it easy to add a cheap web camera, microphone and speakers to the Hoverbot.

Ikea is a hackers favourite, and offers a wide variety of hacker friendly devices and supplies. Their catalog offers a wide selection of fine, Swedish engineered products which can be used as enclosures for building robots. [Isabelle] zeroed in on a deep, circular plastic tray from a storage table set, stiffened with some plywood reinforcement. The tray offers ample space to mount the two motors, two castor wheels, battery and the rest of the electronics. Most of the original hardware from the hoverboard comes handy while putting it all together.

The software glue that holds all this together is JavaScript. The event-driven architecture of Node.js makes it a very suitable framework to use for Hoverbot. [Isabelle] has built a basic application allowing remote control of the robot. It includes a dashboard which shows live video and audio streams from the robot, buttons for movement control, an input box for converting text to speech, ultrasonic sensor visualization, LED lighting control, message log and status display for the motors. This makes the dashboard a useful debugging tool and a starting point for building more interesting applications. Check the build log for all the juicy details. Which other products from the Ikea catalog can be used to build the Hoverbot? How about a robotic Chair?

Continue reading “Turning That Old Hoverboard Into A Learning Platform”

Raspberry Pi’s Power Over Ethernet Hardware Sparks False Spying Hubbub

Have you ever torn open an Ethernet jack? We’d bet the vast majority of readers — even the ones elbow-deep into the hardware world — will answer no. So we applaud the effort in this one, but the conclusion landed way off the mark.

In the last few days, a Tweet showing a Raspberry Pi with its Ethernet socket broken open suggested the little PCB inside it is a hidden bug. With more going on inside than one might expect, the conclusion of the person doing the teardown was that the Raspberry Pi foundation are spying upon us through our Ethernet traffic. That’s just not the case. But we’re still excited about what was found.

Continue reading “Raspberry Pi’s Power Over Ethernet Hardware Sparks False Spying Hubbub”

Reverse-Emulating NES: Nintendception!

This is a stellar hack, folks. [Tom7] pulled off both full-motion video and running a Super Nintendo game on a regular old Nintendo with one very cute trick. And he gives his presentation of how he did it on the Nintendo itself — Nintendo Power(point)! The “whats” and the “hows” are explained over the course of two videos, also embedded below.

In the first, he shows it all off and gives you the overview. It’s as simple as this: Nintendo systems store 8×8 pixel blocks of graphics for games on their ROM cartridges, and the running program pulls these up and displays them. If you’re not constrained to have these blocks stored in ROM, say if you replaced the cartridge with a Raspberry Pi, you could send your own graphics to be displayed.

He demos a video of a familiar red-haired English soul-pop singer by doing just that — every time through the display loop, the “constant” image block is recalculated by the Raspberry Pi to make a video. And then he ups the ante, emulating an SNES on the Pi, playing a game that could never have been played on an NES in emulation, and sending the graphics block by block back to the Nintendo. Sweet!

The second video talks about how he pulled this off in detail. We especially liked his approach to an epic hack: spend at least a day trying to prove that it’s impossible, and when you’ve eliminated all of the serious show-stoppers, you know that there’s a good chance that it’ll work. Then, get to work. We also learned that there were capacitors that looked identical to resistors used in mid-80s Japan.

These are long videos, and the first one ends with some wild speculation about how a similar human-brain augmentation could take a similar approach, replacing our “memories” with computed data on the fly. (Wait, what?!? But a cool idea, nonetheless.) There’s also another theme running through the first video about humor, but frankly we didn’t get the joke. Or maybe we just don’t know what’s funny. Comments?

None of that matters. A SNES game was played in an NES by pushing modified graphics from a “ROM” cartridge in real-time. And that’s awesome!

If you want more Nintendo-in-Nintendo goodness, check out this NES ROM that’s also a zip file that contains its own source code. If you compile the source, you get the zip file, which if you unzip gives you the source to compile. Right?

Continue reading “Reverse-Emulating NES: Nintendception!”

Counting Bees With A Raspberry Pi

Even if keeping bees sounds about as wise to you as keeping velociraptors (we all know how that movie went), we have to acknowledge that they are a worthwhile thing to have around. We don’t personally want them around us of course, but we respect those who are willing to keep a hive on their property for the good of the environment. But as it turns out, there are more challenges to keeping bees than not getting stung: you’ve got to keep track of the things too.

Keeping an accurate record of how many bees are coming and going, and when, is a rather tricky problem. Apparently bees don’t like electromagnetic fields, and will flee if they detect them. So putting electronic measuring devices inside of the hive can be an issue. [Mat Kelcey] decided to try counting his bees with computer vision, and so far the results are very promising.

After some training, a Raspberry Pi with a camera can count how many bees are in a given image to within a few percent of the actual number. Getting an accurate count of his bees allows [Mat] to generate fascinating visualizations about his hive’s activity and health. With real-world threats such as colony collapse disorder, this type of hard data can be crucial.

This is a perfect example of a hack which might not pertain to many of us as-is, but still contains a wealth of information which could be applicable to other projects. [Mat] goes into a fantastic amount of detail about the different approaches he tried, what worked, what didn’t, and where he goes from here. So far the only problem he’s having is with the Raspberry Pi: it’s only able to run at one frame per second due to the computational requirements of identifying the bees. But he’s got some ideas to improve the situation.

As it so happens, we’ve covered a few other methods of counting bees in the past, though this is the first one to be entirely vision based. Interestingly, this method is similar to the project to track squirrels in the garden. Albeit without the automatic gun turret part.

Boozer Tells The Internet How Much You Drink (If You Want It To)

Over the past few years, Reddit user [callingyougoulet] has created Boozer, a DIY beer dispenser that keeps track of how much of your brew you have left in your kegs. Installed in a Keezer (a freezer that contains beer kegs and faucets) [callingyougoulet]’s dispenser uses a Raspberry Pi to keep track of things. A series of flow sensors determine how much liquid has passed through them and, when the drink is poured, can calculate how much you poured and how much you have left.

Starting with a chest freezer, [callingyougoulet] built a nice wooden surround as well as installed a tower on top to hold the faucets. The top of the freezer has nice granite tiles covering it, and some LED accent lighting adds to the end product. However, taking the granite off in order to get at the kegs inside takes some time (about 20 minutes.)

Inside the freezer is the Raspberry Pi and four flow sensors, each one connected to a GPIO port on the Pi. After some calibration, the Python code running on the Pi can calculate a pretty close estimate of the amount of liquid poured. There’s also a temperature sensor in the freezer, so that you can tell how cool your beer is.

If the build had stopped there, it would have been a great project as-is, but [callingyougoulet] added twitter, Slack and MQTT outputs as options, so that a home automation system (or the entire internet) can tell how much and when you’ve been drinking and, more importantly, you can know how much is left in your kegs! There are some very cool keg cooling builds on the site, such as, a kegerator built from the ground up, and a very elegant kegerator built on the cheap check them out for ideas!

Via Reddit.

Magic Mirror Tirelessly Indulges Children’s Curiousity

[pepelepoisson]’s Miroir Magique (“Magic Mirror”) is an interesting take on the smart mirror concept; it’s intended to be a playful, interactive learning tool for kids who are at an age where language and interactivity are deeply interesting to them, but whose ceaseless demands for examples of spelling and writing can be equally exhausting. Inspiration came from his own five-year-old, who can neither read nor write but nevertheless has a bottomless fascination with the writing and spelling of words, phrases, and numbers.

Magic Mirror is listening

The magic is all in the simple interface. Magic Mirror waits for activation (a simple pass of the hand over a sensor) then shows that it is listening. Anything it hears, it then displays on the screen and reads back to the user. From an application perspective it’s fairly simple, but what’s interesting is the use of speech-to-text and text-to-speech functions not as a means to an end, but as an end in themselves. A mirror in more ways than one, it listens and repeats back, while writing out what it hears at the same time. For its intended audience of curious children fascinated by the written and spoken aspects of language, it’s part interactive toy and part learning tool.

Like most smart mirror projects the technological elements are all hidden; the screen is behind a one-way mirror, speakers are out of sight, and the only inputs are a gesture sensor and a microphone embedded into the frame. Thus equipped, the mirror can tirelessly humor even the most demanding of curious children.

[pepelepoisson] explains some of the technical aspects on the project page (English translation link here) and all the code and build details are available (in French) on the project’s GitHub repository. Embedded below is a demonstration of the Magic Mirror, first in French then switching to English.

Continue reading “Magic Mirror Tirelessly Indulges Children’s Curiousity”