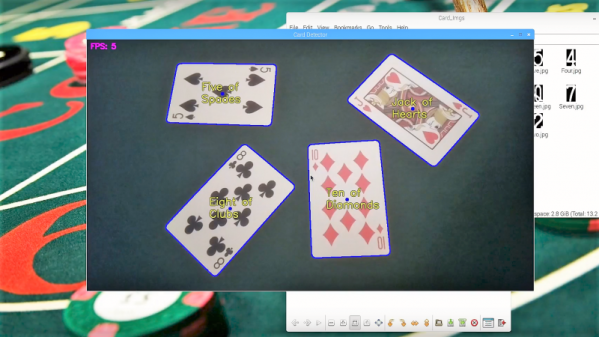
Security camera detecting a human

Motion Detecting Camera Recognizes Humans Using The Cloud

[Mark West] and his wife had a problem, they’d been getting unwanted guests in their garden. Mark’s solution was to come up with a motion activated security camera system that emails him when a human moves in the garden. That’s right, only a human. And to make things more interesting from a technical standpoint, he does much of the processing in the cloud. He sends the cloud a photo with something moving in it, and he’s sent an email only if it has a human in it.

Continue reading “Motion Detecting Camera Recognizes Humans Using The Cloud”

Open Your Garage Door With Your Smartphone

The eternal enemy of [James Puderer]’s pockets is anything that isn’t his smartphone. When the apartment building he resides in added a garage door, the forces of evil gained another ally in the form of a garage door opener. So, he dealt with the insult by rigging up a Raspberry Pi to act as a relay between the opener and his phone.

The crux of the setup is Firebase Cloud Messaging (FCM) — a Google service that allows messages to be sent to devices that generally have dynamic IP addresses, as well as the capacity to send messages upstream, in this case from [Puderer]’s cell phone to his Raspberry Pi. After whipping up an app — functionally a button widget — that sends the command to open the door over FCM, he set up the Pi in a storage locker near the garage door and was able to fish a cable with both ethernet and power to it. A script running on the Pi triggers the garage door opener when it receives the FCM message and — presto — open sesame.

Continue reading “Open Your Garage Door With Your Smartphone”

Hackaday Links Column Banner

Hackaday Links: January 29, 2017

A 3D printer and laser cutter were cited as cause in two deaths. A couple (and two cats) were found dead in their apartment this week. The cause of death was carbon monoxide poisoning. Police and the gas company investigated the residence and found no other source of carbon monoxide besides a 3D printer and a laser cutter. Be sure to check out the people who know more about these deaths than the people who actually investigated these deaths in the comments below. In the mean time, get a CO detector. It’s nasty stuff.

At CES last this month, Lulzbot unleashed the MOARstruder. It’s an extruder with a massive, massive, 1.2mm nozzle. [James] from xrobots dot co dot uk just got his hands on the MOARstruder and the initial results are pretty cool. With a 1.2mm nozzle, you can print big parts fast (helpful for [James]’ massive builds), and the parts are stronger. Check out the video for a great hammer vs. printed part test.

We knew this would happen eventually. Pi Blades. Element14 is now offering ‘breakout boards but not quite’ for the full-size Raspberry Pis and Pi HATs. The idea of this product is to package clusters of Pis into an easy-to-use form factor. The Bitscope Blade Quattro, for example, provides power to four Pis. In other news, I own 20% of the world’s supply of vertical SODIMM sockets.

Arbitrary Code Execution On The Nintendo 64. A bit of background is required before going into this. Pokemon Stadium is a game for the N64. It used a Transfer Pak to read the save game data on Pokemon Game Boy cartridges to battle, trade, and organize Pokemon. Additionally, the Pokemon Tower in Pokemon Stadium allows players to play first-gen Game Boy Pokemon games from within an N64 – sort of like the SNES Super Game Boy. By using two Game Boy Pokemon games and two Transfer Paks, arbitrary code can be executed on the N64. Video demo right here. This is really cool, and the next obvious step is a ‘bootloader’ of sorts to allow arbitrary code downloading from controller button presses.

The Travelling Hacker Box is on the move! The original plan for the Travelling Hacker Box was to visit home base for the 2016 Hackaday SuperConference, then depart to foreign lands beginning with Canada, Greenland, Europe, Africa, Asia, Oceana, and the other America. After the SuperCon, the box was shipped out to its first recipient in Canada. The box came back. Something with customs. Now, the Travelling Hacker Box is on the move again. The plan is still the same, it’s just delayed a month or two. If you want to check out the future travels of the Travelling Hacker Box, here you go.

Bandsaw Tension Gauge Uses Raspberry Pi And Load Cell

No matter what material you’re cutting, getting the blade tension right is one of the keys to quality cuts on the bandsaw. Unfortunately, most bandsaws come with only a rudimentary tension gauge, and while there are plenty of tricks for measuring blade tension indirectly, nothing beats a digital blade tension gauge for repeatable results.

Despite being an aftermarket accessory for his beefy Hitachi CB-75F bandsaw, [Stephen B. Kirby]’s Pi-based tension guide looks like an OEM product. Housed in a sturdy case and sporting a sealed membrane keypad and four-line LCD display, the interface electronics are pretty straightforward. The tricky bit is sensing the amount of tension on the bandsaw blade. For that task, [Stephen] mounted a load cell in place of the original tensioning spring. A few adapters helped that job, and with a little calibration, the gauge is capable of displaying the tension by measuring the force over the cross-sectional area of the current blade.

We really like it when electronics can bring a new level of precision to old-school hardware, whether it’s a simple DRO for a manual lathe or a more accomplished build like [Stephen]’s. Sometimes adding new silicon can make old iron a little easier to use.

Raspberry Pi SDR

[Chris D] noticed that the excellent software defined radio (SDR) software gqrx will run on the Raspberry Pi now. So he married a Raspberry Pi 3, a touchscreen, an RTL-SDR dongle, and an upconverter to make a very nice receiver setup. You can see the receiver in action below.

The video is a little light on build details, but there is a shot of the setup with the pieces labeled, and you should be able to figure it out from there. Of course, gqrx works with lots of different SDR devices so you might have to make adjustments depending on what you use (for example, many of the supported dongles won’t need the upconverter that [Chris] uses).

Continue reading “Raspberry Pi SDR”

Objectifier: Director Of Domestic Technology

book-example[Bjørn Karmann]’s Objectifier is a device that lets you control domestic objects by allowing them to respond to unique actions or behaviour, using machine learning and computer vision. The Objectifier can turn on a table lamp when you open a book, and turn it off when you close the book. Switch on the coffee maker when you place the mug next to the pot, and switch it off when the mug is removed. Turn on the belt sander when you put on the safety glasses, and stop it when you remove the glasses. Charge the phone when you put a banana in front of it, and stop charging it when you place an apple in front of it. You get the drift — the possibilities are endless. Hopefully, sometime in the (near) future, we will be able to interact with inanimate objects in this fashion. We can get them to learn from our actions rather than us learning how to program them.

The device uses computer vision and a neural network to learn complex behaviours associated with your trigger commands. A training mode, using a phone app, allows you to train it for the On and Off actions. Some actions require more human effort in training it — such as detecting an open and closed book — but eventually, the neural network does a fairly good job.

The current version is the sixth prototype in the series and [Bjørn] has put in quite a lot of work refining the project at each stage. In its latest avatar, the device hardware consists of a Pi Zero, a Raspberry-Pi camera module, an SMPS power brick, a relay block to switch the output, a 230 V plug for input power and a 230 V socket outlet for the final output. All the parts are put together rather neatly using acrylic laser cut support pieces, and then further enclosed in a nice wooden enclosure.

On the software side, all of the machine learning part is taken care of using “Wekinator” — a free, open source software that allows building musical instruments, gestural game controllers, computer vision or computer listening systems using machine learning. The computer vision is handled via Processing. All the code is wrapped using openframeworks, with ml4A providing apps for working with machine learning.

All of the above is what we could deduce looking at the pictures and information on his blog post. There isn’t much detail about the hardware, but the pictures are enough to tell us all. The software isn’t made available, but maybe this could spur some of you hackers into action to build another version of the Objectifier. Check out the video after the break, showing humans teaching the Objectifier its tricks.

Continue reading “Objectifier: Director Of Domestic Technology”

Pikelet – A Pi-Zero PC

There are many uses for an old 10 Mbps Ethernet hub besides using it as a speed-bump in your network. (No fun in that!) [thinkerzone] decided to gut an old EN104 Bay Networks ‘Netgear Hub’ to re-purpose the solid steel case as a Raspberry Pi Zero PC housing. The project, which [thinkerzone] called Pikelet, aims to be an ‘IoT server’ with the feel of a PC. Note: a PC, not a Gameboy. In his hackaday.io project, he describes the minimum set of features for the Pikelet.

  • Power button – PCs need a power button
  • Power and Status LEDS – Blue for power, RGB for the programmable status LED
  • USB ports – using a Zero4U hub to expand the Pi Zero usb ports
  • Ethernet – using a ENC28J60 module was the original idea, but it burned while making the project
  • HDMI access – the case should ensure the HDMI port is accessible
  • Minimum storage – a 32 Gb SD card was found to be “enough to be useful”
  • UART – via a FT232 module
  • WiFi – a WiFi dongle with an external antenna, since the metal case would degrade the signal if it was inside, so a WiFi hat was not an option

On the software side, it runs the latest version of Raspbian with some additional configuration for the UART port and status LED pins.

In the project logs we can follow along as [thinkerzone] battles through the implementation of the project and, well, Murphy’s Law.  One of the things that a descriptive log is useful for is that it serves as a reminder that an apparently simple project can have a lot of setbacks. Sometimes an easy-to-describe project is quite a challenge to implement. And it can be annoying when explaining the challenges to other (non hackers/makers) persons and they go: “That’s just connecting some wires…”

Is the feeling familiar? It’s nice to see someone else going through it too.