Multiplexing Pi Cameras

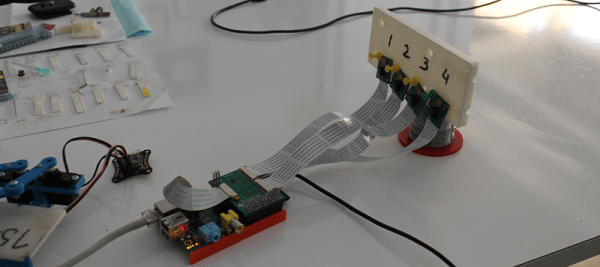
The Raspberry Pi and its cool camera add-on is a great way to send images and video up to the Intertubes, but what if you want to monitor more than one scene? The IVPort can multiplex up to sixteen of these Raspi camera modules, giving the Pi sixteen different views on the world and a ridiculously high stack of boards connected to the GPIO header.

The Raspberry Pi’s CSI interface uses high-speed data lines from the camera to the CPU to get a lot of image data quickly. Controlling the camera, on the other hand, uses regular old GPIOs, the same kind that are broken out on the header. We’ve seen builds that reuse these GPIOs to blink a LED, but with a breakout board with additional camera connectors, it’s possible to use normal GPIO lines in place of the camera port GPIOs.

The result is a stackable extension board that splits the camera port in twain, allowing four Raspi cameras to be connected. Stack another board on top and you can add four more cameras. A total of four of these boards can be stacked together, multiplexing sixteen Raspberry Pi cameras.

As far as the obvious, ‘why’ question goes, there are a few interesting things you can do with a dozen or so computer controlled cameras. The obvious choice would be a bullet time camera rig, something this board should be capable of, given its time to switch between channels is only 50ns. Videos below.

Continue reading “Multiplexing Pi Cameras”

Thermostat

Custom Raspberry Pi Thermostat Controller

Thermostats can be a pain. They often only look at one sensor in a multi-room home and then set the temperature based on that. The result is one room that’s comfortable and other rooms that are not. Plus, you generally have to get up off the couch to change the temperature. In this day and age, who wants to do that? You could buy an off-the-shelf solution, but sometimes hacking up your own custom hardware is just so much more fun.

[redditseph] did exactly that by modifying his home thermostat to be controlled by a Raspberry Pi. The temperature is controlled by a simple web interface that runs on the Pi. This way, [redditseph] can change the temperature from any room in his home using a computer or smart phone. He also built multi-sensor functionality into his design. This means that the Pi can take readings from multiple rooms in the home and use this data to make more intelligent decisions about how to change the temperature.

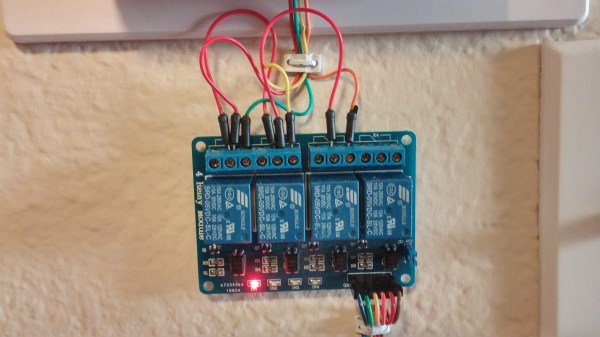
The Pi needed a way to actually talk to the thermostat. [redditseph] made this work with a relay module. The Pi flips one side of the relays, which then in turn switches the buttons that came built into the thermostat. The Pi is basically just emulating a human pressing buttons. His thermostat had terminal blocks inside, so [redditseph] didn’t have to risk damaging it by soldering anything to it. The end result is a functional design that has a sort of cyberpunk look to it.

[via Reddit]

Raspis in Near Space

Throwing Pis Into The Stratosphere

It’s always exciting to see the photos from High Altitude Ballooning (HAB) outings. While it’s no surprise that the Raspi is a popular choice—low cost, convenient USB jacks, etc.—this is the first build we’ve seen that uses an OLED during the trip to show real-time data on-screen to be picked up by the on-board webcam. (Though you may have to squint to see it at the bottom middle of the above image).

[Fabrice’s] payload made it to 26,000m, and the screen he chose, an ILSOFT OLED, performed admirably despite the extreme conditions suffered (temperatures can reach -50C). The last time we saw a near-space Raspi payload was a couple of years ago, when [Dave Akerman] was closing in on UK balloon altitude records. [Dave] hasn’t stopped launching balloons, either, testing new trackers and radio modules, as well as his most recent build that sent a Superman action figure to the skies—all recorded in glorious HD.

Check out both [Dave] and [Fabrice’s] blogs for loads of pictures documenting the latest in High Altitude Ballooning, and stay with us after the jump for a quick video of [Fabrice’s] OLED in action.

Continue reading “Throwing Pis Into The Stratosphere”

"Stomach Shot" lets you see through your zombie corpse.

“Stomach Shot” Halloween Costume

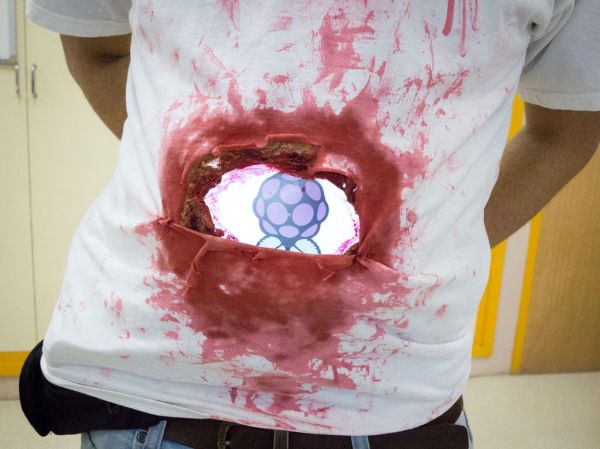
Halloween may have come and gone, but [Luis] sent us this build that you’ll want to check out. An avid Walking Dead fan, he put in some serious effort to an otherwise simple bloody t-shirt and created this see-through “stomach shot” gunshot wound.

The project uses a Raspi running the Pi Camera script to feed video from a webcam on the back of his costume to a 7″ screen on the front. [Luis] attached the screen to a GoPro chest harness—they look a bit like suspenders—to keep it centered, then built up a layer of latex around the display to hide the hard edges and make it more wound-like. Power comes from a 7.4V hobby Lipo battery plugged into a 5V voltage converter.

After ripping a small hole in the back of his t-shirt for the webcam and a large hole in the front for the screen, [Luis] applied the necessary liberal amount of fake blood to finish this clever shotgun blast effect.

Stereo Vision And Depth Mapping With Two Raspi Camera Modules

The Raspberry Pi has a port for a camera connector, allowing it to capture 1080p video and stream it to a network without having to deal with the craziness of webcams and the improbability of capturing 1080p video over USB. The Raspberry Pi compute module is a little more advanced; it breaks out two camera connectors, theoretically giving the Raspberry Pi stereo vision and depth mapping. [David Barker] put a compute module and two cameras together making this build a reality.

The use of stereo vision for computer vision and robotics research has been around much longer than other methods of depth mapping like a repurposed Kinect, but so far the hardware to do this has been a little hard to come by. You need two cameras, obviously, but the software techniques are well understood in the relevant literature.

[David] connected two cameras to a Pi compute module and implemented three different versions of the software techniques: one in Python and NumPy, running on an 3GHz x86 box, a version in C, running on x86 and the Pi’s ARM core, and another in assembler for the VideoCore on the Pi. Assembly is the way to go here – on the x86 platform, Python could do the parallax computations in 63 seconds, and C could manage it in 56 milliseconds. On the Pi, C took 1 second, and the VideoCore took 90 milliseconds. This translates to a frame rate of about 12FPS on the Pi, more than enough for some very, very interesting robotics work.

There are some better pictures of what this setup can do over on the Raspi blog. We couldn’t find a link to the software that made this possible, so if anyone has a link, drop it in the comments.

jackolantern

Simple LED Project To Spice Up Your Halloween Party

[Paul’s] project is a great example of how you can take a simple project and turn it into something more interesting. He built himself a jack-o-lantern with an Internet controlled RGB LED embedded inside.

[Paul] first wired up an RGB LED to a Raspberry Pi. He was sure to wire up each color using a 100ohm resistor to prevent the LED from burning out. The web interface was written in Python. The interface is pretty simple. It consists of three text fields. The user enters a value between 0 and 255 for each of the three LED colors. The program then lights up the LED accordingly.

[Paul] realized he would need a diffuser for the LED in order to really see the blended colors properly. Instead of using a common solution like a ping-pong ball, he opted to get festive and use a plastic jack-o-lantern. [Paul] removed the original incandescent bulb from the lantern and mounted the LED inside instead. The inside of the pumpkin is painted white, so it easily diffuses the light. The result is a jack-o-lantern that glows different colors as defined by his party guests. Be sure to check out the demonstration video below.

Farmbot Progress

THP Semifinalist: Farmbot

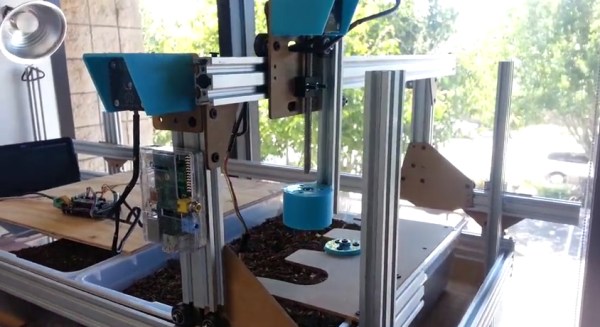
The FarmBot team has been pretty busy with their CNC Farming and Gathering machine. The idea is to automate the farming process with precise deployment of tools: plows, seed injection, watering, sensors, etc. An Arduino with an added RAMPS handles the movement, and a Raspi provides internet connectivity. Their prototype has already experienced four major iterations: the first revision addressed bigger issues such as frame/track stability and simplification of parts. Now they’re locking down the specifics on internet-of-things integration and coding for advanced movement functions.

The most recent upgrade provides a significant improvement by overhauling the implementation of the tools. Originally, the team envisioned a single, multi-function tool head design that carried everything around all the time. Problem is, the tool that’s in-use probably works best if it’s lower than the others, and piling them all onto one piece spells trouble. The solution? a universal tool mounting system, of course. You can see them testing their design in a video after the break.

If the FarmBot progress isn’t impressive enough—and admittedly we’d have called project lead [Rory Aronson] crazy for attempting to pull this off…but he did it—the FarmBot crew started and successfully funded an entire sub-project through Kickstarter. OpenFarm is an open-source database set to become the go-to wiki for all things farming and gardening. It’s the result of [Rory] encountering an overwhelming amount of generic, poorly written advice on plant growing, so he just crowdsourced a solution. You know, no sweat.


SpaceWrencherThe project featured in this post is a semifinalist in The Hackaday Prize.

Continue reading “THP Semifinalist: Farmbot”