Choosing The Right RTC For Your Project

When it comes to measuring time on microcontrollers, there’s plenty of ways to go about things. For most quick and dirty purposes, such as debounce delays or other wait states, merely counting away a few cycles of the main clock will serve the purpose.  Accurate to the tens of milliseconds, they get the average utility jobs done without too much fuss.

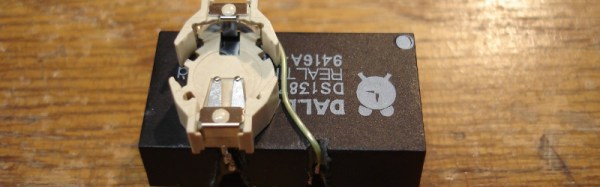
However, many projects are far more exacting in their requirements. When you’re building a clock, or a datalogger, or anything that relies on a stable sense of passing time for more than a few minutes, you’ll want a Real Time Clock. So called due to their nature of dealing with real time, as we humans tend to conceive it, these devices take it upon themselves to provide timekeeping services with a high degree of accuracy. We’ve compiled a guide to common parts and their potential applications so you can get things right the first time, every time.

Continue reading “Choosing The Right RTC For Your Project”

Minimalist Magnetic Minute Minder Mesmerizes

Timepieces are cool no matter how simplistic or granular they are. Sometimes its nice not to know exactly what time it is down to the second, and most of the really beautiful clocks are simple as can be. If you didn’t know this was a clock, it would still be fascinating to watch the bearings race around the face.

This clock takes design cues from the Story clock, a visual revolution in counting down time which uses magnetic levitation to move a single bearing around the face exactly once over a duration of any length as set by the user. As a clock, it’s not very useful, so there’s a digital readout that still doesn’t justify the $800 price tag.

[tomatoskins] designed a DIY version that’s far more elegant. It has two ball bearings that move around the surface against hidden magnets — an hour ball and a minute ball. Inside there’s a pair of 3D-printed ring gears that are each driven by a stepper motor and controlled with an Arduino Nano and a real-time clock module. The body is made of plywood reclaimed from a bed frame, and [tomatoskins] added a walnut veneer for timeless class.

In addition to the code, STLs, and CAD files that birthed the STLs, [tomatoskins] has a juicy 3D-printing tip to offer. The gears had to be printed in interlocked pieces, but these seams can be sealed with a solution of acetone and plastic from supports and failed prints.

If you dig minimalism but think this clock is a bit too vague to read, here’s a huge digital clock made from small analog clocks.

LEGO My Colorful Custom Clock

[Sofia] spent a lot of time looking around for the perfect LEGO clock. Eventually, she realized that the perfect LEGO clock is, of course, the one you build yourself. So if you find yourself staring at the same old boring clock, contemplating time and the meaning of time itself, why not spend some time making a new timepiece?

You probably already had the LEGO out (no judgment here). This build doesn’t take a whole lot of building blocks — just a microcontroller, a real-time clock module, some LED matrices to display the digits, shift registers if they’re not already built into the matrices, and a pair of buttons for control. [Sofia] used an Arduino Nano, but any microcontroller with enough I/O ought to work. Everybody needs a colorful new way to block out their time.

We love the way this clock looks, especially the transparent panels in front of the LED panels. Given the countless custom pieces out there from all the special sets over the years, we bet you could come up with some really interesting builds.

If your kid is too young to tell time, try building a kid-friendly clock to give them segmented structure.

Via r/duino

Hackaday Podcast 007: Everything Microcontrollers, Deadly Clock Accuracy, CT X-Rays, Mountains Of E-Waste

Elliot Williams and Mike Szczys look at all that’s happening in hackerdom. This week we dive deep into super-accurate clock chips, SPI and microcontroller trickery, a new (and cheap) part on the microcontroller block, touch-sensitive cloth, and taking a home X-ray to the third dimension. We’re saying our goodbyes to the magnificent A380, looking with skepticism on the V2V tech known as DSRC, and also trying to predict weather with automotive data. And finally, what’s the deal with that growing problem of electronic waste?

Links for all discussed on the show are found below. As always, join in the comments below as we’ll be watching those as we work on next week’s episode!

Take a look at the links below if you want to follow along, and as always, tell us what you think about this episode in the comments!

Direct download (60 MB or so.)

Continue reading “Hackaday Podcast 007: Everything Microcontrollers, Deadly Clock Accuracy, CT X-Rays, Mountains Of E-Waste”

Hacking A 30-year-old Russian VFD

Reddit user [InThePartsBin] found some VFDs (Vacuum Fluorescent Displays) on an old PCB on eBay. The Russian boards date from 1987 and have a bunch of through-hole resistors, transistors and a some mystery ICs, plastic wraps around the legs and the top of the tube is held steady by a rubber grommet (the tip itself goes through a hole in a board mounted perpendicular to the main board.) Being the curious kind of person we like, and seeing the boards weren’t too expensive, he bought some in order to play around with to see if he could bring them back to life.

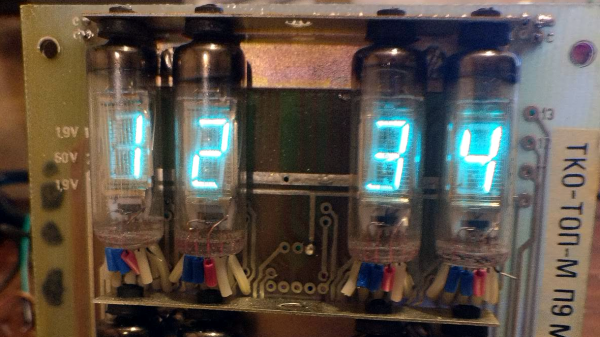
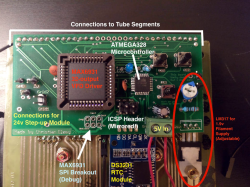
After getting the VFDs lighting up and figuring out the circuitry on the back, [InThePartsBin] decided that a clock was the best thing to build out of it. It was decided that a specialized VFD driver chip was the easiest way to make the thing work, so a MAX6934 was ordered. To give the clock some brains, an ATmega328 was recruited and to keep time, [InThePartsBin] had some DS3231 real-time clock modules left over from a previous project, so they were recruited as well. A daughterboard was designed to sit on the back of the vintage board and hold the ‘328 and the VFD driver chip.

Once [InThePartsBin] soldered on the components it was time to fire it up and send 1’s to the driver to turn on all the segments on all the tubes. Success! The only thing that [InThePartsBin] has left to do is write the code for the clock, but all the segments and tubes are controllable now, so the hardware part is done. There are other VFD clock projects on the site: Check out this one, or this one, and bask in the beautiful steel-blue glow.

Via Reddit.

A New Battery For A Potted Clock Module

If you did much dismantling of PCs back in the 1980s and 1990s, you might be familiar with the Dallas Semiconductor range of potted real-time clock modules. These were chunky dual-in-line devices containing clock and non-volatile RAM chips, a crystal, and a lithium battery. The battery was good for about a decade, which was fine for most PCs of the day because the majority of desktop computers are replaced long before that deadline.

[Glitch], however has an industrial single-board computer with a 486 processor that has had a life much more prolonged than its desktop siblings due to its application. The battery in the onboard Dallas DS1387 has long ago expired, and since these devices are so long out of production to be unavailable, he’s had to improvise.

Improving on some previous documented projects he found through an internet search, he carefully ground away the potting compound to reveal a couple of the battery conductors, cut them with a PCB drill, and mounted a lithium cell holder on the top of the device with some tidily soldered Kynar wires to bring in the power. A CR1225 cell was used rather than the ubiquitous CR2032, as space was at a premium in the width of the ISA card form factor.

The potted RTC module is something of a rare device these days, but if you have a retro computer containing one this seems to be a very useful piece of work to bring it back to life. We’ve covered another similar one with a slightly larger battery in the past.

Making Use Of Stellaris/Tiva Real-Time Clock

If you’re at all like us, or like [Vadim], you’ve got a stash of development boards in a shoebox on a shelf in your closet. If you’re better organized that we are, it might even be labeled “dev boards”. (Ah well, that’s a project for another day.) Anyway, reach into your box and pull one out, and put it to use. Do something trivial if you need to, but a dev board that’s driving a silly blinker is better than a dev board sitting in the dark.

[Vadim]’s good example to us all is going to serve as the brains for an automated plant watering system. That’s a low-demand application where the microcontroller can spend most of the time sleeping. [Vadim]’s first step, then was to get a real-time clock working with the hibernation mode. There’s working code inline in his blog.

royale-with-cheese-pulp-fiction-2_12-movie-clip-1994-hd-6pkq_ebhxj4mkv-shot0001
“I don’t know, I didn’t go into Burger King.”

If you use Arduino, you’ll feel at home in the Energia ecosystem. But it’s like ordering a Quarter Pounder with Cheese in Paris: Energia is a Royale with Cheese (YouTube) — it’s the little differences. And maybe that’s the point of the exercise; it’s always a good thing to try out something new, even if it’s only minimally different.

So grab that unused dev board off the shelf, struggle through the unfamiliar development environment and/or toolchain, but remember to keep an eye out for the sweet little differences. The more tools that you’re familiar with, the more solutions will spring to mind when you’re hacking on your next project.