In the constant pursuit of innovation, it’s easy to overlook the wisdom of the past. The scientific method and modern research techniques have brought us much innovation, which can often lead us to dismiss traditional cultural beliefs.
However, sometimes, there are still valuable kernels of truth in the folklore of yesteryear. This holds true in a medical study from Finland, which focused on the traditional use of spruce resin to treat chronic wounds, breathing new life into an age-old therapy.
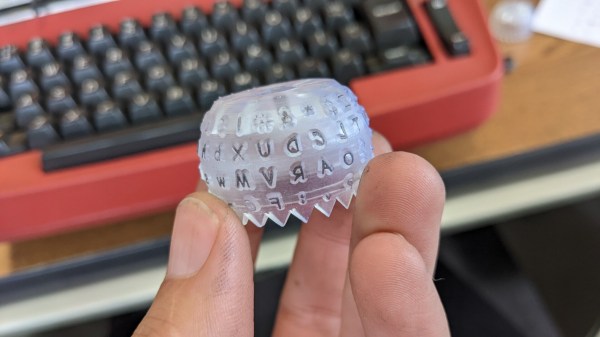
IBM’s Selectric line of typewriters were quite popular in the 1960s, thanks in part to an innovation called the typeball which allowed for easy font changes on a single machine. Unfortunately, as if often the case when specialized components are involved, it’s an idea that hasn’t aged particularly well. The Selectric typewriters are now around 60 years old and since IBM isn’t making replacement parts, those restoring these machines have had to get somewhat creative like using a 3D printer to build new typeballs.
It sounds like it would be a simple, but much like the frustration caused with modern printers, interfacing automated computer systems with real-world objects like paper and ink is not often as straightforward as we would like. The main problem is getting sharp edges on the printed characters which is easy enough with metal but takes some more finesse with a printed plastic surface. For the print, each character is modelled in OpenSCAD and then an automated process generates the 3D support structure that connects the character to the typeball.
This process was easier for certain characters but got more complicated for characters with interior sections or which had a lot of sharp angles and corners. Testing the new part shows promise, although the plastic components will likely not last as long as their metal counterparts. Still, it’s better than nothing.
Regular Hackaday readers may recall that the ability to 3D print replacement Selectric typeballs has been on the community’s mind for years. When we last covered the concept in 2020 we reasoned that producing them on resin printers might be a viable option, and in the end, that does indeed seem to have been the missing element. In fact, this design is based on that same one we covered previously — it’s just taken this long for desktop resin 3D printing technology to mature enough.
The latest update brings a new nozzle, an improved light source, and changes to the formula of the resin. The nozzle and light source improvements hinge on conical lenses that convert the laser beams from a spot to a ring. The initial nozzles looked like the business end of a syringe, but this wasn’t very stable. The new video shows a conventional nozzle which also had some issues. This resulted in a custom-made nozzle that solved all the issues with the conventional nozzle and the syringe tips.
The resin formula is particularly crucial. The second attempt used resin with glass beads to give thickness. That wasn’t without problems, though, so it was switched this time with fused silica, as suggested by some comments on a previous video. They also used aggressive mixing and air removal. The consistency of the previous resins was that of a paste, but according to the video, the new mixture is more like a gel.
At some point, things started going badly. There were several equipment failures. Exasperated, he was ready to give up and was editing the video when he had an epiphany. We’re glad he didn’t give up because the new results are pretty impressive.
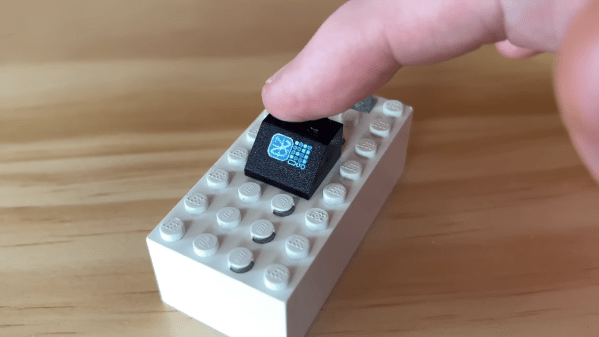
It’s always great when we get a chance to follow up on a previous project with more information, or further developments. So we’re happy that [“Ancient” James Brown] just dropped a new video showing the assembly of his Lego brick with a tiny OLED screen inside it. The readers are too, apparently — we got at least half a dozen tips on this one.
We’ve got to admit that this one’s a real treat, with a host of interesting skills on display. Our previous coverage on these bedazzled bricks was disappointingly thin on details, and now the original tweets even seem to have disappeared entirely. In case you didn’t catch the original post, [James] found a way to embed a microcontroller and a remarkably small OLED screen into a Lego-compatible brick — technically a “slope 45 2×2, #3039” — that does a great job of standing in for a tiny computer monitor.
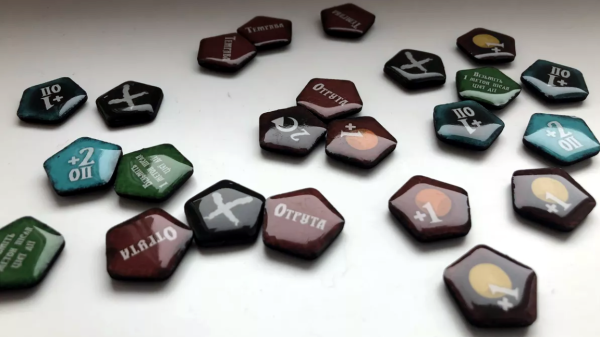
Tabletop games and cardboard tokens go hand-in-hand for a good reason: they are economical and effective. However, their tactile attributes leave a little to be desired. There’s something really great about high-quality pieces possessing a shiny, pleasing smoothness and click-clack handling that cardboard simply can’t deliver, but that all changes with [Dzhav]’s simple method for converting cardboard tokens into deluxe versions of themselves with a little work and a resin coating.
The result is a token with a crystal-clear, smooth, and slightly-convex coating of hardened resin on it. They feel (and sound) like plastic, rather than cardboard. The resin used is a two-part clear jewelry resin, used for casting things like pendants. It benefits from a long working time and unlike UV-cured resin (like the SLA 3D printer resin) it won’t be affected by light.
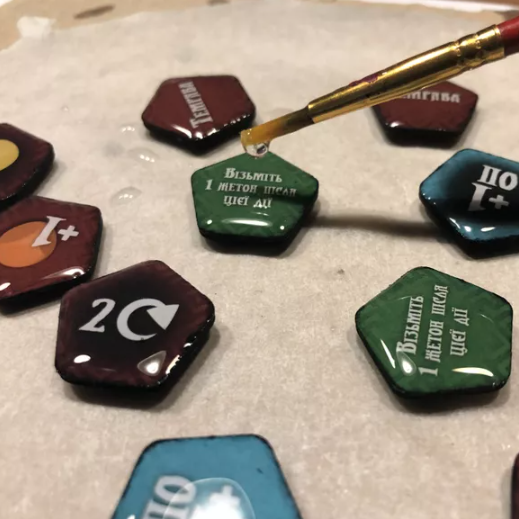
Careful application of resin relies on surface tension to prevent messes.
Like with most things, good results come from careful preparation and technique. [Dzhav] suggests preparing the tokens by sanding the edges completely smooth with fine sandpaper, then using a black marker to color them. Then, tokens are coated one side at a time with a paintbrush and correctly-mixed resin: while holding a token down with a toothpick, resin is brushed right to (but not over) the edges. Then, additional resin can be dropped in the center of the token, and gravity and surface tension will work together to ensure an even coating that doesn’t drip.
After the resin has had plenty of time to cure, the tokens are flipped over and the process repeated. The end result are tokens with both sides coated in a nice, smooth, ever-so-slightly-convex shield of resin.
They look fantastic, and sound even better. Turn up your volume and play the two-second video embedded below to listen for yourself. And when you’re ready for another gamer that didn’t settle for what was in the box, check out this redesigned Catan version.
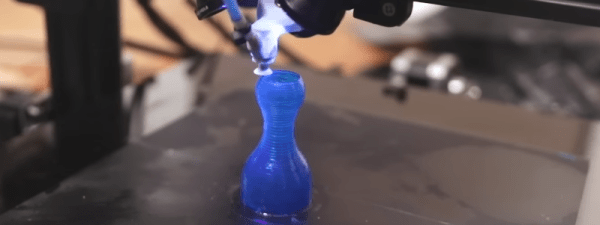
We aren’t sure what made him think of it, but [Proper Printing] decided to make an FDM printer lay down resin instead of filament. Why? We still aren’t sure, but we admire the effort nonetheless. In principle, extruding resin shouldn’t be much different than other liquid things you print like icing or concrete. Then you’d need to UV-cure the viscous liquid quickly. In fact, they wound up making up a paste-like resin using several chemicals and a filler.
Armed with the paste, it would seem like the big obstacles would be over. Instead of part cooling fans, the printer now has two laser heads focused on the print area. Printing in vase mode avoids some problems, but the first few attempts were not very successful.
With a bit of perseverance, the setup did work — for a while. More fine tuning got acceptable results. However, he eventually changed the filler material and got a passable Benchy to print. Nothing to be proud of, but recognizable. Honestly, we were surprised that the laser’s didn’t cure the material still inside the nozzle and cause terrible clogs.
Why put this much effort into doing this? We have no idea. Should you try it? Probably not. Of course, being able to print a paste has its own value. Perhaps delivering glue or solder paste, for example. But you generally won’t need to make tall prints with that kind of material. Then again, we’ve never been opposed to doing something “just because.”
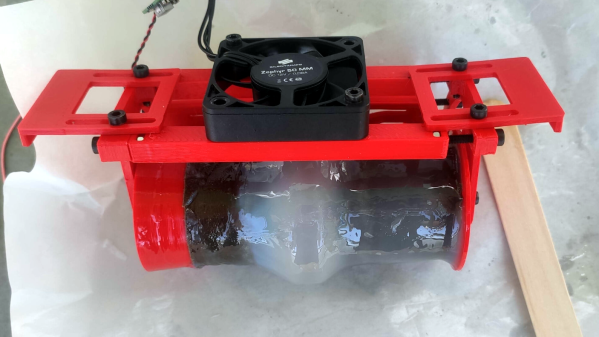
SLA 3D printing with resin typically means rinsing parts with IPA (isopropyl alcohol). That process results in cloudy, used IPA containing a high concentration of dissolved resin. The dual goals of cleaning and reusing IPA are important ones, and we have to say, [Jan Mrázek]’s unusual experiment involving a UV source and slowly-rotating paper tube to extract and cure dissolved resin might look odd, but the results are definitely intriguing.
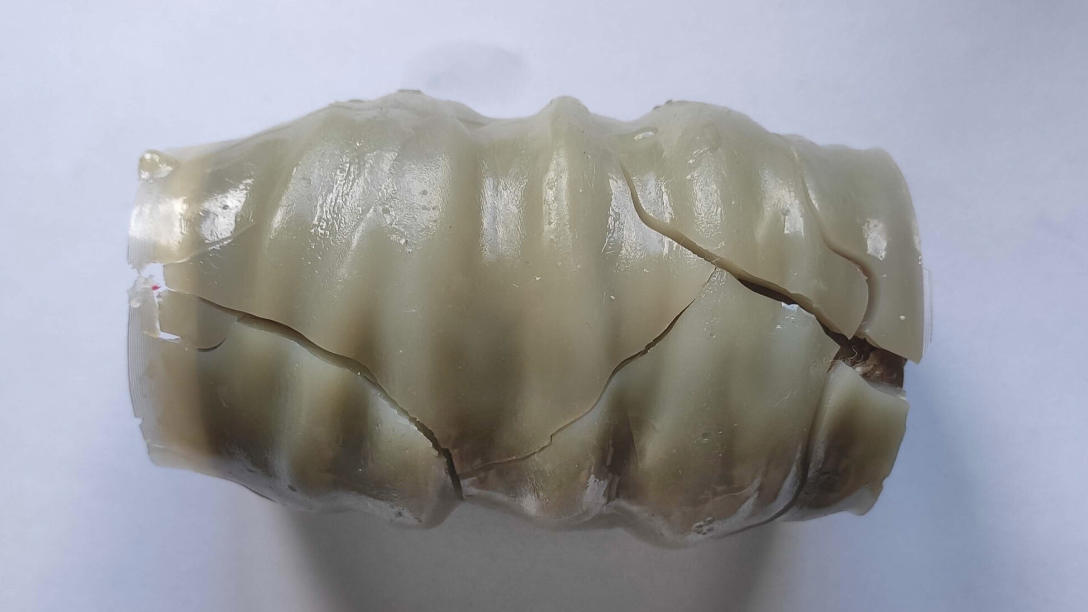
Dissolved resin successfully pulled from IPA and cured onto a cardboard roll. This particular one rotated a bit too quickly, trapping IPA in the curing process and yielding a slightly rubbery wad instead of a hard solid.
The best way to dispose of liquid resin is to cure it into a solid, therefore making it safe to throw away. But what about resin that has been dissolved into a cleaning liquid like IPA? [Jan] felt that there was surely a way to extract the dissolved resin somehow, which would also leave the IPA clean for re-use. His solution? The device shown here, which uses a cardboard tube to pull dissolved resin from an IPA bath and a UV source to cure it onto the tube.
Here’s how it works: the tube’s bottom third sits in dirty IPA, and UV LEDs shine on the top of the tube. The IPA is agitated with a magnetic stirrer for best results. A motor slowly rotates the cardboard tube; dissolved resin gets on the tube at the bottom, UV cures it at the top, and the whole thing repeats. Thin layers of cured resin slowly build up, and after long enough, the roll of cured resin can be thrown away and the IPA should be clean enough for reuse.
So far it’s a pretty successful test of a concept, but [Jan] points out that there are still some rough edges. Results depend on turning the tube at a good rate; turning it too quickly results in IPA trapped with the cured residue. On the plus side, the UV source doesn’t need to be particularly powerful. [Jan] says that Ideally this would be a device one could run in a sealed container, cleaning it over one or two days.
Resin printing is great, but it’s a messy process, so anything that makes it less wasteful is worth checking out. Got any ideas for improving or building on this concept? If so, don’t keep ’em to yourself! Let us know in the comments.