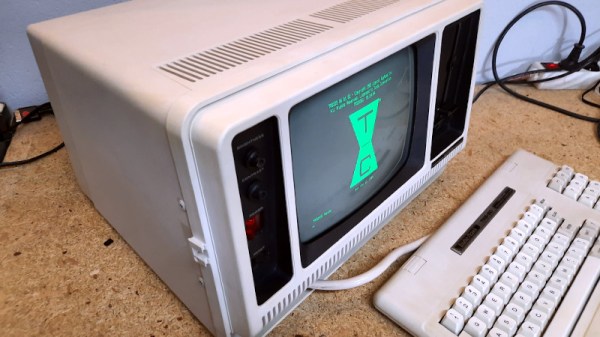
Apollo Comms Flight Hardware Deep Dive

You no doubt recall the incredible Apollo Guidance Computer (AGC) reverse engineering and restoration project featured on the CuriousMarc YouTube channel a few years ago. Well, [Marc] and the team are at it again, this time restoring the Apollo Unified S-Band tracking and communication system flight hardware. As always, the project is well documented, carefully explained, full of problems, and is proceeding slowly despite the lack of documentation.

Like the guidance computer, the Unified S-Band system was pretty innovative for its day — able to track, provide voice communications, receive television signals, and send commands to and monitor the health of the spacecraft via telemetry. The system operates on three frequencies, an uplink containing ranging code, voice and data. There are two downlinks, one providing ranging, voice, and telemetry, the other used for television and the playback of recorded data. All crammed into two hefty boxes totaling 29 kg.

So far, [Marc] has released part 9 of the series (for reference, the Apollo Guidance Computer took 27 parts plus 8 auxiliary videos). There seems to be even less documentation for this equipment than the AGC, although miraculously the guys keep uncovering more and more as things progress. Also random pieces of essential ground test hardware keep coming out of the woodwork. It’s a fascinating dive into not only the system itself, but the design and construction techniques of the era. Be sure to check out the series (part 1 is below the break) and follow along as they bring this system back to life. [Marc] is posting various documents related to the project on his website. And if you missed the AGC project, here’s the playlist of videos, and the team joined us for a Hackaday Chat back in 2020.

Continue reading “Apollo Comms Flight Hardware Deep Dive”

Acid-Damaged Game Boy Restored

The original Game Boy was the greatest selling handheld video game system of all time, only to be surpassed by one of its successors. It still retains the #2 position by a wide margin, but even so, they’re getting along in years now and finding one in perfect working condition might be harder than you think. What’s more likely is you find one that’s missing components, has a malfunctioning screen, or has had its electronics corroded by the battery acid from a decades-old set of AAs.

That latter situation is where [Taylor] found himself and decided on performing a full restoration on this classic. To get started, he removed all of the components from the damaged area so he could see the paths of the traces. After doing some cleaning of the damage and removing the solder mask, he used 30 gauge wire to bridge the damaged parts of the PCB before repopulating all of the parts back to their rightful locations. A few needed to be replaced, but in the end the Game Boy was restored to its former 90s glory.

This build is an excellent example of what can be done with a finely tipped soldering iron while also being a reminder not to leave AA batteries in any devices for extended periods of time. The AA battery was always a weak point for the original Game Boys, so if you decide you want to get rid of batteries of any kind you can build one that does just that.

Continue reading “Acid-Damaged Game Boy Restored”

Game Boy Becomes Super Game Boy With A Pair Of Pis

For the Nintendo aficionados of the 90s, the Super Game Boy was a must-have cartridge for the Super Nintendo which allowed gamers to play Game Boy games on your TV. Not only did it allow four-color dot-matrix gaming on the big screen, but it let you play those favorite Game Boy titles without spending a fortune on AA batteries. While later handhelds like the PSP or even Nintendo Switch are able to output video directly to TVs without issue, the original Game Boy needed processing help from an SNES or, as [Andy West] shows us, it can also get that help from a modern microcontroller.

Testing the design before installing it in the NES case.

The extra processing power in this case comes from a Raspberry Pi Pico which is small enough to easily fit inside of a donor NES case and also powerful enough to handle the VGA directly. For video data input, the Pico is connected to the video pins on the Game Boy’s main board through a level shifter. The main board is also connected to a second Pico which handles the controller input from an NES controller. Some fancy conversion needed to be done at this point because although the controller layouts are very similar, they are handles by the respective consoles completely differently.

With all of the technical work largely out of the way, [Andy] was able to put the finishing touches on the build. These included making sure the power buttons, status LEDs, and reset button all functioned, and restoring the NES case complete with some custom “Game Guy” graphics to match the original design of the Game Boy. We commend the use of original Game Boy hardware in this build as well, which even made it possible for [Andy] and his wife to play a head-to-head game of Dr. Mario through a link cable with another Game Boy. If you’re looking for a simpler way of playing on original hardware without burning a hole in your wallet buying AA batteries, take a look at this Game Boy restoration which uses a Lithium battery instead.

Continue reading “Game Boy Becomes Super Game Boy With A Pair Of Pis”

IBM Cheese Cutter Restoration

For a while now, Mac Pro towers have had the nickname “cheese grater” because of their superficial resemblance to this kitchen appliance. Apple has only been a company since the 70s, though, and is much newer than one of its historic rivals, IBM. In fact, IBM is old enough to have made actual cheese-related computers as far back as the 1910s, and [Hand Tool Rescue] recently obtained one of these antique machines for a complete restoration.

The tool arrived to the restoration workshop in a state so poor that it was difficult to tell what many of the parts on the machine did except for the large cleaver at the top. The build starts with a teardown to its individual parts, cleaning and restoring them to their original luster, machining new ones where needed, and then putting it all back together. The real mystery of this build was what the levers on the underside of the machine were supposed to do, but after the refurbishment it was discovered that these are the way that portions the cheese wheel would be accurately sized and priced before a cut was made.

By placing a section of a wheel of cheese on the machine and inputting its original weight with one of the levers, the second lever is adjusted to the weight of cheese that the customer requested, which rotates the wheel of cheese to the correct position before a cut is made. To us who are spoiled with a world full of electronic devices, a mechanical computer like this seems almost magical, especially with how accurate it is, but if your business in the 1910s involved cheese, this would have been quite normal. In fact, it would be 50 more years before IBM created the machines that they’re more commonly known for.

Thanks to [Jasper Jans] for the tip!

Continue reading “IBM Cheese Cutter Restoration”

A r0tring CS-50 scriber. You type, it writes the letters with a pen on your blueprint or technical drawing.

Plotting To Restore A R0tring CS-50

If you’re of a certain vintage and have ever done any technical drawing, chances are good that you used a r0tring of some kind, be it pencil or pen. Well, r0tring makes more than writing implements.  They also made electronic scribers — a small plotter that pens ISO lettering on technical drawings based on typed input. This was a huge time saver over doing it freehand or stenciling each letter. The CS-50 is designed to hold the top-of-the-line r0tring drawing pen, which turned out to be the most expensive part of this restoration aside from the time spent sniffing out issues.

[Atkelar] likes to open things up and give them a visual inspection before powering them on. We think this is good practice, even if the suspense kills you. But really, [Atkelar] did so much more than that. He started by replacing the likely late-80s-era coin cell even though it registered north of 3 V. Then he swapped out all the electrolytic caps and one tantalum, cleaned the rubber dome keyboard parts with a cheap electric toothbrush, (another great idea), and completely disassembled the x-y mechanism to clean and re-oil it.

Continue reading “Plotting To Restore A R0tring CS-50”

Fresh Paint Or Patina Of Ages, That’s The Antique Question

The world of antique furniture and the world of hackers rarely coincide, and perhaps the allure of the latest tech is greater for most of us than that of a Chipendale cabinet. But there are times when there are analagous situations in both worlds, so it’s worth taking a moment to consider something.

This late-17th-century dressing box would not be of such value or interest were a restoration to strip it of its patina. Daderot, CC0.

Antique furniture has survived for hundreds of years before being owned by today’s collectors. Along the way it picks up bumps and scrapes, wear, and even the occasional repair. Valuable pieces turn up all the time, having been discovered in dusty attics, cowsheds, basements, and all sorts of places where they may have been misused in ways that might horrify those who later pay big money for them. Thus there is a whole industry of craft workers in the field of furniture restoration whose speciality lies in turning the wreck of a piece of furniture into a valuable antique for the showroom.

The parallel in our community if you hadn’t already guessed, can be found in the world of retrocomputers. They are the antiques we prize, they come to us after being abused by kids and then left to languish in a box of junk somewhere. Their capacitors are leaking, their cases may be cracked or dirty, and they often possess the signature look of old ABS mouldings, their characteristic yellowing. This is caused by the gradual release of small quantities of bromine as the fire retardant contained within the plastic degrades under UV light, and causes considerable consternation among some retrocomputing enthusiasts. Considerable effort goes into mitigating it, with the favourite technique involving so-called Retr0bright recipes that use hydrogen peroxide to bleach away the colour.

Continue reading “Fresh Paint Or Patina Of Ages, That’s The Antique Question”

Chip Transplant Brings Timex 2048 Back From Grave

The 1984 Timex Computer 2048 that [Drygol] recently got his hands on was in pretty poor shape. Not only did it have the mangled exterior that comes from several decades of hard use and furious typing, but the internals appeared to be shot as well, with the machine showing nothing but vertical lines when powered up. Thankfully, this retro computer virtuoso was more than up to the challenge of bringing it back from the brink.

After a good cleaning and the installation of a reproduction front panel, the Timex was already looking much better. Unfortunately [Drygol] says he doesn’t currently have the equipment necessary to touch up the graphics and lettering on the key caps, but the fact that he had to qualify that statement with “currently” has us all sorts of excited to see what he’s planning down the line.

A bevy of fresh chips.

Of course beauty is only skin deep, and this particular TC-2048 was still bad to the bone. [Drygol] had a hunch its Z80 processor was dead, but after swapping it and its socket out, the machine still wouldn’t start. Though he did note that the garbled graphics shown on the screen had changed, which made him think he was on the right track. He then replaced all the RAM on the board, but that didn’t seem to change anything.

There isn’t a whole lot else to go wrong on these old machines, so the final step was to try and replace the ROM. Sure enough, after installing a new Winbond W27C512 chip with the appropriate software burned onto it, the nearly 40 year old computer sprang back to life.

Another classic computer saved from the trash heap, but it’s all in a day’s work for [Drygol]. Over the years we’ve seen him perform meticulous repairs on computer hardware that any reasonable person would have given up on. Even if you’re not into retro hardware, his restorations are always full of fascinating tips and tricks that can be applied when repairing gadgetry from whatever era happens to tickle your fancy.