What do you get if you meld a Raspberry Pi, a chiptune synthesizer, and a case that looks like an imaginary Kenback-2000? Well, if you are [Artifextron], you get the NTRON. Part Nintendo console, part chip tune synthesizer, and part objet d’art. You can see the device do its things in the video below.
This is less of a bare metal design and more of a synthesis of parts, but it is a very clever system design using audio mixers and an assortment of modules to do its tasks. It does have an IC handling the gamepad ports. Of course, it also features a ton of 3D printed parts.
The rise of inexpensive yet relatively powerful electronics has enabled a huge array of computing options that would have been unheard of even two decades ago. A handheld gaming PC with hours of battery life, for example, would have been impossible or extremely expensive until recently. But this revolution has also enabled a swath of inexpensive but low-quality knockoff consoles, often running unlicensed games, that might not even reach the low bar of quality set by their sellers. [Jorisclayton] was able to modify one of these to live up to its original promises.
This Ultimate Brick Game, as it is called, originally didn’t even boast the number of games, unlicensed or otherwise, that it claimed to. [Jorisclayton] removed almost all of the internals from this small handheld to help it live up to this original claim. It boasts a Raspberry Pi Zero 2W now as well as a TFT screen and has a number of other improvements including Bluetooth support for external controllers and upgraded audio. A second console was used for donor parts, and some case mods were made as well to accommodate a few extra buttons missing on the original console.
Right now the project is in a prototype phase, as [Jorisclayton] is hoping to use the donor case to build a more refined version of this handheld console in the future. Until then, this first edition upgrade of the original console can run RetroPie, which means it can run most games up through the Nintendo 64 era. RetroPie enables a ton of emulation for old video games including arcade games of the past. This small arcade cabinet uses that software to bring back a bit of nostalgia for the arcade era.
Back in 2018, we covered the work being done by [Andrew Sinden] to create a lightgun that could work on modern televisions. The project was looking for funding via Kickstarter, but due at least in part to skepticism about the technology involved, the campaign fell well short of its goal. It seemed, at the time, like the story would end there.
But we were recently pointed to a fascinating interview with [Andrew] that ran in The Guardian a couple months back that not only tells the rest of the story, but concludes with a happy ending — after years of hard work, the Sinden Lightgun is now available for purchase. It’s not exactly the turn-key product that some would like, as there’s a fair number of hoops one must jump through just to bag some eponymous waterfowl in Duck Hunt, but nothing that would scare off the average Hackaday reader.
Limited technical details about the 2018 prototype may have kept backers away.
The final version of the hardware ditches the realistic firearm aesthetic inherited from the Wii gun accessory it was designed to fit into, and now features a brightly-colored pistol enclosure that wouldn’t look out of place tethered to a Virtua Cop machine. It’s also gained an optional recoil solenoid for force feedback, though it tacks on another $60 to the already hefty $100 price tag for the base model.
We’re glad to see that [Andrew] recognized the importance of getting Linux support for the software side of things, as it enabled the development of a pre-configured Retropie image for the Raspberry Pi 4. Though you aren’t forced to emulate on the Pi, for those who would like to blast the occasional zombie on their desktop, Windows and x86 Linux are also supported.
Often times, when we cover a project here on Hackaday it’s a one-shot deal: somebody had a particular need or desire, built a gadget to fulfill it, and moved on. There’s nothing wrong with that, but there’s a certain feeling of pride when we see a project from this community develop into something more. While not every hacked together piece of hardware we feature has the potential to be the next Arduboy or Sinden Lightgun, we like to think that we’ve already covered the next big project-turned-product success story and just don’t know it yet.
Arcade machines have a distinct look and feel with large imposing cabinets and smaller bartop machines that try to keep the look and feel of a traditional upright arcade cabinet while taking up less space. An entirely new aesthetic has been given for this engineering marvel of a bartop arcade that [DIY Engineering] has made. Gone is the expansive angular box, and in its place are sleek and slender curves. The key piece that makes this build work is the curved monitor.
He started with a detailed design in Fusion360 that really focused on the tools and techniques that [DIY Engineering] knew would work. The backbone of the device was formed from wooden dowels around which 3d printed parts slid on. To the sides of the dowels, two pieces of acrylic are screwed on to act as an LED diffusor. To that acrylic, two pieces of CNC’d red oak are attached with two arcade buttons for pinball-style actuation. Over the top, cast acrylic was heated and then bent into the desired shape with the help of a two-part mold press. The screen slotted right in perfectly. Part of the display at the top was reserved for a marquee, and the look is extraordinary with the dark acrylic. Ten arcade buttons and an eight-way joystick offer an array of options for input.
Internally, a temperature-controlled fan and a Raspberry Pi are running the show. Controls are wired as GPIO and read by the Pi. So naturally, the games on the SD card tend to look best on a long vertical screen: vertical shooters and the like.
Arguably, the best thing about this project isn’t just the execution (which is fantastic) but the look behind the curtain at the process. So many potential problems were solved in the modeling stage, and fabrication went fairly smoothly as a result (or so we think youtube hides a multitude of sins). The results speak for themselves, and we think this is an enviable arcading machine. [DIY Engineering] has mentioned providing files in the future for you to build your own. If perhaps it seems a little intimidating, why not give a smaller 3D printable bartop a try?
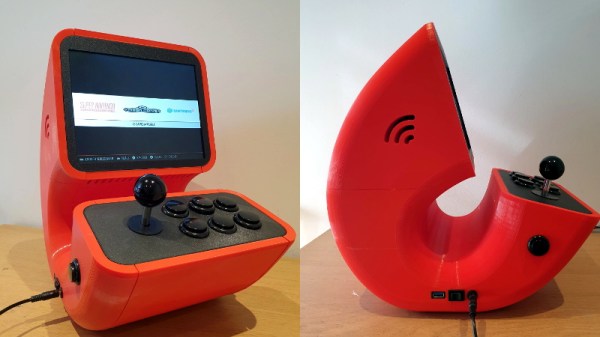
Let’s be honest, building a home arcade cabinet isn’t exactly the challenge it once was. There’s plenty of kits out there that do all the hard work for you, and they even sell some pretty passable turn-key units at Walmart now. If you want to put a traditional arcade cabinet in your home, it’s not hard to get one.
Which is why this wild build by [Rafael Rubio] is so interesting. The entirely 3D printed enclosure looks like some kind of art piece from the 1970s, and is a perfect example of the kind of unconventional designs made possible by low-cost additive manufacturing. Building something like this out of wood or metal would be nightmare, especially for the novice; but with even a relatively meager desktop 3D printer you’re only a few clicks away from running off your own copy.
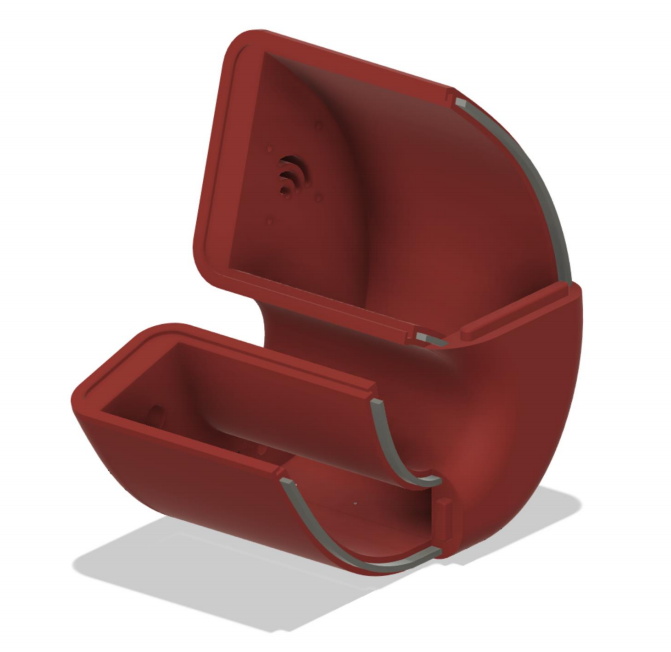
Removable side panels allow access to the electronics.
Inside the nautilus-like enclosure is a Raspberry Pi running Retropie, a 10″ LCD panel from Pimoroni, and a GeeekPi interface board that connects up to the 8-way joystick and arcade buttons. [Rafael] has included a Bill of Materials and an assembly overview that you can follow along with, though the cavernous internal dimensions of the enclosure certainly give you ample of room for improvisation if you’d rather blaze your own path.
Like the retro-futuristic computer terminals created by [Oriol Ferrer Mesià], this arcade machine completely reinvents a traditional design that most people take for granted. Is this layout actually better than the standard arcade cabinet? It’s not really our place to say. But it’s certainly a new and unconventional approach to “solved” problem, and that’s what we’re all about.
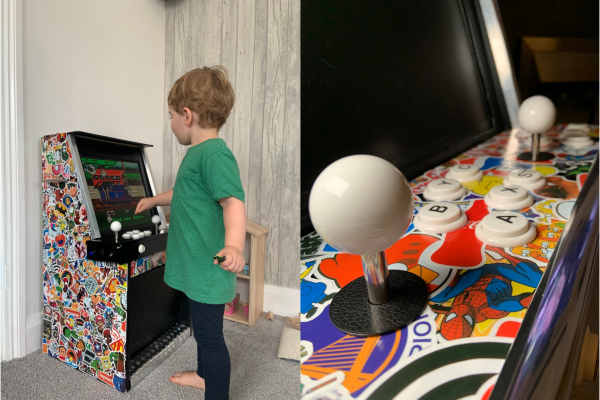
The brain — a Raspberry Pi running RetroPie — should be familiar to most of our readers. [Mark] found the perfect crappy old monitor when they were upgrading at his office, and found some nice speakers to give it good bass. We love the details like the chrome edging, and especially the kick bar/footrest along the bottom. It can be difficult to decide how to decorate a multi-arcade cabinet, so [Mark] went the sticker bomb route with 700 of them randomly distributed and safe from toddler wear and tear under five coats of clear wood varnish.
We think this looks great, especially since [Mark] doesn’t have a workshop and cut all that MDF by hand on a jigsaw in the kitchen. Check out the happy train engineer after the break.
The Raspberry Pi is a hugely popular platform for emulating older consoles, with the RetroPie framework making it easy to get started in no time at all. Often, these single board computers get built into fun arcade boxes or replica console shells to add to the charm. That’s all been done, so instead, [Cedishappy] decided to go in his own direction – resulting in the wonderful Watermelon Gameboy.
What sounds like a trivial exercise of building a RetroPie rig in a unique enclosure actually comes with some engineering challenges. The basics are all pretty standard – GPIO pins interfacing buttons, a speaker and the screen, emulating a Gameboy Advance. But the mechanical implementation is more complex. The watermelon is first cut open, having its red flesh removed, leaving just the rind. Paper and cardboard templates are then used to make holes for the buttons and screen. Unfortunately, hot glue doesn’t work on watermelon, so instead, toothpicks were used to hold the screen and speaker in place. To protect the electronics from the moist melony environment inside, clear food wrap was applied to the Raspberry Pi and other components where needed.
[Cedishappy] goes above and beyond with the project video charmingly showing the reactions of bystanders to the contextually confusing game system. The combination of electronics with fruit and vegetables is an area we don’t see explored often enough; our own [Mike Szczys] built a magnificent LED Jack-o-Lantern that really looks the business. Video after the break.