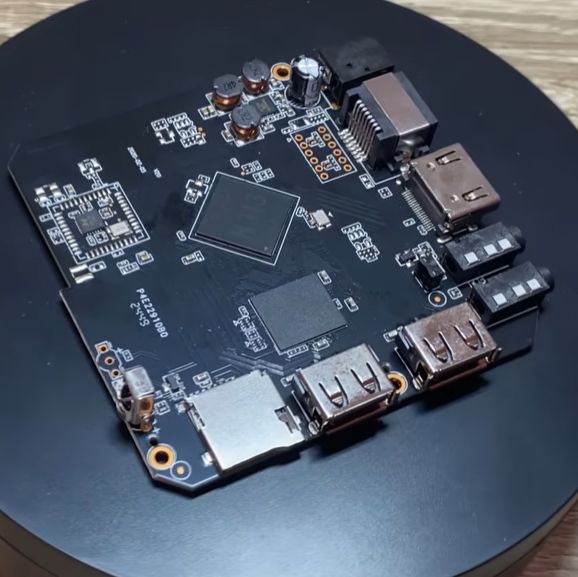
Repurposing Dodgy Android TV Boxes As Linux Boxes

Marketplaces and e-waste recycling centers are practically overflowing with the things: ARM-based streaming TV boxes that run some — usually very outdated and compromised — version of Android. While you can use them for their promised streaming purposes, they’re invariably poorly optimized and often lie about their true hardware specifications. Which leaves the most important question: can you install Linux on these SBCs and use them as a poor man’s Raspberry Pi alternative? The answer, according to [Oleksii’s Tech] on YouTube is ‘sorta’.

The fake H313 TV box SBC in all its glory. (Credit: Oleksii's Tech, YouTube)
The fake H313 TV box SBC in all its glory. (Credit: Oleksii’s Tech, YouTube)

The commonly seen X96Q clone Android TV box that [Oleksii] bought for $10 is a good example. The clone advertises itself as based on a quad-core Cortex-A53 AllWinner H313 SoC, like the genuine X96Q, but actually has a Rockchip RK3229 inside with correspondingly far lower performance. After you have determined what the actual hardware inside the box is, you can get a copy of Armbian for that particular SoC. Here, the Rk322x-box minimal image was used, with the box booting straight off an SD card. Some Android TV boxes require much more complicated methods to even boot off external media, so this was a lucky break.

Continuing the hardware scam, it was advertised as having 2 GB of RAM and 16 GB of Flash, but it actually has just 1 GB of RAM and 8 GB of eMMC Flash. This was enough to get Armbian desktop up and running, but that’s about all you can do. Desktop application performance was atrocious, mostly due to the CPU’s quad Cortex-A7 cores struggling to keep up.

As also suggested in the comments, the best use for these low-spec SBCs is probably to run light server applications on them, including Pi-Hole, Samba, an IRC bouncer, and so on. They’re pretty low-power, often have the requisite Ethernet built in, and it keeps another bit of potential e-waste from getting scrapped.

Continue reading “Repurposing Dodgy Android TV Boxes As Linux Boxes”

Building A DIY Ryzen-Based PC!

This project gives a whole new meaning to DIY PC. We don’t know how capable you were as a teenager, but could you have designed your own Ryzen-based mini PC?

Whilst making repairs to laptop internals, [Dominik Baroński] was busy taking notes. Modern super-integrated laptop PCs have reached the point where all the functions of a complete PC are embedded in a single chip. But it’s a big, complicated chip with very specific feeding and care needs. Once you’ve figured out what it needs, it ‘merely’ remains to supply it power, hook up some DDR4 RAM, PCIe storage, and some USB ports, and you’re away. It sounds easy when you say it like that, but do not underestimate how difficult it is to create such a board—or even to populate it by hand—yet that’s precisely what [Dominik] has achieved.

Continue reading “Building A DIY Ryzen-Based PC!”

Scott holding the demo board which has a 7-segment display and keyboard attached

4-bit Single Board Computer Based On The Intel 4004 Microprocessor

[Scott Baker] is at it again and this time he has built a 4-bit single board computer based on the Intel 4004 microprocessor.

In the board design [Scott] covers the CPU (both the Intel 4004 and 4040 are supported), and its support chips: the 4201A clock-generator, its crystal, and the 4289 Standard Memory Interface. The 4289 irons out the 4-bit interface for use with 8-bit ROMs. Included is a ATF22V10 PLD for miscellaneous logic, a 74HCT138 for chip-select, and a bunch of inverters for TTL compatibility (the 4004 itself uses 15 V logic with +5 V Vss and -10 V Vdd).

[Scott] goes on to discuss the power supply, ROM and page mapper, the serial interface, the RC2014 bus interface, RAM, and the multimodule interface. Then comes the implementation, a very tidy custom PCB populated with a bunch of integrated circuits, some passive components, a handful of LEDs, and a few I/O ports. [Scott] credits Jim Loo’s Intel 4004 SBC project as the genesis of his own build.

If you’re interested in seeing this board put to work check out the video embedded below. If you’d like to know more about the 4004 be sure to check out Supersize Your Intel 4004 By Over 10 Times, The 4004 Upgrade You’ve Been Waiting For, and Calculating Pi On The 4004 CPU, Intel’s First Microprocessor.

Continue reading “4-bit Single Board Computer Based On The Intel 4004 Microprocessor”

BGA soldering

Making A One-Of-A-Kind Lime2 SBC

Upgrading RAM on most computers is often quite a straightforward task: look up the supported modules, purchase them, push a couple of levers, remove the old, and install the new. However, this project submitted by [Mads Chr. Olesen] is anything but a simple.

In this project, he sets out to double the RAM on a Olimex A20-OLinuXino-LIME2 single-board computer. The Lime2 came with 1 GB of RAM soldered to the board, but he knew the A20 processor could support more and wondered if simply swapping RAM chips could double the capacity. He documents the process of selecting the candidate RAM chip for the swap and walks us through how U-Boot determines the amount of memory present in the system.

While your desktop likely has RAM on removable sticks, the RAM here is soldered to the board. Swapping the chip required learning a new skill: BGA soldering, a non-trivial technique to master. Initially, the soldering didn’t go as planned, requiring extra steps to resolve issues. After reworking the soldering, he successfully installed both new chips. The moment of truth arrived—he booted up the LIME2, and it worked! He now owns the only LIME2 with 2 GB of RAM.

Be sure to check out some other BGA soldering projects we’ve featured over the years.

A Guide To Making The Right Microcontroller Choice

Starting a new microcontroller project can be pretty daunting. While you have at least a rough idea of where you want to end up, there are so many ways to get there that you can get locked into “analysis paralysis” and never get the project off the ground. Or arguably worse, you just throw whatever dev board you have in the junk bin and deal with the consequences.

While it’s hard to go wrong with relying on a familiar MCU and toolchain, [lcamtuf] argues in this recent guide to choosing microcontrollers that it’s actually not too much of a chore to make the right choice. Breaking the microcontroller universe down into three broad categories makes the job a little easier: simple process control, computationally intensive tasks, and IoT products. Figuring out where your project falls on that spectrum narrows your choices considerably.

For example, if you just need to read some sensors and run a few servos or solenoids, using something like a Raspberry Pi is probably overkill. On the other hand, a Pi or other SBC might be fine for something that you need wireless connectivity. We also appreciate that [lcamtuf] acknowledges that intangible considerations sometimes factor in, such as favoring a new-to-you MCU because you’ll get experience with technology you haven’t used before. It might not override technical considerations by itself, but you can’t ignore the need to stretch your wings once in a while.

There’s nothing earth-shattering here, but we enjoy think pieces like this. It’s a bit like [lcamtuf]’s recent piece on rethinking your jellybean op-amps.

OpenWRT To Mark 20 Years With Reference Hardware

The OpenWRT project is now two decades old. The project has come a long way since Linksys was forced to release the GNU-licensed code for the original WRT54G router from which the project takes its name. They’ve marked the occasion in an interesting manner: by proposing that the plethora of devices supported by the OS be joined by a fully upstream-supported reference hardware platform.

Spec-wise it’s what you would expect for a hackable router platform in 2024. A MediaTek chipset can be found at its centre, but the hardware is not in this case the important bit. Here will be a platform that won’t have to rely on proprietary manufacturer BLOBs, and which will thus likely continue to have up-to-date kernel support long into the future. So many enticing SBCs fall in this regard, and many retain ossified kernel versions after their manufacturers tire of them as a result.

It appears that the future of this project will be subject to an OpenWRT community vote, and we sincerely hope that it will come to fruition. Meanwhile, we couldn’t resist a peek at the status of the router that started it all, by our reckoning the original WRT54G was last supported by the OS over a decade ago.

New Part Day: Flush-mount Touchscreen For Retro PC Build

I recently had the opportunity to purchase an early version of a new display, and it happened to be just the thing I needed to make a project work. That display is the Elecrow 11.6″ CrowVision touchscreen slated for release in 2024. Preorders are being accepted on Crowd Supply.

I had an idea for a retro-inspired PC build that was just waiting for a screen like this. I’ll talk about the display and what’s good about it, then showcase the build for which it was the missing piece. If you’ve got a project waiting for something similar, maybe this part will provide what you need or at least turn on some new ideas.

What Is It?

The CrowVision 11.6″ 1366 x 768 touchscreen has an HDMI input, USB output for touch data, and accepts 12 V DC. It’s made to interface easily with a Raspberry Pi or other SBC (single-board computer).

Personally I consider a display like this to be the minimum comfortable size for using desktop type applications in a windowed environment. Most displays in this space are smaller. But aside from that, what helps make it useful for embedding into a custom enclosure is the physical layout and design.

Since I was looking for the largest display that could be flush-mounted in an enclosure without a lot of extra space around the display’s sides, it was just what I needed. The integrated touchscreen is a nice bonus.

Continue reading “New Part Day: Flush-mount Touchscreen For Retro PC Build”