Serial Studio: Easily Visualise And Log Serial Data

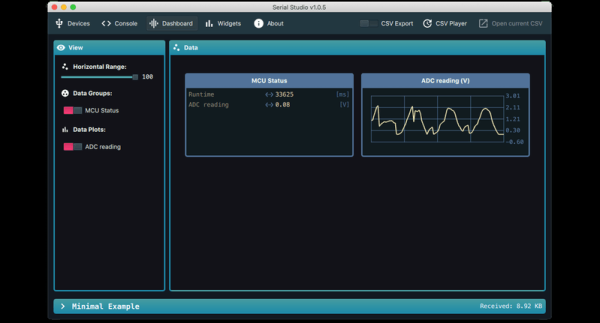
Outputting data from a microcontroller over a serial port is convenient and easy, but formatting, visualizing, and analyzing the data can be tedious and frustrating. [Alex Spataru] knows this all too well, having spent too many hours building and debugging custom dashboards. To save himself and others the same frustration in the future, he created Serial Studio, a tool for quickly building dashboards for serial data.

The only input required for Serial Studio to create a dashboard is a simple JSON structure specifying the data’s format, and how it should be grouped and displayed. Originally Serial Studio required all the JSON data to be sent over serial, which is fine for simple data but quickly becomes cumbersome for more complex applications. To solve this, [Alex] added a feature allowing the JSON document with the format information loaded from the computer, while only the data is sent over serial.

Serial Studio includes several visualization options, including raw line graphs, bar/level indicator, dial indicator, the artificial horizon for IMU data, or a map widget. It can also output the formatted data to a CSV file for further analysis in other software. A console window is also included for viewing raw data or debugging purposes. See the usage demo after the break.

We like Serial Studio’s ease of use and adaptability, and we’ll likely use it for our own projects in the future. It is compatible with Linux, Windows, and Mac thanks to the Qt framework, and the code is open-source and available on GitHub.

If you’ve ever watched one of the BPS.Space model rocket launch videos, you’ll know how critical data logging, visualization and analysis is for [Joe Barnard]’s work. Serial Studio is perfect for such applications, and [Alex] used it extensively for simulated satellite competitions at his university. Continue reading “Serial Studio: Easily Visualise And Log Serial Data”

Nissan Gives Up Root Shell Thanks To Hacked USB Drive

For the impatient Nissan owners who may be joining us from Google, a hacker by the name of [ea] has figured out how to get a root shell on the Bosch LCN2kai head unit of their 2015 Xterra, and it looks like the process should be the same for other vehicles in the Nissan family such as the Rogue, Sentra, Altima, and Frontier. If you want to play along at home, all you have to do is write the provided image to a USB flash drive and insert it.

Now for those of us who are a more interested in how this whole process works, [ea] was kind of enough to provide a very detailed account of how the exploit was discovered. Starting with getting a spare Linux-powered head unit out of a crashed Xterra to experiment with, the write-up takes the reader through each discovery and privilege escalation that ultimately leads to the development of a non-invasive hack that doesn’t require the user to pull their whole dashboard apart to run.

The early stages of the process will look familiar to anyone who’s messed with embedded Linux hacking. The first step was to locate the board’s serial port and connect it to the computer. From there, [ea] was able to change the kernel parameters in the bootloader to spawn an interactive shell. To make things a little easier, the boot scripts were then modified so the system would start up an SSH server accessible over a USB Ethernet adapter. With full access to the system, the search for exploits could begin.

A simple script on the flash drive enables the SSH server.

After some poking, [ea] discovered the script designed to mount USB storage devices had a potential flaw in it. The script was written in such a way that the filesystem label of the device would be used to create the mount point, but there were no checks in place to prevent a directory traversal attack. By crafting a label that read ../../usr/bin/ and placing a Bash script on the drive, it’s possible to run arbitrary commands on the head unit. The provided script permanently adds SSHd to the startup process, so when the system reboots, you’ll be able to log in and explore.

So what does [ea] want to do with this new-found exploit? It looks like the goal is to eventually come up with some custom programs that extend the functionality of the in-dash Linux system. As it seems like these “infotainment” systems are now an inescapable feature of modern automobiles, we’re certainly excited to see projects that aim to keep them under the consumer’s control.

Teardown: Creality Wi-Fi Box

Creality, makers of the Ender series of 3D printers, have released a product called Wi-Fi Box meant to cheaply add network control to your printer. Naturally I had to order one so we could take a peek, but this is certainly not a product review. If you’re looking to control your 3D printer over the network, get yourself a Raspberry Pi and install Gina Häußge’s phenomenal OctoPrint on it. Despite what Creality might want you to believe, their product is little more than a poor imitation of this incredible open source project.

Even if you manage to get it working with your printer, which judging by early indications is a pretty big if, it won’t give you anywhere near the same experience. At best it’ll save you a few dollars compared to going the DIY route, but at the cost of missing out on the vibrant community of plugin developers that have helped establish OctoPrint as the defacto remote 3D printing solution.

That being said, the hardware itself seems pretty interesting. For just $20 USD you get a palm-sized Linux computer with WiFi, Ethernet, a micro SD slot, and a pair of USB ports; all wrapped up in a fairly rugged enclosure. There’s no video output, but that will hardly scare off the veteran penguin wrangler. Tucked in a corner and sipping down only a few watts, one can imagine plenty of tasks this little gadget would be well suited to. Perhaps it could act as a small MQTT broker for all your smart home devices, or a low-power remote weather station. The possibilities are nearly limitless, assuming we can get into the thing anyway.

So what’s inside the Creality Wi-Fi Box, and how hard will it be to bend it to our will? Let’s take one apart and find out.

Continue reading “Teardown: Creality Wi-Fi Box”

Dissecting The TL-WR841N For Fun And Profit

The TP-Link TL-WR841N isn’t a particularly impressive piece of hardware, but since it works decently well and sells for under $20 USD, it’s one of the most popular consumer routers on Amazon. Now, thanks to [TrendyTofu] of the Zero Day Initiative, we now have a concise step-by-step guide on how to hack your way into the newer versions of the hardware and take full control over this bargain WiFi device. This work was initially done to help test out reported vulnerabilities in the router’s firmware, but we’re sure the readers of Hackaday can come up with all sorts of potential uses for this information.

TP-Link helpfully labeled the UART pins

The story starts, as so many before it have, with a serial port. Finding the UART pads on the PCB and wiring up a level shifter was no problem, but [TrendyTofu] found it was only working one-way. Some troubleshooting and an oscilloscope later, the culprit was found to be a 1kΩ pull down resistor connected to the RX line that was keeping the voltage from peaking high enough to be recognized.

Once two-way communication was established, proper poking around inside the router’s Linux operating system could begin. It wasn’t a huge surprise to find the kernel was ancient (version 2.6.36, from 2010) and that the system utilities had been stripped to the absolute bare minimum to save space. Replacing the firmware entirely would of course be ideal, but unfortunately OpenWRT has dropped support for the newer hardware revisions of the TL-WR841N.

To teach this barebones build of Linux some new tricks, [TrendyTofu] used the mount command to find a partition on the system that actually had write-access, and used that to stash a pre-compiled build of BusyBox for MIPS. With a more complete set of tools, the real fun could begin: using GDB to debug TP-Link’s binaries and look for chinks in the armor. But feel free to insert your own brand of mayhem here.

You might think that in the era of the Raspberry Pi, abusing cheap routers to turn them into general purpose Linux boxes would be somewhat out of style. Frankly, you’d be right. But while the days of strapping Linksys WRT54Gs to remote controlled cars might be long be gone, there are still some routers out there interesting enough to make it worth dusting off this time-honored hardware hacker tradition.

Exploring The Dell N1108T-ON Ethernet Switch

In an era where everything seems to be getting “smarter” every year, it will probably come as no surprise to find that even relatively middling networking hardware is now packing advanced features and considerable computational power. A case in point is the Dell N1108T-ON Ethernet switch. Despite only costing around $100 USD on the second hand market, [Ben Cox] discovered this particular switch was capable of a lot more than what was advertised by poking around its onboard operating system.

It all started by plugging into the serial port on the front of the switch, which [Ben] happily notes is an integrated FTDI USB serial adapter to make life easy. Booting into recovery mode gave him local shell access, and some poking around determines it’s the sort of BusyBox-powered Linux system that you’d expect on an embedded device. The biggest discoveries were that it was running a relatively recent kernel (3.8.1), and that it apparently had Python installed.

The reverse shell Python script

From there, [Ben] found out that these switches have a feature where the administrator can install and run Python “applications” by packaging them up as tarballs and copying them from a USB flash drive. So he wrote up a simple Python program that used the socket library to open up a reverse shell to his desktop computer, and to his surprise, it worked perfectly on the first try. Now with root access, the fun really started.

The next step was getting an SSH installed and running on the switch, so that he didn’t have to do the reverse shell trick every time. He then started installing the packages necessary to turn the switch into a secure VPN tunnel with Wireguard. This took a little fiddling as [Ben] didn’t have the option of installing the normal Wireguard kernel module, but he eventually got the necessary tools modified and cross-compiled to ARM. He believes this is just the start of what’s capable on devices like this, and we’re interested in seeing where the community goes from here.

We’ve seen hackers add management capability to a “dumb” unmanaged switch in the past, but software modifications like this promise to make the creation of custom, secure, networks far easier even on a hacker’s budget. A lot has certainly changed since the last time we saw somebody really dive into a professional Ethernet switch.

SerialPlot Does Exactly What You Think It Does

The serial port remains a hacker staple, being one of the easiest ways to move a little bit of data from one machine to another. All manner of projects use the interface, and often, sensors are connected and their data read over such connections. In these cases, it can be useful to plot said data, and SerialPlot is a tool that can do just that.

SerialPlot is capable of reading data over several serial ports at once, and plotting it for your viewing pleasure. It’s capable of interpreting data in a variety of integer and float formats, and plotting multiple channels in a synchronised manner. It’s also capable of sending basic commands out over the serial port, which can be used to trigger or control attached equipment.

Overall, it’s a useful utility for anyone with an array of sensor’s connected over the most classic of interfaces. Of course, if you’re having trouble keeping track of all your serial ports, there’s a utility to help with that, too.

Windows Utility Helps ID Serial Ports

The humble serial interface has been around for a very long time, and will stay with us in one form or other for the foreseeable future. It was easy enough to keep track of back in the days when a computer only had one, or perhaps two COM ports. However, in this day and age of USB-programmable microcontrollers, it’s likely you’ve got COMs coming out the wazoo. Thankfully, [Amr Bekhit] has put together a utility to help solve this problem.

[Amr’s] utility is called Serial Port Monitor, and it does what it says on the tin. When new serial ports are enumerated in Device Manager, a system tray notification pops up noting the number of the newly attached COM port. Additionally, it maintains a list of ports sorted in order of the newest first, and also features a right-click menu that allows the launching of various terminal programs.

It’s a useful tool to keep in your back pocket that can prove particularly so when programming many devboards at once, or any other time when you find yourself dealing with a mess of serial devices.

Incidentally, if you find yourself having continual headaches with USB-to-Serial adapters on Windows, this might just be your problem. Happy hacking.

Footnote: In light of this article, the author would like to formally apologise to [Cosmos2000] for permanently disabling COM1 on his main programming rig. Sorry, friend.