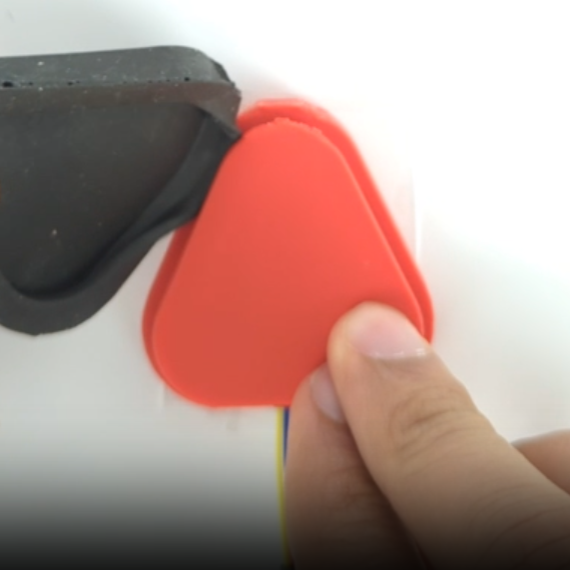
A Soft Soldering Jig For Hard Projects

We’ve seen some absolutely gorgeous freeform circuit sculptures. There’s a mystic quality to taking what has normally been hidden away for safety and reliability reasons and putting it on display for everyone to see. Of course, creating these unique circuit sculptures takes considerable time and effort. [Inne] created several silicone soldering jigs to help with these tricky joints.

While a vice or helping hands is crucial for many joints, when dealing with tiny SMD components and exacting angles, you need something a little more specialized. Double-sided tape is often recommended, but heat ruins the adhesive and SMD components like to stick to soldering iron tips. Since silicone tends to be heat resistant, it makes a decent material for soldering on. [Inne] uses a city analogy with the cups for soldering called plazas, each with a hole (called a manhole) leading to a foot-switch vacuum pump to keep parts in place. The OpenSCAD code is available on GitHub under a GPLv3 license. It generates a two-part mold that you can cast in A-8/A-15 silicone.

It’s a clever project that makes it far easier to assemble gorgeous circuit sculptures. We love the design and thought that went into it, particularly the naming scheme as we often find appropriately naming variables in OpenSCAD quickly becomes difficult.

DOOM Ported To A Single LEGO Brick

By now you’ve all seen the tiny LEGO brick with a working screen in it. The work of one [James “Ancient” Brown], it was truly a masterpiece of miniaturization and creativity. Since then, [James] hasn’t stopped innovating. Now, he’s demoing a playable version of DOOM running on a single plastic brick.

We’ve covered the construction of these astounding screen bricks before. Long story short, [James] designed a tiny PCB that hosts an RP2040 microcontroller which is then hooked up to a tiny OLED screen. The components are placed in a silicone mold, which is then filled with transparent resin to form the brick. The screen is then powered via contacts in the bottom, much like older-style LEGO motors.

Early experiments involved running various graphics to emulate a spaceship dashboard, but [James] has now gone much further. He’s implemented RP2040-doom to run the game. It uses tilt controls thanks to an accelerometer, combined with capacitive touch controls for shooting. The monochrome OLED is driven very fast with a special library of [James’] own creation to create three levels of grayscale to make the game actually visible and (just barely) playable.

It’s a hack, of course, and the controls are far from perfect. Nobody’s speed-running E1M1 on [James’s] LEGO brick, to be sure. Perchance. With that said, it’s still a glorious piece of work nonetheless. Just imagine, sitting with friends, and announcing you’re going to play some DOOM — only to pluck a piece of LEGO out of your pocket and start blasting away at demons.

Just because [James] doesn’t know when to quit, we’re going to lay down the gauntlet. Let’s get network play happening on these things, yeah?
Continue reading DOOM Ported To A Single LEGO Brick”

DIY Custom Earplugs For Pennies Per Pair

Hearing is one of our most precious senses, and yet many take their hearing for granted, exposing themselves to loud noises that do lasting damage. [Jonathan Levi] of The Next Level does no such thing, at least not anymore. He’s even gone so far as to have custom acrylic earplugs made, which he carried around for two years, finally had them tweaked to be perfect, and promptly lost them. Rather than shell out another $150-$200 for another pair, [Jonathan] decided to see if he could make some himself.

While it’s true that [Jonathan] got a head start by asking the earplug company for the STLs they created back when he was fitted, he goes through the ways that one could mold and then scan one’s ears at home for not a lot of money. There are even kits for squirting that quick-setting goo into your ear to get just the right shape. Once you’ve got the ear canal positives, some quick photogrammetry work with your phone camera and a lazy Susan should be enough to get a model going in Blender.

[Jonathan] had the good sense to label left and right on the 3D printed mold, and furthermore added some small 3D printed screws that are color-coded to help him keep them plugs straight, and give him something to grab on to when it’s time to take them out. Be sure to check out the build video after the break.

Continue reading “DIY Custom Earplugs For Pennies Per Pair”

More Detail On That Fantastic Lego OLED Brick

It’s always great when we get a chance to follow up on a previous project with more information, or further developments. So we’re happy that [“Ancient” James Brown] just dropped a new video showing the assembly of his Lego brick with a tiny OLED screen inside it. The readers are too, apparently — we got at least half a dozen tips on this one.

We’ve got to admit that this one’s a real treat, with a host of interesting skills on display. Our previous coverage on these bedazzled bricks was disappointingly thin on details, and now the original tweets even seem to have disappeared entirely. In case you didn’t catch the original post, [James] found a way to embed a microcontroller and a remarkably small OLED screen into a Lego-compatible brick — technically a “slope 45 2×2, #3039” — that does a great job of standing in for a tiny computer monitor.

Continue reading “More Detail On That Fantastic Lego OLED Brick”

Hardware Store Chemicals Transform Sheets Into Waterproof Tarps

For hackers in the Northern Hemisphere, the seasons of wet and cold are upon us. Staying dry is every bit as important as staying warm, so what better than a hack or two to keep us warm and dry! All you’ll need is a bed sheet, some rope, and a run to the local hardware store, and a bit of knowledge. [NightHawkInLight] has us covered with the excellent video “Recycled Bedsheets Make The Best Waterproof Tarps” as seen below the break.

[NightHawkInLight] brings old traditional methods into the 21st century by turning away from oil, beeswax and canvas in favor of a recycled bed sheet made waterproof with silicone. The video goes into just enough detail so that you can reproduce their results without fear of working with the powerful solvent being used.

Cheap hardware store grade silicone sealant is thinned by naphtha, worked into the old bed sheet, and then hung out to dry overnight. The result? A perfectly waterproof sheet that’s just as pliable as before treatment. But how can you use it like a tarp, when there are no eyelets? If you watch the video for no other reason, check out the neat attachment trick at the end, where traditional technology is brought to the fore once again with nothing more than a rock and a slip knot.

We can imagine that the uses for such inexpensive, durable home made tarps are many. Perhaps one could put it to use when building your own Custom Cycling Camper.

Continue reading “Hardware Store Chemicals Transform Sheets Into Waterproof Tarps”

Stop Silicone Cure Inhibition, No Fancy Or Expensive Products Required

Casting parts in silicone is great, and 3D printing in resin is fantastic for making clean shapes, so it’s natural for an enterprising hacker to want to put the two together: 3D print the mold, pour in the silicone, receive parts! But silicone’s curing process can be inhibited by impurities. What’s cure inhibition? It’s a gross mess as shown in the image above, that’s what it is. Sadly, SLA-printed resin molds are notorious for causing exactly that. What’s a hacker to do?

Firstly: there are tin-cure and platinum-cure silicones, and for the most part tin-cure silicone works just fine in resin-printed molds. Platinum-cure silicones have better properties, but are much more susceptible to cure inhibition. Most workarounds rely on adding some kind of barrier coating to molds, but [Jan Mrázek] has a cheap and scalable method of avoiding this issue that we haven’t seen before. Continue reading “Stop Silicone Cure Inhibition, No Fancy Or Expensive Products Required”

A Rotocasting Machine Sized For The Home Shop

If you’ve ever wondered how large, hollow plastic structures like tanks and drums are formed, you’re in luck: [Andy] not only fills us in on the details of rotational casting and molding, but he also built this sweet little rotational casting machine to help him with his DIY projects.

Granted, [Andy]’s build won’t be making anything too large, like a car fuel tank or a kayak. Not only is it sized more for smallish parts, but those structures are generally made with the related process of rotational molding. Both processes use an enclosed multipart mold that’s partially filled with plastic resin, and then rotate the mold around two axes to distribute a thin layer of resin around the inside of the mold. The difference is that roto-molding uses a thermoplastic resin, whereas roto-casting uses resins like polyurethane and silicone that set at room temperature.

The machine looks simple, but only because he took great pains to optimize it. The videos below cover the build in detail — feel free to skip to the 11:38 mark of the second video if you just want to see it in action. Though you’ll be missing some juicy tidbits, like welding a perfect 90° joint in square tubing. There’s also the custom tool [Andy] built to splice the beaded chain he used to drive the spinning of the mold, which was pure genius.

Using the machine and a complex nine-piece mold, [Andy] was able to create remarkably detailed tires for RC cars from polyurethane resin. We’d love to see what else this rig is good for — almost as much as we want to see details on how the mold was made. We’ve seen other rotational casting machines before, but this one takes the cake for fit and finish.

Continue reading “A Rotocasting Machine Sized For The Home Shop”