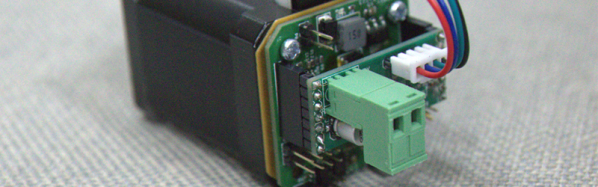
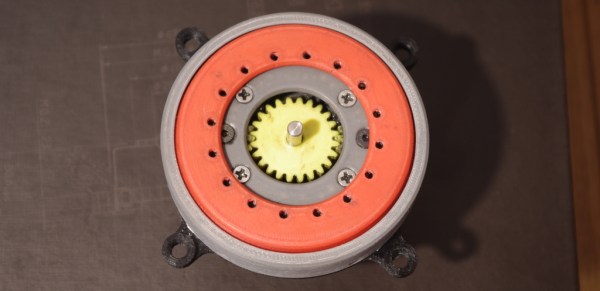
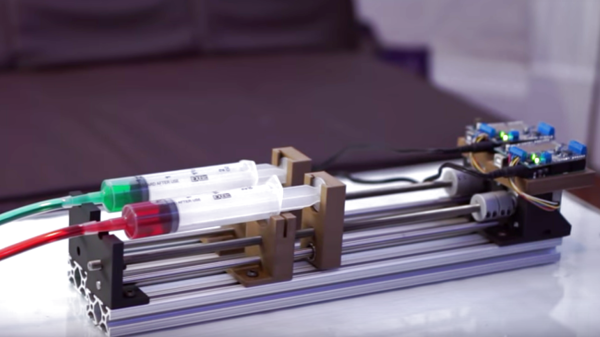
Landscape To Portrait At The Click Of A Mouse

Modern 16:9 aspect ratio monitors may be great for watching a widescreen movie on Netflix, but for most PDFs, Word documents, and certain web pages, landscape just won’t do. But if you’re not writing the next great American novel and aren’t willing to commit to portrait mode, don’t — build an auto-rotating monitor to switch your aspect ratio on the fly.

Like many of us, [Bob] finds certain content less than suitable for the cinematic format that’s become the standard for monitors. His fix is simple in concept, but a little challenging to engineer. Using a lazy susan as a giant bearing, [Bob] built a swivel that can be powered by a NEMA 23 stepper and a 3D-printed sector of a ring gear. Due to the narrow clearance between the top and bottom of the lazy susan, [Bob] had to do considerable finagling to get through holes for the mounting hardware located, but in the end the whole thing worked great.

Our only quibble would be welding galvanized pipe for the stand, which always gives us the willies. But we will admit the tube notching turned out great with just a paper template. We doubt it would have been much better if he used an amped-up plasma-powered tubing notcher.

Continue reading “Landscape To Portrait At The Click Of A Mouse”

Linear Clock Slows The Fugit Of The Tempus

We feature a lot of clocks here on Hackaday, and lately most of them seem to be Nixie clocks. Not that there’s anything wrong with that, but every once in a while it’s nice to see something different. And this electromechanical rack and pinion clock is certainly different.

[JON-A-TRON] calls his clock a “perpetual clock,” perhaps in a nod to perpetual calendars. But in our opinion, all clocks are perpetual, so we’ll stick with “linear clock.” Whatever you call it, it’s pretty neat. The hour and minute indicators are laser cut and engraved plywood, each riding on a rack and pinion. Two steppers advance each rack incrementally, so the resolution of the clock is five minutes. [JON-A-TRON] hints that this was a design decision, in part to slow the perceived pace of time, an idea we can get behind. But as a practical matter, it greatly simplified the gear train; it would have taken a horologist like [Chris] at ClickSpring to figure out how to gear this with only one prime mover.

In the end, we really like the look of this clock, and the selection of materials adds to the aesthetic. And if you’re going to do a Nixie clock build, do us a favor and at least make it levitate.

Continue reading “Linear Clock Slows The Fugit Of The Tempus”

Walter Is The Slickest Retro-Futuristic Robot Arm

[Jochen Alt] is on a roll. We just covered his ball-balancing robot, Paul, only to find his phenomenal six-DOF robot arm in full retro style. Its name is “Walter” and it’s done up in DDR style (the former East Germany), in painted, 3D-printed plastic. The full design and build documents are an absolutely amazing resource if you’re into robot arm or legs.

In particular, the sections on trajectory planning and kinematics are fantastic. If you’re interested in robot motion planning by Bezier curves, you know where to go. (We’ve always wanted a Bezier-curve 3D printer slicer, but that’s another story.) The construction is also top-notch here, and the attention to detail that went into this arm is phenomenal. It’s all done with stepper motors and geared belts, which allow each of Walter’s joints to be driven by a motor that’s one joint further upstream than would be the case if it were designed with servos. [Jochen] even went so far as to expose the belt in some places to show off the gearing. Walter is worth checking out.

Even if you’ll never build such a fancy robot arm, you should read through the docs just to appreciate all of the thought and work that went into this very refined and simple-from-the-outside design. If you’d like to start out on the simple side of the spectrum, check out these robot arms made of office supplies or a desk lamp. Once you’re ready for your second arm project this short list, some of which [Jochen] mention in his writeup, should get you up and grasping. And do check out his balancing bot, Paul.

Unique Planetary Gearbox Can Be Custom Printed For Steppers

Stepper motors are a staple in all sorts of projects, but it’s often the case that a gearbox is needed, especially for applications like the linear drives in CNC machines and 3D printers. In those mechanisms, a high-torque, low backlash gearbox might be just the thing, and a 3D printable split planetary harmonic drive for the popular NEMA 17 motors would be even better.

Right up front, we’ll say that we’re skeptical that any plastic gearbox can stay as backlash free as [SirekSBurom] claims his creation is. But we can see the benefits of the design, and it has some nice features. First off, of course, is that it’s entirely 3D printed, except for a few screws. That it mates perfectly with a NEMA 17 motor is a really nice feature, too, and with the design up on Thingiverse it shouldn’t be too tough to scale it up and down accordingly. The videos below show you the theory: the stepper drives a sun gear with two planet gears orbiting, each of which engages a fixed ring of 56 teeth, and an output ring of 58 teeth. Each revolution of the planets around the fixed ring rotates the output ring by one tooth, leading to almost 100:1 reduction.

We think the ‘harmonic’ designation on this gearbox is a little of a misnomer, since the defining feature of a harmonic drive seems to be the periodic deformation of a flex spline, as we saw in this 3D-printed strain wave gear. But we see the resemblance to a harmonic drive, and we’ll admit this beastie is a little hard to hang a name tag on. Whatever you call it, it’s pretty cool and could be a handy tool for all kinds of builds.

Continue reading “Unique Planetary Gearbox Can Be Custom Printed For Steppers”

DIY Syringe Pump Saves Big Bucks For Hacker’s Lab

If you had a choice between going to your boss and asking for funds for a new piece of gear, would you rather ask for $3000 to buy off-the-shelf, or $200 for the parts to build the same thing yourself? Any self-respecting hacker knows the answer, and when presented with an opportunity to equip his lab with a new DIY syringe pump for $200, [Dr. D-Flo] rose to the challenge.

The first stop for [Dr. D-Flo] was, naturally, Hackaday.io, which is where he found [Naroom]’s syringe pump project. It was a good match for his budget and his specs, but he needed to modify some of the 3D printed parts a little to fit the larger syringes he intended to use. The base is aluminum extrusion, the drive train is a stepper motor spinning threaded rod and a captive nut in the plunger holders, and an Arduino and motor shield control everything. The drive train will obviously suffer from a fair amount of backlash, but this pump isn’t meant for precise dispensing so it shouldn’t matter. We’d worry a little more about the robustness of the printed parts over time and their compatibility with common lab solvents, but overall this was a great build that [Dr. D-Flo] intends to use in a 3D food printer. We look forward to seeing that one.

It’s getting so that that you can build almost anything for the lab these days, from peristaltic pumps to centrifuges. It has to be hard to concentrate on your science when there’s so much gear to make.

Continue reading “DIY Syringe Pump Saves Big Bucks For Hacker’s Lab”

Pint-Sized, Low-Cost CNC Machine

A little MDF, a little plywood, some bits of threaded rod – put it all together and you’ve got this low-cost desktop CNC build using very few parts you’d need to go farther afield than the local home center to procure.

We’ve seen lots of e-waste and dumpster diving CNC builds here before; what’s appealing here is not only the low price tag of the build but also its approachability. As the short videos below show, [Thimo Voorwinden] does an admirable job of using the tools and materials he has on hand. We also appreciate the modularity of the build – the X- and Y-axis carriages are nearly identical and could be interchanged to alter the dimensions of the work area, or even replaced with a larger carriage if needed. The Z-axis is a little different from the usual low-end CNC build in that it doesn’t use a Dremel or other small rotary tool but rather mounts the handpiece of a flexible shaft rotary tool. Keeping the motor off the machine allows for more torque, less vibration, and reduced dead load.

The end result is a desktop CNC for about €200 with a work area large enough to fabricate small wooden and plastic parts, or to mill foam blocks for use as casting molds. It looks like [Thimo] has more in store for his little CNC machine, and we’re looking forward to seeing what improvements he can come up with.

Continue reading “Pint-Sized, Low-Cost CNC Machine”

Modified Servo Adds Focus Control To Telescope

Scanning the heavens with a telescope is a great way to spend long, clear winter nights, but using a manual telescope can get to be a drag. A motorized mount with altitude and azimuth control is basic equipment for the serious observer, but adding a servo to control the focus of your telescope is one step beyond your average off-the-shelf instrument.

Having already motorized the two axes of the equatorial mount of his modest telescope as a senior project, [Eric Seifert] decided to motorize the focus rack as well. His first inclination was to use a stepper motor like he did on the other two axes, but with a spare high-torque servo at hand, he hacked a quick proof-of-concept. The servo was modified for continuous rotation in the usual way, but with the added twist of replacing the internal potentiometer with an external linear pot. Attached to the focus tube, the linear pot allows [Eric] to control the position and speed of the modified servo. Sounds like controlling the focus will be important to [Eric]’s planned web interface for his scope; we’ll be looking for details on that project soon.

We like the simplicity of this solution, and it’s a trick worth keeping in mind for other projects.  But if fancy steppers and servos aren’t your thing, fear not — astrophotography is as easy as slapping a couple of boards together with a hinge.

Continue reading “Modified Servo Adds Focus Control To Telescope”