The Teensy Audio Library

There are a few ways of playing .WAV files with a microcontroller, but other than that, doing any sort of serious audio processing has required a significantly beefier processor. This isn’t the case anymore: [Paul Stoffregen] has just released his Teensy Audio Library, a library for the ARM Cortex M4 found in the Teensy 3 that does WAV playback and recording, synthesis, analysis, effects, filtering, mixing, and internal signal routing in CD quality audio.

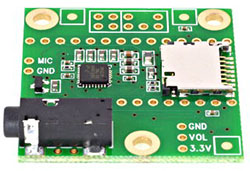
This is an impressive bit of code, made possible only because of the ARM Cortex M4 DSP instructions found in the Teensy 3.1. It won’t run on an 8-bit micro, or even the Cortex M3-based Arduino Due. This is a project meant for the Teensy, although [Paul] has open sourced everything and put it up on Github. There’s also a neat little audio adapter board for the Teensy 3 with a microSD card holder, a 1/8″ jack, and a connector for a microphone.

In addition to audio recording and playback, there’s also a great FFT object that will split your audio spectrum into 512 bins, updated at 86Hz. If you want a sound reactive LED project, there ‘ya go. There’s also a fair bit of synthesis functions for sine, saw, triangle, square, pulse, and arbitrary waveforms, a few effects functions for chorus, flanging, envelope filters, and a GUI audio system design tool that will output code directly to the Arduino IDE for uploading to the Teensy.

It’s really an incredible amount of work, and with the number of features that went into this, we can easily see the quality of homebrew musical instruments increasing drastically over the next few months. This thing has DIY Akai MPC/Monome, psuedo-analog synth, or portable effects box written all over it.

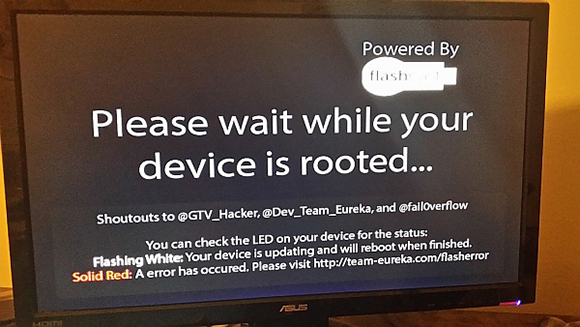
Chromecast Is Root

Image from [psouza4] on the xda-developers forum

Chromecast is as close as you’re going to get to a perfect device – plug it in the back of your TV, and instantly you have Netflix, Hulu, Pandora, and a web browser on the largest display in your house. It’s a much simpler device than a Raspi running XBMC, and we’ve already seen a few Chromecast hacks that stream videos from a phone and rickroll everyone around you.

Now the Chromecast has been rooted, allowing anyone to change the DNS settings (Netflix and Hulu users that want to watch content not available in their country rejoice), and loading custom apps for the Chromecast.

The process of rooting the Chromecast should be fairly simple for the regular readers of Hackaday. It requires a Teensy 2 or 2++ dev board, a USB OTG cable, and a USB flash drive. Plug the Teensy into the Chromecast and wait a minute. Remove the Teensy, plug in the USB flash drive, and wait several more minutes. Success is you, and your Chromecast is now rooted.

Member of Team-Eureka [riptidewave93] has put up a demo video of rooting a new in box Chromecast in just a few minutes. You can check that out below.

Continue reading “Chromecast Is Root”

TFT LCDs Hit Warp Speed With Teensy 3.1

[Paul Stoffregen], known as father of the Teensy, has leveraged the Teensy 3.1’s hardware to obtain some serious speed gains with SPI driven TFT LCDs. Low cost serial TFT LCDs have become commonplace these days. Many of us have used Adafruit’s TFT LCD library  to drive these displays on an Arduino. The Adafruit library gives us a simple API to work with these LCDs, and saves us from having to learn the intricacies of various driver chips.

[Paul] has turbocharged the library by using hardware available on Teensy 3.1’s 32 Freescale Kinetis K20 microcontroller. The first bump is raw speed. The Arduino’s ATmega328 can drive the SPI bus at 8MHz, while the Teensy’s Kinetis can ramp things up to 24MHz.

Speed isn’t everything though. [Paul] also used the Freescale’s 4 level FIFO to buffer transfers. By using a “Write first, then block until the FIFO isn’t full” algorithm, [Paul] ensured that new data always gets to the LCD as fast as possible.

Another huge bump was SPI chip select. The Kinetis can drive up to 5 SPI chip select pins from hardware. The ATmega328 doesn’t support chip selects. so they must be implemented with GPIO pins, which takes even more time.

The final result is rather impressive. Click past the break to see the ATmega based Arduno race against the Kinetis K20 powered Teensy 3.1.

Paul’s library is open source and available on Github.

Continue reading “TFT LCDs Hit Warp Speed With Teensy 3.1”

PS/2 Synth Will Knock You Off Your Broom

Here’s a hack centered around something a lot of people have sitting around: a PS/2 keyboard. [serdef] turned a Harry Potter-edition PS/2 into a combination synth keyboard and drum machine and has a nice write-up about it on Hackaday.io.

For communication, he tore up a PS/2 to USB cable to get a female mini DIN connector and wired it to the Nano. He’s using a Dreamblaster S1 synth module to generate sounds, and that sits on a synth shield along with the Nano. The synth can be powered from either the USB or a 9-volt.

Keymapping is done with the Teensy PS/2 keyboard library. [serdef] reused a bunch of code from his bicycle drummer project which also employed the Dreamblaster S1. [serdef] is continually adding features to this project, like a pot for resonance control which lets him shape the waveform like an analog synth. He has posted some handy PS/2 integration code, his synth code, and a KiCad schematic. Demo videos are waiting for you across the link.  Continue reading “PS/2 Synth Will Knock You Off Your Broom”

Building A True Unix Keyboard

keyboard

compact keyboards that do away with a third of the keys you would usually find on a normal-sized keyboard are all the rage now, but for [jonhiggs], they weren’t good enough. There is a long tradition of Unix shortcuts these compact keyboards don’t pay attention to – CTRL-A being the Home key, and CTRL-D being the Page Down key. To fix this horrible oversight of Unix history, [jon] tore apart one of these compact keyboards, rewired the switch matrix, and made his own perfect keyboard.

The keyboard [jon] is using is a Filco Minila, a very nice and high quality keyboard in its own right.  After mapping out the switch matrix, [jon] wired all the switches up to a Teensy 2.0 loaded up with the TMK firmware. This is a pretty standard way of building a custom keyboard, and [jon] could have just cut a switch plate and installed panel-mount switches and wired up the matrix and diodes point to point. The case for the keyboard is constructed out of Lego.

Because this is a true, modern Unix keyboard, [jon] needed to connect this keyboard to a box running his *nix of choice. He’s doing this in the most future-retro way possible, with an Amazon EC2 instance. This project isn’t done yet, and [jon] is hoping to add an ARM dev board, an iPad Retina display, battery, and SSD, turning this into a completely homebrew laptop designed around [jon]’s needs.

The Rabbit H1 Is A Stationary Mouse Replacement

rabbit h1

[Dave] has some big plans to build himself a 1980’s style computer. Most of the time, large-scale projects can be made easier by breaking them down into their smaller components. [Dave] decided to start his project by designing and constructing a custom controller for his future computer. He calls it the Rabbit H1.

[Dave] was inspired by the HOTAS throttle control system, which is commonly used in aviation. The basic idea behind HOTAS is that the pilot has a bunch of controls built right into the throttle stick. This way, the pilot doesn’t ever have to remove his hand from the throttle. [Dave] took this basic concept and ran with it.

He first designed a simple controller shape in OpenSCAD and printed it out on his 3D printer. He tested it out in his hand and realized that it didn’t feel quite right. The second try was more narrow at the top, resulting in a triangular shape. [Dave] then found the most comfortable position for his fingers and marked the piece with a marker. Finally, he measured out all of the markings and transferred them into OpenSCAD to perfect his design.

[Dave] had some fun with OpenSCAD, designing various hinges and plywood inlays for all of the buttons. Lucky for [Dave], both the 3D printer software as well as the CNC router software accept STL files. This meant that he was able to design both parts together in one program and use the output for both machines.

With the physical controller out of the way, it was time to work on the electronics. [Dave] bought a couple of joysticks from Adafruit, as well as a couple of push buttons. One of the joysticks controls the mouse cursor. The other joystick controls scrolling vertically and horizontally, and includes a push button for left-click. The two buttons are used for middle and right-click. All of these inputs are read by a Teensy Arduino. The Teensy is compact and easily capable of emulating a USB mouse, which makes it perfect for this job.

[Dave] has published his designs on Thingiverse if you would like to try to build one of these yourself.


Custom Electronics And LED Panels Brighten Up A Nightclub

ledPanels

When [Robert] is presented with a challenge, he doesn’t back down. His friend dreamed of reusing some old LED panels by mounting them to the ceiling of the friend’s night club. Each panel consists of a grid of five by five red, green, and blue LEDs for a total of 75 LEDs per panel. It sounded like a relatively simple task but there were a few caveats. First, the controller box that came with the panels could only handle 16 panels and the friend wanted to control 24 of them. Second, the only input device for the controller was an infrared remote. The friend wanted an easy way for DJ’s to control the color of the panels and the infrared remote was not going to cut it. Oh yea, he also gave [Robert] just three weeks to make this happen.

[Robert] started out by building a circuit that could be duplicated to control each panel. The brain of this circuit is an ATtiny2313. For communication between panels, [Robert] chose to go with the DMX protocol. This was a good choice considering DMX is commonly used to control stage lighting effects. The SN75176 IC was chosen to handle this communication. In his haste to get this PCB manufactured [Robert] failed to realize that the LED panels were designed common cathode, as opposed to his 25 shiny new PCB’s which were designed to work with a common anode design. To remedy this, he switched out all of the n-channel MOSFET with p-channel MOSFET. He also spent a couple of hours manually cutting through traces and rewiring the board. After all of this, he discovered yet another problem. The LED’s were being powered from the same 5V source as the microcontroller. This lead to power supply issues resulting in the ATtiny constantly resetting. The solution was to add some capacitors.

Click past the break for more on [Robert’s] LED panels.

Continue reading “Custom Electronics And LED Panels Brighten Up A Nightclub”