What To Do With Your Brand New Ultrasonic Transducer

We wager you haven’t you heard the latest from ultrasonics. Sorry. [Lindsay Wilson] is a Hackaday reader who wants to share his knowledge of transducer tuning to make tools. The bare unit he uses to demonstrate might attach to the bottom of an ultrasonic cleaner tank, which have a different construction than the ones used for distance sensing. The first demonstration shows the technique for finding a transducer’s resonant frequency and this technique is used throughout the video. On the YouTube page, his demonstrations are indexed by title and time for convenience.

For us, the most exciting part is when a tuned transducer is squeezed by hand. As the pressure increases, the current drops and goes out of phase in proportion to the grip. We see a transducer used as a pressure sensor. He later shows how temperature can affect the current level and phase.

Sizing horns is a science, but it has some basic rules which are well covered. The basic premise is to make it half of a wavelength long and be mindful of any tools which will go in the end. Nodes and antinodes are explained and their effects demonstrated with feedback on the oscilloscope.

We have a recent feature for an ultrasonic knife which didn’t cut the mustard, but your homemade ultrasonic tools should be submitted to our tip line.

Continue reading “What To Do With Your Brand New Ultrasonic Transducer”

A Pin Pusher To Make Life Easier

Picture the scene: you’ve whipped up an amazing new gadget, your crowdfunding campaign has gone well, and you’ve got a couple hundred orders to fill. Having not quite hit the big time, you’re preparing to tackle the production largely yourself. Parts begin to flood in, and you’ve got tube after tube of ICs ready to populate your shiny new PCBs? After the third time, you’re sick and tired of fighting with those irksome little pins. Enter [Stuart] with the answer.

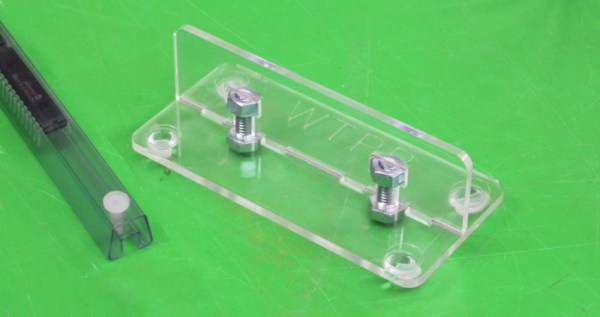
It’s a simple tool, attractively presented. Two pieces of laser cut acrylic are assembled in a perpendicular fashion, creating a vertical surface which can be used to press pins out of IC tubes. [Stuart]’s example has rubber feet, though we could easily see this built into a work surface as well.

The build highlights two universal truths. One, that laser cutters are capable of producing elegant, visually attractive items almost effortlessly, something we can’t say about the garden variety 3D printer. Secondly, all it takes is a few little jigs and tools to make any production process much easier. This is something that’s easy to see in the many factories all over the world – special single-purpose devices that make a weird, tricky task almost effortless.

In DIY production lines, testing is important too – so why not check out this home-spun test jig?

Tachometer Uses Light, Arduinos

To measure how fast something spins, most of us will reach for a tachometer without thinking much about how it works. Tachometers are often found in cars to measure engine RPM, but handheld units can be used for measuring the speed of rotation for other things as well. While some have mechanical shafts that must make physical contact with whatever you’re trying to measure, [electronoobs] has created a contactless tachometer that uses infrared light to take RPM measurements instead.

The tool uses an infrared emitter/detector pair along with an op amp to sense revolution speed. The signal from the IR detector is passed through an op amp in order to improve the quality of the signal and then that is fed into an Arduino. The device also features an OLED screen and a fine-tuning potentiometer all within its own self-contained, 3D-printed case and is powered by a 9 V battery, and can measure up to 10,000 RPM.

The only downside to this design is that a piece of white tape needs to be applied to the subject in order to get the IR detector to work properly, but this is an acceptable tradeoff for not having to make physical contact with a high-speed rotating shaft. All of the schematics and G code are available on the project site too if you want to build your own, and if you’re curious as to what other tools Arduinos have been used in be sure to check out the Arduino-based precision jig.

Continue reading “Tachometer Uses Light, Arduinos”

Digital Kiln

A kiln or foundry is too often seen as a piece of equipment which is only available if a hackspace is lucky enough to have one or individuals are dedicated enough to drop the cash for one of their own. [The Thought Emporium] thought that way until he sourced materials to make his own kiln which can also be seen after the break. It costs half the price of a commercial model not including a failed—and exploded—paint can version.

As described in the video, these furnaces are tools capable of more than just pottery and soft metal baubles. Sure, a clay chess set would be cool but what about carbon fiber, graphene, aerogel, and glass? Some pretty hot science happens at high temperatures.

We get a nice walk-through of each part of the furnace starting with the container, an eleven-gallon metal tub which should set the bar for the level of kiln being built. Some of the hardware arrangements could be tweaked for safety and we insist that any current-carrying screw is safely mounted inside an enclosure which can’t be opened without tools. There’s good advice about grounding the container if metal is used. The explanation of PID loops can be ignored.

What else can you do with a kiln? How about jewelry, heat treating metal, or recycle your beer cans into an engine.

Continue reading “Digital Kiln”

Rescuing An Antique Saw Set

Who doesn’t like old tools? Even if they aren’t practical to use for production, plenty of old tools still have a life to offer the hobbyist or home worker.  Some tools might seem a bit too far gone – due to age, rust, or practicality, to use. That’s where [Hand Tool Rescue] comes in. [HTR] finds rusty, dirty old tools, and brings them back to life. Sometimes they’re practical tools, other times, they’re a bit out there. In a recent video, he restored a BeMaCo automatic saw set from the 1940’s. Saw sets are tools which bend each tooth of a saw blade slightly. Typically they are pliers-like devices.

The slight bend of each tooth on the blade widens the saw’s kerf and prevents binding. Typically these tools are pliers-like devices. The BeMaCo set is something else — it pulls the blade through tooth by tooth, while a spring-loaded head pecks away, bending each tooth. It’s something Rube Goldberg would have loved.

[HTR’s] filming style borrows a lot from [Jimmy DiResta], who we’ve covered here before. There are no words, and most of the video is sped up. Even with the fast video, [HTR] probably has many hours of footage to pare down to a 20-minute video.

The restoration begins with tearing the saw set apart. Every nut and bolt is removed. All the parts are cleaned, chemically de-rusted, and wire-wheeled. Even the motor is torn down, cleaned, and wired up. Then come the re-assembly. [HTR] gets every piece back in its proper place. We’re wondering how many times he had to refer to the teardown video to get everything right. Finally, the saw set is complete — ready for another 70 years of work.

Cutting Stone With A Diamond Bit Built From Plumbing Parts

Everyone’s favorite Canadian is at it again. This time, [AVE] needed to cut a large hole in a stone countertop. They making coring bits for this, but a bit this size would cost upwards of $400. Not a problem. [AvE] broke out the tools and built his own stone cutting bit.

Everything starts with a 6″ plastic pipe cap. [AvE] center drilled the cap, then threaded it. A turned down bolt makes a great arbor for this new tool. The edge of the cap was then slotted. [AvE] used a clapped out Bridgeport milling machine, but you could do the same job with a hacksaw or a Dremel tool.

The secret sauce is industrial diamonds. That’s right, this is a diamond cutting bit. [AvE] ordered 20 grams of 20-25 mesh industrial diamonds. “Mesh” defines the size of the individual diamonds — in this case around 50 microns and up.  Now, how to bind diamond and plastic? Plumber’s transition cement didn’t work – the diamonds and coating just peeled off like a sunburn. The solution turned out to be JB-Weld. A liberal coating of JB-Weld on the face of the tool, a sprinkling of industrial diamonds, and the pipe cap was ready to cut.

The cutting operation was slow, steady, and lots of cooling water. [AvE] made it most of the way through his countertop before having to refurbish his bit.

[AvE] usually is a man of many words, as can be seen in this post about his EDM machine. This time though, he gave us the silent treatment — an entire video with no words, set to classical music. It’s great seeing YouTubers step outside their comfort zone and trying something new.

Continue reading “Cutting Stone With A Diamond Bit Built From Plumbing Parts”

Modding A Powdercoating Gun For Performance

In life, tools come in two varieties – good tools, and cheap tools. This is where the hacker steps in, to transform a cheap tool into more than the sum of its parts. [Josh] had problems with his Eastwood powdercoating gun. [Josh] decided to fix things with a couple of tasteful mods.

The problem with the gun was related to the delivery of powder to the workpiece. The stream was either too weak to coat properly, or too heavy, delivering a thick stream of powder. [Josh] surmised that with better airflow into the powder reservoir, the gun would deliver a properly mixed cloud of powder as required. By drilling a couple of small holes into the air feed into the reservoir, the powder stream was much less heavy and the gun’s performance was greatly improved.

[Josh] then decided to take things a step further, by fitting a tip from a more expensive gun to his Eastwood model. There were some challenges in getting it connected electrically, but nothing a little electrical tape couldn’t fix. While this did further improve results, it was a minor improvement compared to the air feed modifications.

Overall, [Josh] was able to take a poorly performing tool and transform it into something much more useful, just by drilling a couple of holes. Check out our Hacklet on quick tool hacks, or share your best work in the comments.