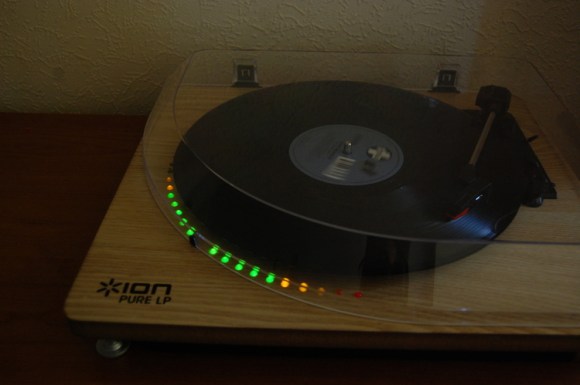
Hackaday Links: November 29th, 2012

EMC2 CNC keyboard labels

If you’ve got a dedicated computer running EMC2 for CNC control you may be interested in these keyboard labels. [Rich] mentions that they use the labels for their engraver at the Connecticut Hackerspace. Just print them out and glue them in the face of the keys.

Dev board seminars and freebies

[Mike] wrote in to tell us STM is giving away samples of the STM32 F3 Discovery again. But you can also get in on some free seminars. One is an online webinar for TI’s Launchpad family, the other is for the F3 Discovery board and is being held all around the US.

Replacing batteries with USB power

[Johan] didn’t want to use batteries for the light on the microscope he uses when working with SMT parts. He added a few components with let him power the device from USB instead.

MSP430 VU meter uses FFT

Here’s an MSP430 using Fast Fourier Transform for signal processing. There’s very little explanation, but apparently this collection of FFT related material was used heavily in the project. [via Reddit]

Cell Racr

If you’re looking for a new office game you might consider Cell Racr. It pits your cellphone’s vibrating motor against everyone else’s. Just place the phone on an incline and repeatedly dial its number to advance toward the finish line.

8x8x8 LED Cube And The Board That Drives It

Check out the LED cube which [Thomas], [Max], and [Felix] put together. But don’t forget to look at that beautiful PCB which drives it… nice! But hardware is only part of what goes into a project like this one. After the soldering iron had cooled they kept going and wrote their own software to generate patterns for the three-dimensional display.

Looking at a clean build like this one doesn’t drive home the amount of connections one has to make to get everything running. To appreciate it you should take a look at this other 512 LED cube which has its wires showing. You can see from the schematic (available in the project repository) that all of these lines are managed by a series of shift registers. The board itself connects to a computer from which it gets the visualization commands. A Java program they call CubeControl can push letters or turn the cube into a VU meter.

The team built at least two of these. This smaller version uses red LEDs, while the larger one shown in the video after the break has blue ones.

Continue reading “8x8x8 LED Cube And The Board That Drives It”

Hackaday Links: November 15, 2012

Another way to break out dual pin headers

[Uwe] wrote in to share his technique for breaking out dual pin headers. He uses two single pin headers, a piece of protoboard, and a dual row pin socket to make an adapter. This is removable where the other method we saw this week was not.

Web-based slide show hack

Wanting to use an old Android tablet as a digital picture frame, [Gordon] coded up a simple way to use an HTML page to scan your picture directories to feed a rotating background image.

The simplest hot plate

For his chemistry experiments [Charlie] is using a plain old clothes iron for a hot plate. he simply clamps it upside down to the bench. It doesn’t have any stirring abilities, but we already have an old iron in the shop which we use for toner transfer so we’ll have to keep this in mind if we ever need to heat chemicals (might be a good way to warm etchant).

A charging VU meter

This Cambrionix series8 universal charger has columns of LEDs that are animated when a device is charging. [Steve Tyson] works for the company and has had some fun messing with the firmware. He’s showing off the display as a VU meter.

Game Boy knockoff teardown

This wide-form-factor Game Boy is a knockoff from way back when the original system hit the market. You won’t want to miss this lengthy post that takes a look at what’s inside. [Thanks Neil]


Collection Of Nixie Bar Graphs Bump To The Beat

This VU meter uses Nixie tubes as the display. There are a total of fourteen IN-13 bar graph tubes that map out the audio spectrum. The build uses purely hardware for the display; no microcontroller processing, or dedicated VU-meter chips were used.

Input begins with a dual Op-Amp along with a pair of potentiometers which allow the left and right channels to be balanced. Both channels are then each split into seven signals, which explains the layout of tubes seen above. Each signal is then fed through a voltage divider to envelope the output between 0V and 6V. There is also a low-pass filter to handle sudden volume spikes which don’t work well with the nixies. But as shown in the video after the break, all that work has paid off. Thr clip gives us a look at the green protoboards which host all of this filtering hardware. You’ll want to turn the volume down for the first couple of demonstrations which use a sweep to test the system.

Continue reading “Collection Of Nixie Bar Graphs Bump To The Beat”

ultimate-breadboard

The Ultimate Breadboard – A Prototyping Station That Has It All

[Claudio] was working on a homebrew oscilloscope project when he started thinking about how unsuitable a standard breadboard is for a large-scale project. Rather than adding components on top of components until they became what he lovingly calls a “fragile, unforgiving crapstack”, he decided to build himself the Ultimate Breadboard.

He packed so much into his design, that it’s honestly hard to know where to begin describing it. Aside from an appropriately large breadboarding surface embedded in the center of the console, he added a power supply to the left hand side, which sits just below an Avr-Net-IO board. The right side of the console features an Arduino NG, and a pair of level converters. He also added some LED-based VU meters, a couple of 7-segment displays, an LCD display, an analog voltmeter, along with plenty of I/O connectors.

The Ultimate Breadboard might look a bit daunting at first, but it seems like an awesome setup on which to do any sort of prototyping. Be sure to check out the video below for more details and to see [Claudio] give a tour of the device.

Continue reading “The Ultimate Breadboard – A Prototyping Station That Has It All”

A Quick And Dirty VU Meter For Your Next Party

If you want an easy project to spice up your next party, chances are you already have parts on hand to throw together [Mikerbot’s] quick and dirty VU-meter lights. The circuit he designed uses the audio input to trigger the base of a PNP transistor, toggling power through a string of LEDs. He’s using four lights for each of the stereo output signals, making them pulse with the music as seen in the video after the break. The circuit is built on a breadboard, and housed in a picture frame with a less-than-impressive diffuser (we think that’s always the hardest part… check out the Heavy Frost used in this project if you want something that works really well).

There are some VU meter chips out there that will really augment this concept. But one improvement might be to throw in an amplifier chip like the LM386 and a couple of potentiometers so that you can dial-in the sensitivity.

Continue reading “A Quick And Dirty VU Meter For Your Next Party”

Using An LED Cube As An Audio Visualizer

[Isaac] sent in his mashup build of a LED cube combined with a graphic EQ meter. The build is fairly simple and from the video we can tell that his build would be a great installation in a dubstep venue. While it’s not the 9x9x9 cube possible with some judicious coding we think it’s a very fitting display for the intended purpose.

Continue reading “Using An LED Cube As An Audio Visualizer”