Timepieces are a staple of Hackaday, we have featured so many of them over the years that for us to become really excited by a fresh one it must be particularly special. The days when simply breaking out the Nixies was enough are long past.
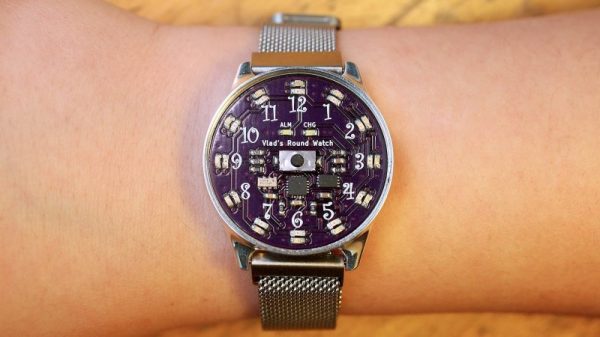
So this binary wristwatch project by [Sverd Industries] definitely caught our eye. Not for being particularly novel, after all binary LED clocks are not in themselves hard, but for the exceptionally high quality of its construction. It’s a simple enough design, with a real-time clock chip and an ATmega328 in its most power-sipping mode on a circular PCB with an array of LEDs as the display, and all contained within a 3D-printed shell.
This design has real quality, the discrete components are tucked underneath the board leaving the ICs on the top with only the LEDs for company. The glass front is glued into place, and the shell is professionally 3D-printed. Power comes from a single CR2032, and to save battery life the LEDs are only activated by the press of a concealed button. We would wear this watch. For that matter, you would wear this watch. Take a look at the video below the break, and we’re sure you’ll agree. Looks like a few are even available over on Tindie.
This isn’t the first binary watch we’ve featured, so it’s tough to pick a comparison. This very low BoM example might lack some of the polish of the one presented here, but it has the same ability to catch our eye.
The microcontroller running the watch is an STM32, chosen for its easy programmability. It’s running the LEDs in an emulation of the dial of an analog clock, hence the high part count. Naturally, it’s no simple task to cram 73 LEDs and all the necessary connections into the confines of a watch-sized PCB. [Kevin] goes into great detail about the challenges involved, from routing the traces to a tricky power draw problem caused by some odd blue LEDs.
In an age of smartwatches, an analog watch might seem a little old-fashioned. Whether it’s powered by springs or a battery, though, the machinery that spins those little hands is pretty fascinating. Trouble is, taking one apart usually doesn’t reveal too much about their tiny workings, unless you get up close and personal like with this microscopic tour of an analog watch.
This one might seem like a bit of a departure from [electronupdate]’s usual explorations of the dies within various chips, but fear not, for this watch has an electronic movement. The gross anatomy is simple: a battery, a coil for a tiny stepper motor, and the gears needed to rotate the hands. But the driver chip is where the action is. With some beautiful die shots, [electronupdate] walks us through the various areas of the chip – the oscillator, the 15-stage divider cascade that changes the 32.768 kHz signal to a 1 Hz pulse, and a remarkably tiny H-bridge for running the stepper. We found that last section particularly lovely, and always enjoy seeing the structures traced out. There are even some great tips about using GIMP for image processing. Check out the video after the break.
[electronupdate] knows his way around a die, and he’s a great silicon tour guide, whether it’s the guts of an SMT inductor or a Neopixel close-up. He’s also looking to improve his teardowns with a lapping machine, but there are a few problems with that one so far.
As if building tiny mechanisms with dozens of moving parts that all need to mesh together perfectly to work weren’t enough, some clock and watchmakers like to put their horology on hard mode with tourbillon movements. Tourbillons add multiple axes to the typical gear trains in an attempt to eliminate errors caused by the influence of gravity — the movement essentially spins on gimbals while tick-tocking away.
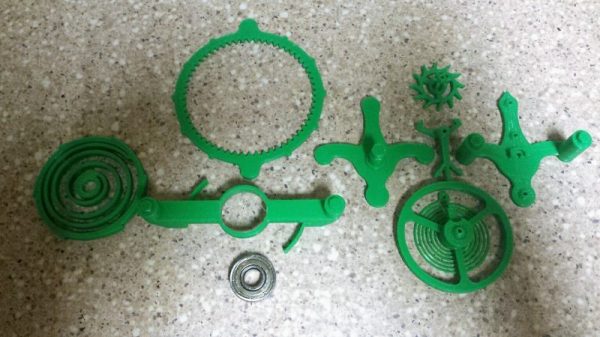
It feels like tourbillons are too cool to lock inside timepieces meant for the ultra-rich. [Alduinien] agrees and democratized the mechanism with this 3D-printed tourbillon. Dubbed “Hawkeye,” [Alduinien]’s tourbillon is a masterpiece of 3D printing. Composed of over 70 pieces, the mechanism is mesmerizing to watch, almost like a three-axis mechanical gyroscope.
The tourbillon is designed to be powered either by the 3D-printed click spring or by a small electric motor. Intended mainly as a demonstration piece, [Alduinien]’s Thingiverse page still only has the files for the assembled mechanism, but he promises to get the files for the individual pieces posted soon. Amateur horologists, warm up your 3D-printers.
Tourbillons are no stranger to these pages, of course. We’ve done an in-depth look at tourbillons for watches, and we’ve even featured a 3D-printed tourbillon clock before. What we like about this one is that it encourages exploration of these remarkable instruments, and we’re looking forward to seeing what people do with this design. For those looking for more background on clock escapements in general, [Manuel] wrote a great article on how we turned repetitive motion into timekeeping.
Sometimes silence is the best compliment to a DIY project, and that doesn’t just apply to homemade lockjaw toffee. When a watch is so well-made that it looks like one from a jewelry store, it is easy to keep quiet. [ColinMerkel] took many pictures of his fourth wristwatch attempt but “attempt” is his word because we call this a success. This time around he didn’t forget the crown for adjusting the time so all the pieces were in place.
His second “attempt” at wristwatch making was featured here and it had a classical elegance. Here, the proverbial game has been stepped up. Instead of using stock steel, the body is constructed of 303 stainless steel. The watch dial will definitely draw compliments if its DIY nature is revealed, which is equally mathematical and charming. Pictures of this process were enough to convey the build without words which is always a bonus if you only want a quick look or English isn’t your first choice for language.
Real quick question: how do you increase productivity at work? The greatest (highest paid) minds would just say: do agile or scrum or something. What’s scrum? That’s where you gather ’round every morning for a waste of time meeting that kills your every desire to be productive. A while back, [Travis Goodspeed] was stuck in some lesser circle of hell like this and in an effort to be polite by not looking at his phone too much, looked at his watch too much. This led to the creation of the Goodwatch, a new bit of hardware that replaces the guts of a Casio calculator watch with a hex editor, ISM-band radio, MSP430 disassembler, and of course an RPN calculator.
[Travis] has already introduced the GoodWatch to the world. We took a look back in December but haven’t heard anything since. His talk at Shmoocon 2018 put a little more light on how this project came to be.
It’s becoming abundantly clear that [Colin Merkel] doesn’t know the definition of “good enough”. Not only has he recently completed his third (and most impressive) wristwatch build, but he also managed to put together one of the most ridiculously romantic gifts ever conceived. While some of us are giving our significant others a gift card to Starbucks, he made his girlfriend a watch with a chart on the face representing the position of the stars at the time and place of their first meeting.
As per his usual style, the documentation on this build is phenomenal. If paging through his gallery of build images doesn’t make you want to get a lathe and start learning metal working, nothing will. A chunk of stainless steel rod miraculously becomes a gorgeous wrist watch over the course of a few dozen images, perfectly encapsulating that old adage of “making it look easy”.
Certainly the highlight of this build is the star chart on the face. To make it, he used PyEphem to plot the position of the brightest stars that were visible at the time and place of their first meeting. He then wrote a script to take those stars and convert their positions to G-Code the CNC could use to drill holes in the appropriate locations. The depth of the hole even corresponds to the magnitude (brightness) of each star, giving the chart a subtle 3D effect.
Unfortunately, [Colin] made a couple of mistakes during this build, to the point that he’s not exactly sure how to proceed. He mentions he might even be forced to start over from scratch. It’s hard to imagine how something that looks this good could ever end up being a failure, but the world of watch making is unkind.
To start with, he used 304 stainless instead of 303. This made machining the case much more difficult, and from his very first cut he realized it was going to be a problem. While it was an annoyance he mentions a couple times during the build log, he was at least was able to work through it.
The real problem came at the end, when he put the watch together. He originally made his designs assuming a front glass which was 0.5 mm thick, but in actuality used a piece that is 0.8 mm thick. This slight difference is just enough to cause the seconds hand to rub up on the glass, putting drag on the movement. The end result is that the battery dies extremely quickly, effectively rendering the watch useless.
We can’t imagine the heartbreak [Colin] felt when he realized what happened; we felt bad just reading about it. But given his track record, we have no doubt he’ll get the issue sorted out. It would be a shame to start over completely, but there’s some consolation in knowing it’s part of the learning process: you don’t become a master of your craft without making a couple mistakes along the way.