Building A Tiny Finger Plane For Detailed Work

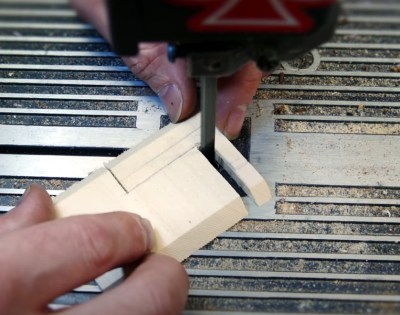
A plane is a tool familiar to all woodworkers, used to shape a workpiece by hand by shaving away material. Regular planes are two-handed tools available at all good hardware stores. For finer work, a finger plane can be useful, though harder to find. Thankfully, [Daniel] put together a video showing how to make your own.

[Daniel]’s build relies on stabilized wood, useful for its density and consistent quality, though other woods work too. A 6″ pen blank is enough to make a pair of matching finger planes. A block and two side panels are cut out from the material, with attention paid to making sure everything remains square for easy assembly. The parts are glued together with a block set at the desired cutting angle for the plane. With the assembly then tidied up on the bandsaw and sander, [Daniel] installs the cutting blade. This can be made from a larger standard plane blade, or a cutdown chisel can be pressed into service. The blade is held in place with a wooden wedge beneath a metal pin. The pin itself is crafted from an old drill bit, cut down to size.

It’s a useful tool for doing fine plane work, for which a full-size tool would be ungainly. We can imagine it proving particularly useful in producing accurate scale models in smaller sizes. If you’re big into woodworking, consider giving your tools a good sharpen on the cheap, too. Video after the break.

Continue reading “Building A Tiny Finger Plane For Detailed Work”

Escape Tunnel In Your Living Room: A Different Take On The Infinity Mirror

Most infinity mirrors are just minor variations on the same old recipe. Take a frame, add a normal mirror in the back, a one-way mirror on the front, and put some LEDs between them. [Stevens Workshop] took a slightly different approach and built an escape tunnel coffee table that really caught our attention.

To create the tunnel and ladder illusion, [Steven] kept the mirrors, but made a deeper wood frame, installed a light bulb in an industrial-looking socket instead of the usual LEDs, and added a single ladder rung. The end result makes for a very interesting conversation piece, and some of us prefer it to the multicolored LED look. Though he added his own touches, the idea was actually borrowed from from [asthhvdrt36] and [BreezleSprouts] on Reddit who used slightly different light and ladder designs.

While there’s nothing groundbreaking here, it’s certainly a case of “why didn’t I think of that”. Sometimes the old and familiar just needs a different perspective to create something fascinating. One of the advantages of the classic infinity mirror is the thin profile, which we’ve seen integrated into everything from guitars to coasters.

Complex Wood Joints, Thanks To New Software’s Interactive Features

Artfully-crafted wooden joints that fit together like puzzle pieces and need neither glue nor nails is fascinating stuff, but to call the process of designing and manufacturing them by hand “time-consuming” would be an understatement. To change that, a research team from the University of Tokyo presented Tsugite, a software system for interactively designing and fabricating complex wooden joints. It’s named after the Japanese word for joinery, and aims to make the design and manufacture of glue and fastener-free joints much easier than it otherwise would be.

Three-way joint that requires no glue or fasteners.

It looks like the software is so far only a research project and not something that can be downloaded The software is available on GitHub and the approach it takes is interesting. This downloadable PDF explains how the software deals with the problem of how to make such a task interactive and practical.

The clever bit is that the software not only provides design assistance for the joints themselves in a WYSIWYG (what you see is what you get) interface, but also generates real-time feedback based on using a three-axis CNC tool as the manufacturing method. This means that the system understands the constraints that come from the fabrication method, and incorporates that into design feedback.

The two main limitations of using a three-axis CNC are that the cutting tool can only approach the material from above, and that standard milling bits cannot create sharp inner corners; they will have a rounded fillet the same radius as the cutting bit. Design can be done manually, or by selecting joints from a pre-defined gallery. Once the design is complete, the system generates the toolpaths for manufacture.

Currently, Tsugite is limited to single joints meant for frame structures, but there’s no reason it couldn’t expand beyond that scope. A video to accompany the paper is embedded below, it’s short and concise and shows the software in action, so be sure to give it a look.

Continue reading “Complex Wood Joints, Thanks To New Software’s Interactive Features”

A Geared Bench Vise To Clamp All The Things

On the eternal quest of workshop upgrades, [Alexandre Chappel] has combined woodworking and 3D printing to add a versatile 0.5 m wide vise with some clever internals to his workbench.

The challenge with such a wide vise is that it requires two timed lead screws on either end of the vise to prevent if from pulling skew under force. This can be done with a chain, belt, or [Alexandre]’s choice, gears. Inside the moving part of the vise he fitted series of 5 herringbone gears. By turning the center gear with a lever, it rotates the gears on the end which are fixed to tow lead screws. The external surfaces of the clamp are made with plywood, and the gears are printed with PLA and high infill percentage. [Alexandre] does say that he is not sure durable the gears are, but they definitely aren’t flimsy. He added an acrylic inspection window to the box section, which we think looks superb with the colored gears peaking through. The back of the vise is mounted inside the workbench, which keeps the look clean and doesn’t take up any bench space.

[Alexandre] does a lot of filming in his workshop, so recently he also built a very impressive and practical camera arm to avoid having to move tripods the whole time. A vise is a must-have tool in almost any workshop, so we’ve seen a few DIY versions, like magnetic base vise and one with a hydraulic vise.

Vintage Gauges Turned Classy Weather Display

It’s always good to see old hardware saved from the junk pile, especially when the end result is as impressive as this analog gauge weather display put together by [Build Comics]. It ended up being a truly multidisciplinary project, combing not only restoration work and modern microcontroller trickery, but a dash of woodworking for good measure.

Naturally, the gauges themselves are the real stars of the show. They started out with rusted internals and broken glass, but parts from a sacrificial donor and some TLC from [Build Comics] got them back in working order. We especially like the effort that was put into making the scale markings look authentic, with scans of the originals modified in GIMP to indicate temperature and humidity while retaining the period appropriate details.

To drive the 1940s era indicators, [Build Comics] is using an Arduino Nano and a DHT22 sensor that can detect temperature and humidity. A couple of trimmer pots are included for fine tuning the gauges, and everything is mounted to a small scrap of perfboard hidden inside of the custom-made pine enclosure.

This is hardly the first time we’ve seen analog gauges hooked up to modern electronics, but most of the projects are just that: modern. While the end look might be somewhat polarizing, we think maintaining the hardware’s classic style was the right call.

Laser Cutting Your Way To An RGB LED Table

You’ve got the RGB keyboard, maybe even the RGB mouse. But can you really call yourself master of the technicolor LED if you don’t have an RGB table to game on? We think you already know the answer. Luckily, as [ItKindaWorks] shows in his latest project, it’s easy to build your own. Assuming you’ve got a big enough laser cutter anyway…

The construction of the table is quite straightforward. Using an 80 watt laser cutter, he puts a channel into a sheet of MDF to accept RGB LED strips, a pocket to hold a Qi wireless charger, and a hole to run all the wires out through. This is then backed with a second, solid, sheet of MDF.

Next, a piece of thin wood veneer goes into the laser cutter. In the video after the break you can see its natural tendency to roll up gave [ItKindaWorks] a little bit of trouble, but when strategically weighted down, it eventually lays out flat. He then uses the laser to blast an array of tiny holes in the veneer, through which the light from the LEDs will shine when it’s been glued over the MDF. A few strips of plastic laid over the strips serve both to diffuse the light and support the top surface.

The end result is truly gorgeous and has a very futuristic feel. Assuming you’ve got the equipment, it’s also a relatively simple concept to experiment with. It’s yet another example of the unique construction techniques possible when you add a high-powered laser to your arsenal.

Continue reading “Laser Cutting Your Way To An RGB LED Table”

Build A Lathe Like It’s 1777

We’ve seen quite a few scratch built lathes here at Hackaday, but none quite like the handcrafted pole lathe put together by [Jon Townsend] and his band of Merry Men as part of their effort to build a period-accurate 18th century log cabin homestead. With the exception of a few metal spikes here and there, everything is made out of lumber harvested from the forest around them.

The lathe is designed to be a permanent structure on the homestead, with two poles driven into the ground to serve as legs. Two rails, made of a split log, are then mounted between them. The movable components of the lathe, known as “puppets” in the parlance of the day, are cut so they fit tightly between the rails but can still be moved back and forth depending on the size of the work piece. With two metal spikes serving as a spindle, the log to be turned down is inserted between the puppets, and wedges are used to lock everything in place.

So that’s the easy part. But how do you spin it? The operator uses a foot pedal attached to a piece of rope that’s been wound around the log and attached to a slender pole cantilevered out over the lathe. By adjusting the length and angle of this pole, the user can set the amount of force it takes to depress the pedal. When the pedal is pushed down the log will spin one way, and when the pole pulls the pedal back up, it will spin the other.

Since the tools only cut in one direction, the user has to keep letting the pressure off when the log spins back around. The fact that the work piece isn’t continuously rotating in the same direction makes this very slow going, but of course, everything was just a bit slower back in the 18th century.

So now that we’ve seen lathes made from wood, intricately cut slabs of stone, and a grab bag of junkyard parts, there’s only one question left. Why do you still not have one?

Continue reading “Build A Lathe Like It’s 1777”