A Retro Touch Pad You Can Use On Modern Computers

As [Jan Derogee] explains in the faux-retro video after the break, drawing on classic 8-bit computers was something of a pain. The rudimentary light pens and joysticks of the 1980s allowed for free-form input, but were clumsy and awkward to use. Which is why he set out to create an ideal drawing device for the C64 using modern electronics. For the sake of completion, he also gave it a USB HID mode so it would work on somewhat more modern computers.

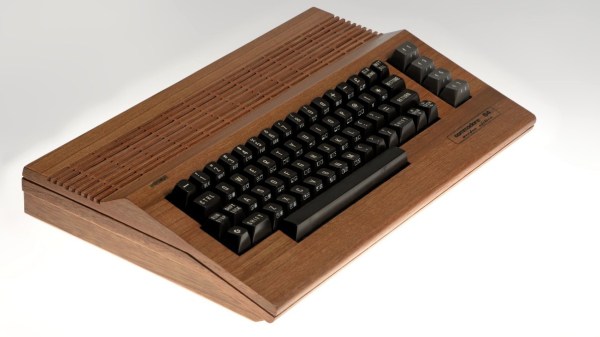
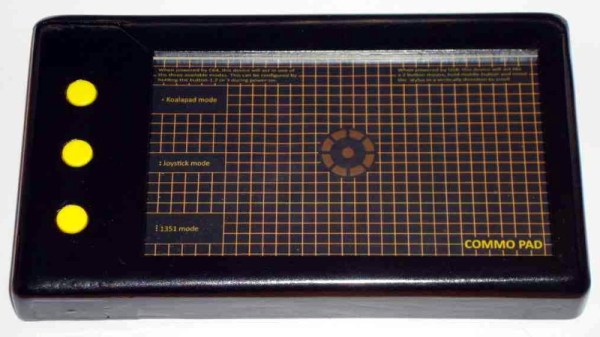
His device, which he’s calling the Commo Pad, looks like it could have been transported here directly from the 1980s, but it’s built from entirely new hardware. The case is actually made of wood that [Jan] sanded and painted to give it that chunky plastic aesthetic that we all know and love, and the retro artwork on the touch panel really goes a long way to sell the vintage vibe.

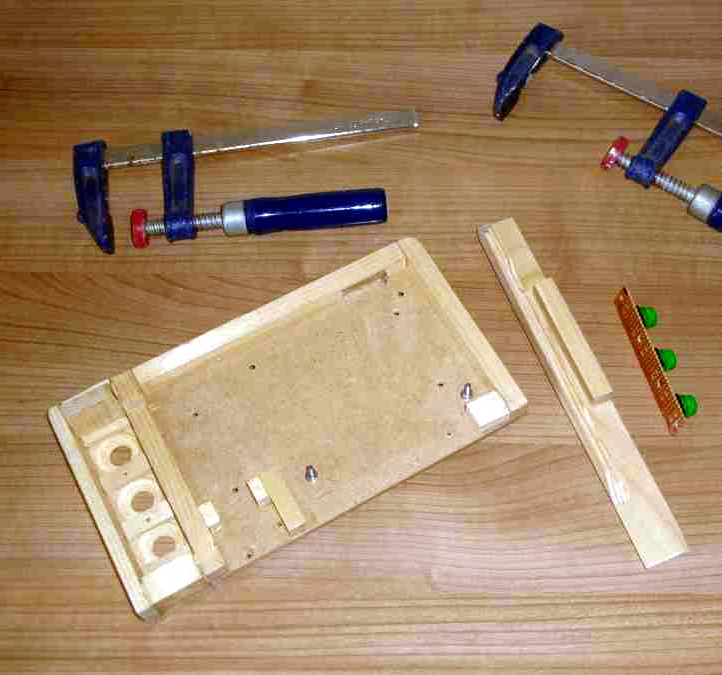
Speaking of which, the touch panel is perhaps the most interesting component of the entire build. It’s actually a resistive panel that was meant for mounting to an LCD that [Jan] has connected to an Arduino. All he had to do was provide a stable frame for it and print out some art work to slide in behind it.

The Arduino and associated electronics allow the Commo Pad to be picked up by the C64 as either a joystick or mouse, which means it doesn’t need any custom software on the computer side to function. Similarly, it can also mimic a USB mouse if you want to plug it into something made a bit later than 1982. Should you be so inclined to make it wireless, the addition of a Bluetooth seems like it would be relatively trivial.

If the Commo Pad doesn’t have enough of a retro-futuristic vibe for your tastes, we recently covered a custom optical touch panel that looked like it could double as a prop from Blade Runner which might do the trick.

Continue reading “A Retro Touch Pad You Can Use On Modern Computers”

Breathtaking C64C Case Faithfully Recreates Original In Wood

Most computer case modders take certain liberties with their builds, to express their creativity and push the state of the art. Some, however, seek to recreate the original in as detailed a way as possible while still being unique. This faithful reproduction of a Commodore 64C in wood is a great example of the latter approach.

[Atilla Meric]’s experience with model airplane building came into play when he decided to leap into this build. Being used to making small, thin pieces of wood even smaller and thinner proved valuable here, as did working from templates and getting complex shapes cut out cleanly. [Atilla] used a miniature table saw to rough cut his stock; the wood species may have been lost in the translation from Turkish but it appears to be some variety of oak. Detail cuts were done with knives, and everything was held together with glue. The painstaking effort that went into the air vents is amazing, and the fact that they exactly match the vents on the original injection-molded case is truly impressive. We also like the subtle detail of the slightly depressed area around the keyboard opening, just like the original, as well as the smooth curve at the front of the case to comfortably support the wrists. The cutouts for connectors and the labels are top-notch too.

We appreciate the craftsmanship that went into this case mod, and the time and effort [Atilla] put into the build are obvious. We’ve seen wooden computer case mods before, but this one really pushes all our buttons.

[via Twitter]

Building A Real Wooden Table Saw

A table saw is one of those tools that aren’t strictly necessary to have, but immensely helpful if you do happen to have one around. The folks at [I Build It] have made a three part series that features a homemade table saw build, so you can finally get around to adding one to your makerspace.

The build uses a real table saw arbor and is made from Baltic birch plywood and solid wood, with some plastic sheets for the trunnions and top. The blade is housed in a blade lift made out wooden panels with a pivot point and slot for the lift mechanism. Bearings allow the blade the freedom of movement, while a curved cutout allows it to stay flat against the wall of the slot while the blade lift mechanism moves.

Meanwhile a reused motor from a previous table saw is dusted, cleaned, and rewired to run in reverse. While most table saws only need two trunnions, a third is used for supporting the motor, since it has to move with the lift and tilt. Once the lift/tilt mechanism is complete, the frame for the table saw is more straightforward, with many steps involving clamping, measuring, cutting, fitting, and painting the assembly. For the final few steps, a switched is mounted outside the table saw in a small box that connected to the power supply and motor, as well as a shop vac for handling dust collection from the saw. While the enclosure isn’t a metal box, as long as the connections are secured properly the wires shouldn’t come loose.

If you want to see other examples of homemade table saws, check out this teeny tiny saw and this kid-friendly table saw build.

Continue reading “Building A Real Wooden Table Saw”

Making A Custom Caliper Case For Pros

Every professional has a tool set that they would never part with. Likewise, for experimental physicists, mechanical engineers, and tinkerers, a caliper set can be unspeakably crucial to their work. That’s why [Andrew Birkel] designed his own personal caliper set to fit just the right proportions for his tools while adding a bit of personal flair.

The project uses CNC routing, Solidworks for CAD, laser engraving, and woodworking to design the custom case for a set of calipers, metric and English screw pitch gauges, fillet gauges, and radius gauges. It’s a practical build for a custom tool set that doesn’t already come with a case of its own. The particular tools were chosen for their use in particle physics experiments: for determining threads, inside and outside curvatures, and measuring length, depth, and width.

The box was made from an oversized piece of wood with holes drilled into the sides. After compiling the G-code program for the build, the two halves of the box was was milled from the wood. The first run on the CNC mill with aluminum managed to cause the grain to split, so [Birkel] went with a CNC router instead. Once the piece was sanded, hidden barrel hinges were added. The finished box was wiped down with mineral oil and teak oil to bring out the natural coloration of the wood as well as to add protection (lacquer mixed into the oil). To finish it off, the case was customized with a laser engraved name and email for identification.

It’s a pretty slick build to say the least, and certainly one that can be customized to the dimensions of whatever tools your personal caliper set happens to have.

Downdraft Device Dismisses Dust

Woodworking is messy business, especially the sanding part. But even if you don’t care what happens to your shop floor, you don’t want dead tree particulate matter in your lungs. Wearing a mask or even a respirator is a good start, but a dust collection system is better. Someday, [XYZ Create] might have a shop-wide sawdust-slurper installed. In the meantime, he made a downdraft table out of scrap plywood and a plastic storage box.

The only thing he didn’t already have on hand was a port that matched his shop vacuum. We like his workaround to avoid drilling a huge hole in plastic that would certainly crack — use a hose clamp to get the OD of the port, heat up the clamp on a hot plate, and let it melt a hole into the box. Hopefully, he at least opened a window. [XYZ Create] glued four pieces of scrap plywood together for the top, and drilled all 117 holes by hand. Who needs pegboard?

Not fancy or big enough for your needs? Here’s one with a built-in filtration system.

Continue reading “Downdraft Device Dismisses Dust”

Rise And Shine With This Japanese-Inspired Clock

On the Hackaday.io page for his gorgeous “Sunrise Alarm Clock”, [The Big One] is quick to point out that his design is only inspired by Japanese lanterns, and does not use authentic materials or traditional woodworking techniques. Perhaps that’s an important fact to some, but we’ll just say that the materials used seem far less important when the end result looks this good.

Unfortunately [The Big One] hasn’t provided any interior shots of his clock, as it sounds like the aesthetics of the internal wiring isn’t quite up to the standard set by the outside of it. But he has provided a concise parts list, a wiring diagram, and source code, so we’ve got a pretty good idea of what’s under the hood.

The clock is powered by the uBBB 32u4, an ATMega32u4 development board that [The Big One] developed in conjunction with [Warren Janssens]. It uses the popular MAX7219 LED matrix for the display, and a DS3231 RTC module to help keep the time. There’s also a DFPlayer Mini module onboard that allows him to play whatever sound effects or music he wants when the alarm goes off.

Of course the star of the show is the LED strips which illuminate the shōji-style column. These have apparently been wrapped around a coffee can of all things, which not only serves as a convenient way of holding the strips, but [The Big One] says actually makes the speaker sound a bit better. Hey, whatever works.

This isn’t the first “lantern” clock to grace these pages, but compared to the high-tech presentation of previous projects, we can’t help but be impressed by the grace and elegance of this wooden masterpiece.

Making A Bronze Cannon From Scratch

Casting metal at home is somewhat tricky, but there’s no denying the results can be quite rewarding. [FarmCraft101] put his incredible craftsmanship on display, and learned a few new things in the process, by scratch building a scale replica bronze cannon and carriage.

Starting with a sufficient quantity of scrap metal, he first produced bronze ingots. Getting the actual casting right took multiples attempts. First tried a lost foam cast, which failed miserably, but provided a sample metal which was put through tensile strength testing. The second attempt was done using a wood barrel form and a split mold, and was cast horizontally which resulted in shrinkage on top of the barrel. The third attempt, arranged vertically, almost resulted in a high risk game of “the floor is lava”, with molten bronze pouring out across his garage floor after the mold split open during casting.

Attempt number four was finally successful, again using a vertical mold but with more sturdy clamping. This roughcast barrel was then drilled out and finished to a beautiful mirror with the help of a lathe and a lot of elbow grease. He then turned his attention to the carriage, which itself is a real beauty featuring custom wagon wheels with a charred wood finish and linseed oil coating.

You can check out the build video after the break, but we’ll warn you now, [FarmCraft101] never actually fires this gorgeous creation. If you’d like to try your hand at DIY cannoneering and have a 3D printer, you might want to give lost PLA casting a try, or go into mass production with some DIY silicone molds.

Continue reading “Making A Bronze Cannon From Scratch”