Doppler Gesture Sensing In JavaScript

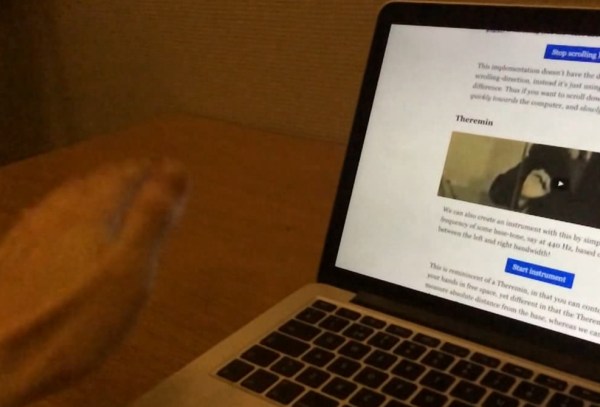
[Daniel] stumbled on an interesting paper (which we featured before) on Doppler gesture sensing using only a computer’s speaker and microphone. Unfortunately the paper didn’t include source code so [Daniel] created his own implementation of Doppler gesture sensing in JavaScript that works right in the browser.

[Daniel]’s JavaScript library generates a sine wave at 20 kHz that’s played through the computer’s speakers. The frequency is high enough that it’s pretty much inaudible. While the tone is being played through the speakers, the computer’s microphone is used to sample the audio and calculate the frequency spectrum of the signal. As you move your hand closer to the computer while the tone is playing, the frequency of the received signal shifts higher; as you move your hand away, it shifts lower. [Daniel]’s script looks for this frequency shift and uses it to trigger events.

doppler

[Daniel] has some awesome examples included on his website where you can test out the functionality for yourself. He has a hands-free scrolling example, spectrum plot, and even a virtual theremin. Since his code is bundled up into an easy-to-use library, it should be fairly easy to integrate into any webpage. The only real limitation to the library is that it only works in Chrome right now (Firefox doesn’t support disabling echo cancellation).

Killer USB Drive Is Designed To Fry Laptops

[Dark Purple] recently heard a story about how someone stole a flash drive from a passenger on the subway. The thief plugged the flash drive into his computer and discovered that instead of containing any valuable data, it completely fried his computer. The fake flash drive apparently contained circuitry designed to break whatever computer it was plugged into. Since the concept sounded pretty amazing, [Dark Purple] set out to make his own computer-frying USB drive.

While any electrical port on a computer is a great entry point for potentially hazardous signals, USB is pretty well protected. If you short power and ground together, the port simply shuts off. Pass through a few kV of static electricity and TVS diodes safely shunt the power. Feed in an RF signal and the inline filtering beads dissipate most of the energy.

To get around or break through these protections, [Dark Purple]’s design uses an inverting DC-DC converter. The converter takes power from the USB port to charge a capacitor bank up to -110VDC. After the caps are charged, the converter shuts down and a transistor shunts the capacitor voltage to the data pins of the port. Once the caps are discharged, the supply fires back up and the cycle repeats until the computer is fried (typically as long as bus voltage is present). The combination of high voltage and high current is enough to defeat the small TVS diodes on the bus lines and successfully fry some sensitive components—and often the CPU. USB is typically integrated with the CPU in most modern laptops, which makes this attack very effective.

Thanks for the tip, [Pinner].

DIY Thermal Insert Press

You might not know what a threaded insert is, but chances are you’ve seen one before. Threaded inserts are small metal (typically brass) inserts that are pressed into plastic to give a strong point of attachment for bolts and screws. These inserts are a huge step up from screwing or bolting directly into tapped plastic holes since the brass threads are very strong compared to the plastic. The only major downside to these inserts is that the press to install them is incredibly expensive. Thankfully, [Alex Rich] came up with a cheap solution: a modified soldering iron mounted to an Arbor press.

Commercial threaded insert presses typically use ultrasonic welding or heat welding to fuse inserts with plastic. [Alex] chose the simple route and went with heat welding, which (as you might imagine) is way simpler than ultrasonic welding. To provide the heat, [Alex] mounted a 100W Weller soldering iron to the press, which he says handles the impact with no problem. Unfortunately the copper tips of the Weller just wouldn’t hold up to the impact, so [Alex] made his own tips out of some brass he turned on a lathe.

If, like most people, you don’t have the capability of making injection-molded cases, let alone an Arbor press on hand, you’re not out of luck! Using this same technique people have successfully added thermal inserts to 3d-printed parts using a soldering iron and much smaller DIY presses. Have any ideas on how you could use thermal inserts in your 3d prints? Let us know in the comments.

Laser-Cut Clock Uses Planetary Gear

[wyojustin] was trying to think of projects he could do that would take advantage of some of the fabrication tech that’s become available to the average hobbyist. Even though he doesn’t have any particular interest in clocks, [wyojustin] discovered that he could learn a lot about the tools he has access to by building a clock.

[wyojustin] first made a clock based off of a design by [Brian Wagner] that we featured a while back. The clock uses an idler wheel to move the hour ring so it doesn’t need a separate hour hand. After he built his first design, [wyojustin] realized he could add a planetary gear that could move an hour hand as well. After a bit of trial and error with gear ratios, he landed on a design that worked.

The clock’s movement is a stepper motor that’s driven by an Arduino. Although [wyojustin] isn’t too happy with the appearance of his electronics, the drive setup seems to work pretty well. Check out [wyojustin]’s site to see the other clock builds he’s done (including a version with a second hand), and you can peruse all of his design files on GitHub.

Looking for more clock-building inspiration? Check out some other awesome clock builds we’ve featured before.

Low-Voltage Tesla Coil Uses A Relay Instead Of A Spark Gap

[Teodor] writes in with a unique Tesla coil he designed and built. Unlike most Tesla coils, [Teodor]’s design is able to run with a fairly low input voltage because it doesn’t use a static spark gap like most Tesla coils. Instead, his coil uses a relay in place of a spark gap.

[Teodor] built his coil using leftover components from his old school, making good use of some parts that might have otherwise been thrown away. The most critical component of his circuit, the relay, is just a standard normally-closed relay that is rated at 20A. [Teodor] wired the relay so that it energizes its own coil whenever it is shut. This causes the relay to briefly open every time the coil is energized, creating a resonant circuit. The resonant circuit charges a tank capacitor and places it in series with the primary coil inductor every time the relay closes, forming the tank circuit of his design.

With [Teodor]’s design, the resonant frequency of the secondary is nearly identical to that of the primary. This creates a significant voltage boost, helping produce very high voltages from such a low input voltage. The only downside to this design that [Teodor] recently discovered is that the relay contacts get red-hot after a few minutes of operation. Not optimal, but it still works! Check out [Teodor]’s writeup for more details and instructions on how to build your own.

CNC Milling Photos With A Halftone Generator

Looking for an awesome way to mill out a photo or graphic? Check out [Matt Venn]’s halftone gcode generator which creates halftone CNC toolpaths from any image file. We’ve run across some halftone generators before, but [Matt]’s generator has some interesting features and makes for some pretty unique output.

[Matt] initially wrote a simple command line program in Python, but just rewrote his script with a more user-friendly UI that renders a preview of the output as you change options.  The UI lets you change parameters like drill depth, number of lines, and the step size to tweak the output. It even has an option to map the halftone points along a sine wave which makes an interesting effect as shown in the image above.

[Matt]’s program generates standard gcode that you can use to run your CNC machine. [Matt] recommends milling a material with layers of different colors, but you can always mill a solid material and fill the routed areas with paint or dye instead. Want to grab the script or check out the source code? Head over to [Matt]’s GitHub repository.

Thanks for the tip, [Keith O].

A Real-Time Networked VU Running On The ESP8266

Even though the ESP8266 WiFi chipsets are really cheap (and can be somewhat challenging to work with), they still pack a lot of processing power. For instance, [Mr.jb.swe] took one of these modules and made a stand-alone live VU meter with WS2812B LED strip. The VU runs entirely on the ESP chip, without any additional microcontroller. It’s an example we think a lot of projects could follow to do away with unused horsepower (extra microcontrollers) sometimes used to avoid programming directly on the ESP. The stuff you can do with these modules is wild… did you see this WiFi signal strength mapping project?

The ESP chipset acts as a UDP client which receives packets from a WinAmp plugin that [Mr.jb.swe] wrote. The plugin continuously calculates the dB of whatever track is playing and streams it over WiFi to his ESP8266. He also mentions that the ADC of the ESP chipset could be used to sample audio as well, although that pretty much eliminates the need for WiFi.

The whole setup is very responsive even though the processor is parsing UDP messages, driving the WS2812 strip, and driving a small OLED display for debug—and it doesn’t even use a separate microcontroller. [Mr.jb.swe] also posted snippets of his code to get you started on your own project. Check out the videos after the break to see it in action.

Continue reading “A Real-Time Networked VU Running On The ESP8266”