Killer USB Drive Is Designed To Fry Laptops

[Dark Purple] recently heard a story about how someone stole a flash drive from a passenger on the subway. The thief plugged the flash drive into his computer and discovered that instead of containing any valuable data, it completely fried his computer. The fake flash drive apparently contained circuitry designed to break whatever computer it was plugged into. Since the concept sounded pretty amazing, [Dark Purple] set out to make his own computer-frying USB drive.

While any electrical port on a computer is a great entry point for potentially hazardous signals, USB is pretty well protected. If you short power and ground together, the port simply shuts off. Pass through a few kV of static electricity and TVS diodes safely shunt the power. Feed in an RF signal and the inline filtering beads dissipate most of the energy.

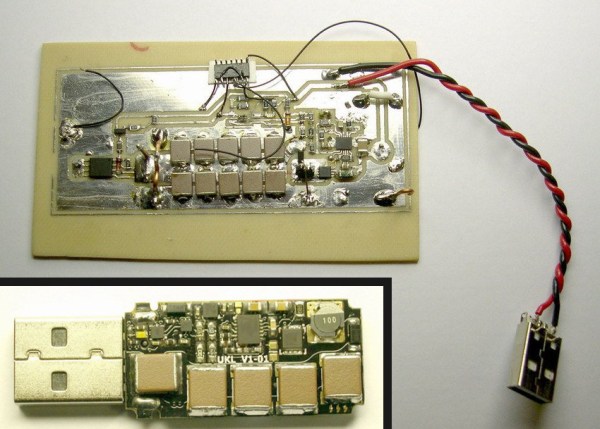
To get around or break through these protections, [Dark Purple]’s design uses an inverting DC-DC converter. The converter takes power from the USB port to charge a capacitor bank up to -110VDC. After the caps are charged, the converter shuts down and a transistor shunts the capacitor voltage to the data pins of the port. Once the caps are discharged, the supply fires back up and the cycle repeats until the computer is fried (typically as long as bus voltage is present). The combination of high voltage and high current is enough to defeat the small TVS diodes on the bus lines and successfully fry some sensitive components—and often the CPU. USB is typically integrated with the CPU in most modern laptops, which makes this attack very effective.

Thanks for the tip, [Pinner].

[James] Multiplies His Floor Sander By Four

Hackaday contributor and new homeowner [James Hobson] had a dilemma on his hands. He had rented a commercial drum sander to begin a floor refinishing project. Like many before him, James was a bit too aggressive with the drum sander in places. The uneven stripes didn’t show up until the sander was returned and the floor was stained. Renting the sander again would be an expensive prospect. There had to be a better answer…

That’s when [James] put on his [Hacksmith] cape and got to work. He built himself a DIY floor sander (YouTube Link) using four Ryobi orbital sanders, some scrap wood, and a bit of ingenuity. [James] screwed the four sanders to a plywood sub plate, then added a top plate with a handle. He even gave the sander its own outlet strip so he wouldn’t be dragging four power cords behind him.

[James] found that synthetic steel wool pads weren’t cutting through the floor very well, so he upgraded to 220 grit sandpaper. That did the trick, and the sander worked great. Now he won’t have to rent a drum sander when it comes time to refinish the first floor of his new house!

Continue reading “[James] Multiplies His Floor Sander By Four”

Hackaday Retro Edition: A New Commodore 64 Case

Some time in the 80s, the plastic injection molds for the Commodore 64C, the Commodore 128, and the Plus/4 were shipped from somewhere in Asia to the great Commodore Mother Brain in West Chester, Pennsylvania. These molds had already produced a million or two cases, but there were some issues with production – too much waste, or something like that. A mechanical engineer took a look at the molds, sent out some recommendations, and moved the 2500 pound molds to a corner of the building.

For some time after a gray day in April, 1994 these molds sat in a West Chester, Pennsylvania warehouse until they were sold off. They made their way to a plastics manufacturer around Dallas, Texas where they sat for twenty years. All things must pass, sometimes several times, and this plastics manufacturer closed down, contacted an auctioneer, and began to sell off some of their equipment.

The hero of our story, [Dallas Moore], owns a small business, buying and selling everything from Barbie dolls to antiques. He found an ad for an auction at a plastics manufacturing plant in the newspaper, and figuring he could find something interesting, headed out to the auction preview.

The auctioneer at this liquidation sale asked [Dallas] what he did, and mentioned there was something pretty cool tucked away in a warehouse full of hardened steel molds. Something about molds for old computers. These were the molds for the Commodore 64C, Commodore 128, and the Commodore Plus/4. A literal crucible of computing history, stacked on a pallet and up for sale.

The auctioneer said one of his friends was interested in the molds, and thought they would make a neat coffee table. Something about this struck [Dallas] the wrong way and for the entire drive home he thought about someone taking history and turning it in to a piece of furniture. He decided to buy these molds and lugged the three 2500 pound pieces of hardened steel to his shop. Not wanting to let a good piece of history go to waste, he contacted another plastics manufacturer, planned a run of a thousand or so Commodore 64C cases in red, white, and blue. [Dallas] is funding the whole production run through Kickstarter.

To me, this is one of the greatest retrocomputing successes in recent memory. There will always be someone putting SD cards in old computers, getting them on the Internet (and especially pointed towards our retro edition), and cloning complete systems in FPGAs. This, though, is a clear example of someone recognizing the historical importance of several thousand pounds of steel, realizing there’s a market out there, and doing the leg work to remanufacture these pieces of history.

I put in my $45 for a red one, and I tipped off [Bil Herd], designer of the C128 and Plus/4, to this Kickstarter. He’s been talking with [Dallas], there I’m sure he’ll chime in on the comments with some retellings of Commodore battle stories.

If it arrives in time, I’ll be bringing my limited-edition red 64C case to the Vintage Computer Festival in Wall, NJ April 17-19. That’s a plug for the event. If you’re in the area, you should come.

EDIT: [Dallas] has a different story of where the molds came from.

Squirrel Scaring Robotic Owl

Robotic Owl Scares Squirrels Out Of Their Skin

Tired of the local squirrels tearing up his balcony garden, 11[metroSFVogange] took matters into his own hands and created this, the Squirrelinator 2000.

He had tried buying repellents and other home remedies, but nothing seemed work. And his poor indoor cat was starting to feel emasculated, as he watched through the window helplessly as his owner’s garden was destroyed by the furry terrorists.

It’s built off of an old IP camera he had collecting dust, which happens to have an alarm I/O port… perfect. To disguise the camera he picked up a owl statue for cheap from the hardware store because it was missing an eye — he plans to add a glowing red terminator eye later on, because why not?

After modifying the owl to fit the IP camera, he can now control the owl’s head with the pan and tilt functions of the camera — accessible by smartphone. He’s also thrown on a pair of solar-powered spinning props to help scare off the squirrels as well. In case that’s not enough, when the motion sensor goes off the owl shoots a squirt gun and takes pictures of the (hopefully soaked) squirrel for internet points. Classy.

Sadly, it seems to be working because he hasn’t caught any squirrels in his garden yet! We will of course update this post if a poor sucker attempts to mess with his begonias again.

[via Reddit]

Quantel

Retrotechtacular: The Early Days Of CGI

We all know what Computer-Generated Imagery (CGI) is nowadays. It’s almost impossible to get away from it in any television show or movie. It’s gotten so good, that sometimes it can be difficult to tell the difference between the real world and the computer generated world when they are mixed together on-screen. Of course, it wasn’t always like this. This 1982 clip from BBC’s Tomorrow’s World shows what the wonders of CGI were capable of in a simpler time.

In the earliest days of CGI, digital computers weren’t even really a thing. [John Whitney] was an American animator and is widely considered to be the father of computer animation. In the 1940’s, he and his brother [James] started to experiment with what they called “abstract animation”. They pieced together old analog computers and servos to make their own devices that were capable of controlling the motion of lights and lit objects. While this process may be a far cry from the CGI of today, it is still animation performed by a computer. One of [Whitney’s] best known works is the opening title sequence to [Alfred Hitchcock’s] 1958 film, Vertigo.

Later, in 1973, Westworld become the very first feature film to feature CGI. The film was a science fiction western-thriller about amusement park robots that become evil. The studio wanted footage of the robot’s “computer vision” but they would need an expert to get the job done right. They ultimately hired [John Whitney’s] son, [John Whitney Jr] to lead the project. The process first required color separating each frame of the 70mm film because [John Jr] did not have a color scanner. He then used a computer to digitally modify each image to create what we would now recognize as a “pixelated” effect. The computer processing took approximately eight hours for every ten seconds of footage. Continue reading “Retrotechtacular: The Early Days Of CGI”

Design In Package Flexibility Into Your Next PCB

To err is human.  And to order the wrong component foot print is just part of engineering. It happens to us all; You’re working hard to finish a design, you have PCBs on the way and you’re putting in your order into your favorite parts supplier. It’s late, and you’re tired. You hit submit, and breathe a sigh of relief. Little do you know that in about a week when everything arrives, that you’ll have ordered the wrong component package for your design.

Well, fear not. [David Cook] has a solution that could save your bacon. He shows you how to design multiple footprints into your board to avoid the most common mistakes such as voltage regulators with different pin-outs than expected. Other uses for the trick include, common trim pots with different pin spacing and a layout for decoupling caps that will fit both a 0.1″ and 0.2″ footprints.

We’ll file this under the “Why Didn’t I Think of That” category. It’s a super simple hack, but that’s what we love about it. We could see this being very handy for people who often scavenge parts. Also, for makers that sell just a bare PCBs (without parts) to those that want just a board. No, it won’t save you if your need an SMD and you mistakenly ordered a dip, but at the end of the day, it’s a nice trick to keep up your sleeve.  You might never know when you’ll need it.

Caption CERN Contest Rolls Into Week 6

The Caption CERN Contest has been rolling along since the first week of February. We’re in our 6th week now, and the users over at Hackaday.io have given us some great captions!

Here are the results from Week 5:

The Funnies:

Guy #1 “Pay close attention: If anything goes wrong, press this BIG RED BUTTON. Then count to ten.”
Guy #2″ What does it do?”
Guy #1 “Absolutely nothing… it just gives you something to do while you’re dying a horrible, painful death.” – [Lorin Briand]
“We’ve miniaturized the mainframe – only 21,480 tubes!.” – [Tim]
“Watch my finger…now, you are getting very sleepy…fund this project…sleeeeepy…” – [Erik Ratcliffe]

The winner this week is [johnowhitaker] with the following caption:

‘Any moment now…’ An elderly visitor waits skeptically for the ‘funny tingling’ experienced by anyone within 3m of the machine as it runs a specific program.

Congrats  [johnowhitaker], you’re getting a free CRT Android T-shirt from The Hackaday Store!

Week 6 just started! Caption the image for your chance to win a T-shirt of your own!

cern-6-sm
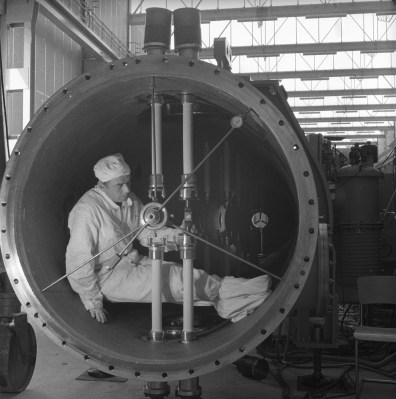
CERN scientists and engineers often find themselves in interesting positions. However, we’re not sure if this CERN staffer ever expected to be quite where he is now!

The only hard information we have to go on is the album this title of the image: “SEPARATEURS ELECTRO STATICS MONTAGE DES ELECTRODES”. Our French isn’t as good as our C++ or x86 assembly, but that sounds like electrostatic separators. Which separators, on which beamline, and in what decade? Your guess is as good as our’s, or CERN’s for that matter.

Add your humorous caption as a comment to this project log. Make sure you’re commenting on the project log, not on the project itself. As always, if you actually have information about the image or the people in it, let the folks at CERN know on the original image discussion page.

If you really want to see what’s happening at CERN, enter The Hackaday Prize! You could win a trip to Geneva, Switzerland to visit CERN yourself (not to mention a trip to space)!

Good Luck!