A Solar-Powered Wristwatch With An ATtiny13

Wristwatches come in many shapes, sizes, and types, but most still have at least one thing in common: they feature a battery that needs to be swapped or recharged somewhere been every other day and every few years. A rare few integrate a solar panel that keeps the internal battery at least somewhat topped up, as environmental light permits.

This “Perpetual” wristwatch designed by [Serhii Trush] aims to keep digitally ticking along using nothing but the integrated photodiodes, a rechargeable LIR2430 cell, and a power-sipping face that uses one LED for each hour of the day.

The face of the perpetual wristwatch. (Credit: Serhii Trush)

The wristwatch’s operation is demonstrated in the linked video (in Ukrainian, auto-generated subtitles available): to read out the current time, the button in the center is pressed, which first shows the hour, then the minutes (in 5 minute intervals).

After this the ATtiny13 MCU goes back to sleep, briefly waking up every 0.5 seconds to update the time, which explains why there’s no RTC crystal. The 12 BPW34S photodiodes are enough to provide 2 mA at 0.5 V in full sunlight, which together keep the LIR2430 cell charged via a Zener diode.

As far as minimalistic yet practical designs go, this one is pretty hard to beat. If you wish to make your own, all of the design files and firmware are provided on the GitHub page.

Although we certainly do like the exposed components, it would be interesting to see this technique paired with the PCB watch face we covered recently.

Continue reading “A Solar-Powered Wristwatch With An ATtiny13”

Two-Channel Guitar Stomp Box Makes Momentary Switches Latching

When we first saw [Maarten Tromp]’s article about a “momentary latching switch” for guitar effects pedals, we have to admit to being a bit confused. When it comes to push-button switches, “momentary” and “latching” seem to be at odds with each other, with different mechanisms inside the switch to turn one into the other. What gives?

As it turns out, [Maarten]’s build makes perfect sense when you consider the demands of a musical performance. Guitar effects pedals, or “stomp boxes,” are often added to the output of electric guitars and other instruments to change the signals in some musically interesting way. The trouble is, sometimes you only need an effect for a few bars, and the push-on, push-off switches on many effects pedals make that awkward.

[Maarten]’s idea was to build a stomp box with momentary switches that act as inputs to an ATtiny2313 microcontroller rather than directly controlling the effect. That way, a bit of code can determine how long the switch is tapped, and activate a relay to do the actual switching accordingly. A short tap of the button tells the microcontroller to latch the relay closed until another tap comes along; a long press means that the relay is held open only as long as the button is held down.

Yes, he could have used a 555, a fact which [Maarten] readily acknowledges, but with some loss of flexibility; he currently has the threshold set at 250 milliseconds, which works for his performance style. Changing it would be a snap in code, as would toggling the latching logic. A microcontroller also makes expansion from the two-channel setup shown here easier.

Looking for more effects pedal action? We’ve got a bunch — a tube-amp tremolo, an Arduino Mega multipedal, a digital delay line. Take your pick!

Chip Shortage Engineering: Misusing DIP Packages

After years of seeing people showing off and trading their badge Simple Add-Ons (SAOs) at Supercon, this year I finally decided to make one myself. Now for a first attempt, it would have been enough to come up with some cool PCB art and stick a few LEDs on it. But naturally I started with a concept that was far more ambitious than necessary, and before long, had convinced myself that the only way to do the thing justice was to have an onboard microcontroller.

My first thought was to go with the venerable ATtiny85, and since I already had a considerable stock of the classic eight-pin DIP MCUs on hand, that’s what I started prototyping with. After I had something working on the breadboard, the plan was to switch over to the SOIC-8 version of the chip which would be far more appropriate for something as small as an SAO.

Unfortunately, that’s where things got tricky. I quickly found that none of the major players actually had the SMD version of the chip in stock. Both DigiKey and Mouser said they didn’t expect to get more in until early 2024, and while Arrow briefly showed around 3,000 on hand, they were all gone by the time I checked back. But that was only half the problem — even if they had them, $1.50 a piece seems a hell of a lot of money for an 8-bit MCU with 8K of flash in 2023.

The whole thing was made all the more frustrating by the pile of DIP8 ATtiny85s sitting on the bench, mocking me. Under normal circumstances, using them in an SAO wouldn’t really be a problem, but eight hand-soldered leads popping through the front artwork would screw up the look I had in mind.

While brooding over the situation my eyes happened to fall on one of the chips I had been fiddling with, it’s legs badly bent from repeated trips through the programmer. Suddenly it occurred to me that maybe there was a way to use the parts I already had…

Continue reading “Chip Shortage Engineering: Misusing DIP Packages”

ACK1 Makes Getting To Know The ATtiny1616 Easy

Many readers will be familiar with Microchip’s ATtiny85, which has been a popular choice for DIY projects in the past for its low price and (for the time) small size. But those looking for a more modern and capable 8-bit chip may find the ATtiny1616-MNR of interest. It offers expanded flash storage, more GPIO, and ditches SPI programming in favor of UPDI — a protocol that can be done using nothing more than an USB-UART converter and a resistor.

The contents of the ACK1 kit
What’s in the kit if you buy it.

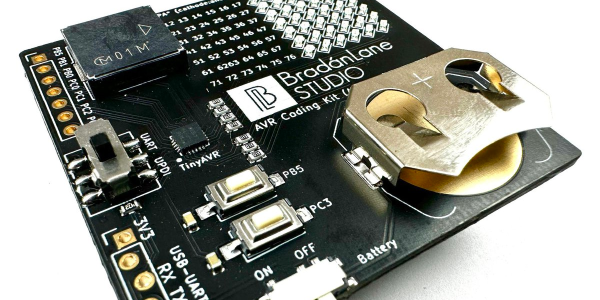
But here’s the catch: the new chip is only available in SMD and there are far fewer tutorials for it! That’s why [Bradán Lane] has created ACK1, a cute little AVR Coding Kit for those of us who want to play with the ATtiny1616 and a companion for his free and open-source course.

The board contains an array of 6 by 7 LEDs in a charlieplexed configuration, a large piezo buzzer, two push buttons, an on/off switch, and a CR2032 battery holder to keep it on without the need for a cable. The kit looks gorgeous in its white-on-black theme with gold plated contacts and can be had for $20 on Tindie at the time of writing.

The ATtiny1616 itself runs at up to 20 MHz and has 17 GPIO pins, 16 KiB of flash storage, 2 KiB of RAM, and 256 bytes of EEPROM for configuration — making it roughly on par with the original Arduino Uno.

The course that goes hand-in-hand with the ACK1 is all about the features of the ATtiny1616, from the basics of using the programmer to reading the buttons, using timers, driving the charlieplexed LEDs, storing data in the EEPROM and much more. Though it does not cover the basics of C, the course is free, and even licensed MIT, so that anyone can share it and improve upon it.

If you enjoy seeing beautiful microcontrollers, you’ll definitely want to see the stylish Uno Plus+.

Moisture Duck Gives You A Green Thumb

Around the Hackaday bunker, any plant other than a cactus has a real chance of expiring due to thirst. Perhaps we should build some of [MakersFunDuck]’s Moisture Duck boards. As you can see in the video below, the simple PCB with an ATtiny13A tells you when it is time to water the plants. The video also covers several exotic methods of determining the watering status, some of which are pretty complex.

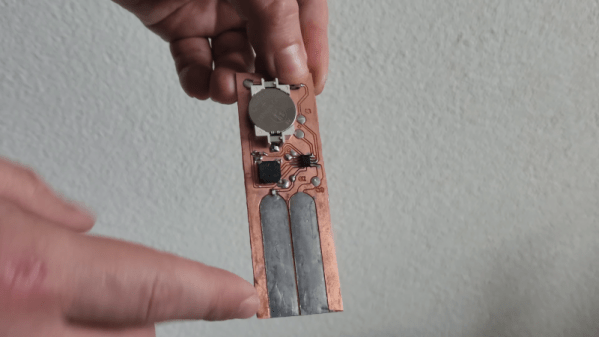
The board is simple because the operation of the device is simple. A fixed resistor creates a voltage divider with the soil, and dry soil has higher resistance than moist soil. A pot sets a threshold, and the microcontroller measures the voltages.

Of course, if you can’t remember to water the plants, you probably can’t remember to change batteries either. So the device sleeps most of the time, and only wakes up every eight seconds to conserve battery. It would be nice to alarm on a low battery, and, honestly, we would probably have made the sleep time longer.

The video covers how he minimizes corrosion, but we aren’t sure how well the board will survive in damp soil, but with a little protection, it might last a while. Besides that, you could probably just consider them almost disposable.

If you are really lazy, you can also automate the actual watering. You can even build that into a smart flower pot.

Continue reading “Moisture Duck Gives You A Green Thumb”

Building An Energy Sword Replica From Halo

A good many of us whiled away the hours of our youths playing Swords Only deathmatch in Halo 2. The Energy Sword, aka the Plasma Sword, was the star of the show, with its devastating glowing blades granting us scoreboard domination. [Arnov Sharma] has now built a quality replica of this science-fiction weapon.

The build starts with a 3D design drawn up in Fusion 360. The parts are then 3D printed, with opaque filament used for the handle and translucent PLA filament for the “blade”. Inside the blade elements are twenty WS2812B LEDs, creating the characteristic glow that made the Energy Sword so tantalizing to find in game. An ATtiny85 is charged with running the LEDs, with the aid of an IP5306 chip to act as a boost converter for the lithium-ion battery supplying the juice.

[Anton] admits that the sword was built for the sole purpose of beautifying his maker space. That’s something we can respect, because we’d love to have one hanging on the wall at home. We’ve featured some other fun gaming replicas before, too.

Continue reading “Building An Energy Sword Replica From Halo

Compact Mouse Jiggler Keeps Boss Off Your Back

The work-from-home revolution enabled many workers to break free from the shackles of the office. Some employers didn’t like the loss of perceived control though, and saddled workers with all kinds of odious spyware to monitor their computer activity. Often, this involves monitoring mouse movement to determine if workers are slacking off or not. Mouse jigglers aim to fool these systems, and the MAUS from [MAKERSUN99] is one you can build yourself.

The MAUS is not a mechanical system that moves a real-life mouse on your desk. Instead, it directly injects emulated mouse movements via USB. It runs on an ATtiny85, which is able to spit out USB HID commands with the help of the V-USB software USB implementation. Along with the microcontroller, MAUS also features a red LED and a WS2812B RGB LED for user feedback. It’s also available on Tindie if your boss has you so busy that you don’t have time to build one.

Mouse jigglers came to prominence as working from home became mainstream. However, they’ve been around for years.

Continue reading “Compact Mouse Jiggler Keeps Boss Off Your Back”