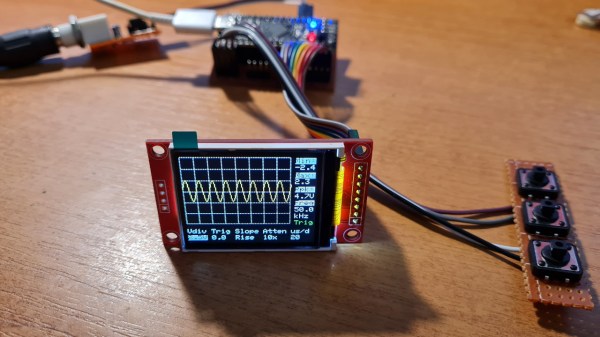
The completed oscilloscope in parts, with the screen in the front connected with prototyping wires, protoboarded buttons on the right, and the BlackPill board somewhere behind

DIY STM32 Scope Is Simple, Cheap, And Featureful

Would you like to have a small digital oscilloscope? Do you have a spare BlackPill (STM32F401) board and a TFT display laying around? [tvvlad1234] presents us with a simple and educational digital storage oscilloscope design that barely needs any components for you to build one, and it’s packed with features just like you would expect from a self-respecting open-source project. Not just that — it can even stream data to your computer, in a format compatible with the TekScope software!
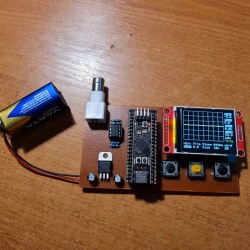
The same scope design, but now on a self-etched boardIt’s hard to overshadow just how easy this scope is to build, use, and hack on. You really don’t need much in the way of parts, a protoboard will do, though you can also etch or order your own PCBs. The front-end is super straightforward to find components for and assemble, a few opamps and resistors is all you need. So after jumper-wiring the LCD and three push buttons to your BlackPill, you’re golden.

Of course, the simple frontend results in the input range being from -3.3 V to 3.3 V, but as you could guess, this is exactly the kind of project where you could tweak the resistors and even upgrade it later on. Are you a bit lost in how oscilloscopes work? [tvvlad1234] has an explainer for you, too!

This build could easily take up a honorary “temporary turned permanent” place on your bench, thanks to its McGyver-esque qualities. It’s also, quite possibly, a better scope than the red “soldering kit” ones we’ve seen online. All in all, it’s a strong contender in the “simple and powerful DIY scope” arena, before this, we’ve seen one built with an Arduino Nano, and one with a Pi Pico.

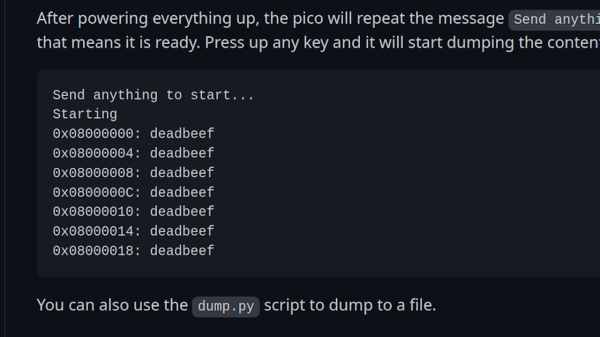
Dumping script window, showing the bytes being dumped one by one from the STM chip

Need To Dump A Protected STM32F0x? Use Your Pico!

Sometimes, security mechanisms can be bypassed if you just do things slightly out of the ordinary. For instance, readout protection on microcontrollers is a given nowadays, to the point where it’s intentionally enabled and relied upon as a major technical measure to protect intellectual property. The gist is — when you connect to a microcontroller over its debug interface and then ask to read its flash memory, it will politely refuse. However, [Racerxdl] shows us that in practice, it’s not flawless protection – for certain chips, you just need to be a little quicker than usual.

Usually, flashing and debugging software will chat with the microcontroller for a bit, and probe parameters before going for any direct requests. However, if you skip the courtesy and bluntly get to the point immediately right after power is applied to the microcontroller, you can intimidate them just enough to give you one byte of its memory before it refuses to cooperate further. Since that can be any byte you wish, you can read the entire flash — one byte at a time.

You need to power cycle the chip before you can progress, so the hardware does involve a bit more than just an SWD interface, and it will take a fair bit more time than reading out a non-protected chip the usual way; plus, of course, the debugging interface needs to be active for this in the first place, which isn’t always the case. However, it still beats paying a few thousand dollars for a factory in China to decap your chip and read it out using a fancy machine.

[Racerxdl] didn’t just write a proof-of-concept for this attack – they implemented it for one of our favourite chips, the RP2040. As such, you no longer need an unobtainium STM32 to dump an unobtainium STM32.

To be clear, [Racerxdl] didn’t design this attack — it’s been around for some time now. Credit for that goes to Johanes Obermaier. All in all, this is a wonderful reminder that seemingly reliable security mechanisms can be foiled by the simplest tricks. For instance, if your chip erases the flash when you unlock its protection, you can just tell it not to.

DIY Game Boy Games Make The Perfect Christmas Gift

Sometimes, the best gift is the one you make yourself. [Pigeonaut] decided to whip up a few Game Boy games of their very own creation to gift to the special people in their life.

The games were crafted using a platform called GB Studio. It’s a tool that allows the drag-and-drop creation of games for the Game Boy and Game Boy Color handhelds. It’s capable of creating ROM files to run in an emulator, within a web page, or they can be flashed to a cartridge and played on real Nintendo hardware.

For the full effect, [Pigeonaut] went with the latter method. Four games were created: Phantom Shock, Climbing Mount Crymore, Cozy Cat Cafe, and A Tiny Hike. Each was flashed onto a real cart and given a high-quality label to make a lovely tangible gift. Upon gifting, [Pigeonaut]’s friends and partner were able to play their way through their personalized titles on a GameCube running the Game Boy Player accessory.

It’s hard to imagine a more touching gift than a personal game crafted from the ground up. Getting to play it on a real Nintendo is even better, and we’ve seen hardware that can achieve that before. Try out the games in your web browser via the links above, or send us in your own cool homebrew hacks to the Tipsline!

Giant Spinning POV Christmas Tree

Spinning Holographic POV Christmas Tree Of Death

[Sean Hodgins] really harnessed the holiday spirit to create his very own Giant Spinning Holographic Christmas Tree (of Death). It’s a three-dimensional persistence-of-vision (POV) masterpiece, but as a collection of rapidly spinning metal elements, it’s potentially quite dangerous as well. As [Sean] demonstrates, the system can display other images and animations well beyond the realm of mere holiday trees.

Initial experiments focused on refining the mechanical structure, bearings, and motor. A 1/2 horsepower A.C. motor was selected and then the dimensions of the tree were “trimmed” to optimize a triangular frame that could be rotated at the necessary POV speed by the beefy motor.  A six-wire electrical slip ring allows power and control signaling to be coupled to the tree through its spinning central shaft.

The RGB elements are SK9888 LEDs also know as DotStar LEDs. DotStar LEDs are series-chainable, individually-addressable RGB LEDs similar to NeoPixels. However, with around 50 times the pulse width modulation (PWM) rate, DotStars are more suitable for POV applications than NeoPixels.  The LED chain is driven by a Raspberry Pi 4 single board computer using a clever system for storing image frames.

If deadly rotational velocity is not your cup of tea, consider this slower spinning RGB Christmas tree featuring a DIY slip ring. Or for more POV, may we suggest this minimalist persistence-of-vision display requiring only a few LEDs and an ATtiny CPU.

Continue reading “Spinning Holographic POV Christmas Tree Of Death”

A Hacker’s Christmas Story

Twas the night before Christmas, and because I decided to make everyone’s presents myself this year, I’m still working like mad to get everything done before the big deadline. Why do I do this to myself? Well, partly because I enjoy the process.

My wife had this idea that we can make the older folks some fun decorative blinky things, and picked some motives. My son then drew them out on paper, and I scanned those drawings in and traced them over in CAD. We then cut the shapes out of wood on the CNC router, which turned out to be incredibly successful. (Now that I’ve done it, I wouldn’t be surprised if all of those “quirky” decorative objects that the Swedish flat-packers sell aren’t initially sketched out by third graders.)

Then my son painted them, and it’s my job to insert the twinkling. I bought some of those three-wire “fairy lights” for the purpose, and they’re really fun to hack on. They’re like WS2812s, only instead of using four pins and shifting the data downstream, they’re on a bus, each with a hard-coded address – they know where they are in the string and each LED only listens for the Nth set of 24 bits. This means sending 200 color codes just to light up the 4 LEDs in Aunt Micki’s decorative tree, but so be it.

Last stop, and still to do as of the 23rd, route out some kind of wooden battery case, wedge in the LiPo and the charging circuits, and solder on an on/off switch. It’s down to the last minute, but isn’t that always the way?

Definitely would have been easier just to order something online. But is that the spirit of giving? No! The DIY way brings the family together, gets me some quality time with the CNC machine, and tones up my FreeCAD skills. My son even looked over my shoulder as we were coding some of the LED animations. And nothing says Christmas like hand-coded blinkies.

Happy Holidays, y’all!

LED Christmas Lights Optimized For Max Twinkleage

Old-school filament-based Christmas lights used to be available in twinkling form. LEDs, with their hard-on and hard-off nature, aren’t naturally predisposed to such behavior. To rectify this, some time ago, [Mark Kriegsman] built an Arduino program that makes LEDs twinkle beautifully.

The program is known as TwinkleFOX, and relies on the popular FastLED library for addressable LEDs. [Mark’s] demo setup is built around using WS2811 LEDs, put together in a string with plastic diffusers on each bulb. The Arduino is programmed to vary the brightness of each LED according to a triangle wave function. To create the twinkling effect, each LED has its own unique clock signal, so they vary in brightness at different times and at different rates.

Using an Arduino Uno or Leonardo, [Mark] reports its possible to twinkle 300 individual LEDs at a rate of over 50 updates a second. Using a faster microcontroller should net reliable performance with longer strings. Meanwhile, if you’re wondering how the older-style lights used to twinkle, we’ve covered that before too. Video after the break.

Continue reading “LED Christmas Lights Optimized For Max Twinkleage”

Merry Christmas! Rip And Tear!

If you want a little mayhem on your Christmas tree, you can check out [Sprite_tm]’s tiny PC Christmas ornament. With 3D printing, that isn’t such a tall order, but [Sprite]’s does have a unique ability: it plays DOOM, as you can see in the video below.

The device uses an ESP32, and while [Sprite] had ported the iconic shooter to the microcontroller before, he decided to use a Game Boy port that is more lightweight instead. There were a few reasons for the choice, including the ability to do Bluetooth so you could connect controllers so you can play the game. The only catch was he had to pull off the flash memory and replace it with a larger one (see the second video below).

Granted, the screen is tiny, so it is sort of a novelty. But if you want to have a go, the files are all there. As you might expect, there is a tiny battery and the circuitry required to recharge it, as well. We’d probably make an adapter to let it charge from the Christmas lights, but that can wait for version 2.

The input device handling is a bit strange. Bluetooth BLE devices will automatically grab an input device that is in pairing mode. There is no provision for connecting using the “normal” Bluetooth mechanism. A fun project and you could use the case for some other tiny projects, too. A larger flash on an ESP32 has lots of possibilities, as well.

If you need a primer on the ESP32, we got it. If you want to play DOOM on something truly strange, try seven-segment displays.

Continue reading “Merry Christmas! Rip And Tear!”