Stacks Of Spring Washers Power The Drawbar On This CNC Mill Conversion

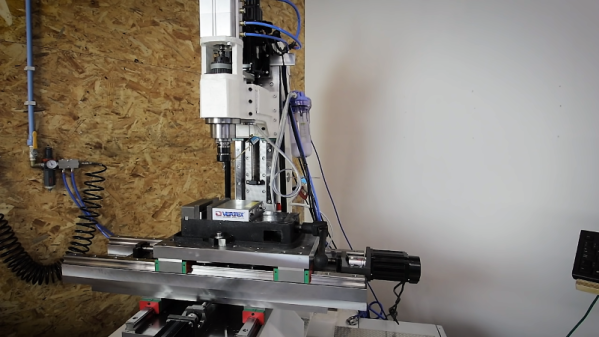
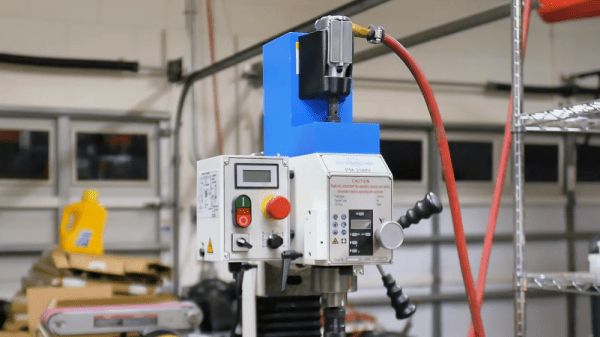
With Tormach and Haas capturing a lot of the entry-level professional market for CNC machines, we don’t see too many CNC conversions of manual mills anymore. And so this power drawbar conversion for a Precision Matthews mill really caught our eye.

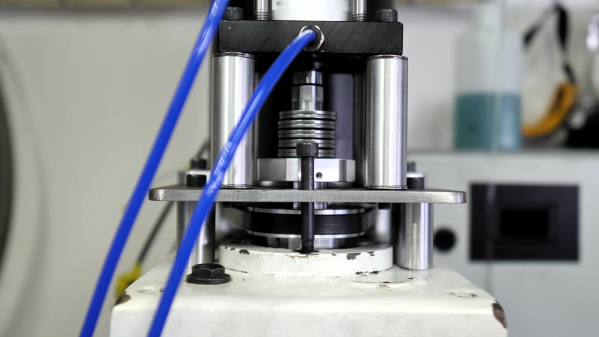
What’s that, you say? Didn’t [Physics Anonymous] already build a power drawbar for a mill? They did, and it was quite successful. But that was based on a pneumatic impact wrench, and while it worked fine on a manual mill, the same approach would be a bit slow and cumbersome on a CNC mill. For this build, they chose a completely different approach to providing the necessary upward force to draw the collet into the collet holder and clamp down on the tool: springs. Specifically, Belleville spring washers, which are shaped like shallow cups and can exert tremendous axial force over a very short distance.

[PA] calculated that they’d need to exert 2,700 pounds (12,000 Newtons) of force over a length of a couple of inches, which seems outside the Belleville washer’s specs. Luckily, the springs can be stacked, either nested together in “series” to increase the load force, or alternating in “parallel” to apply the rated force over a greater distance. To compress their stack, they used a nifty multi-stage pneumatic cylinder to squash down the springs and release the collet. They also had to come up with a mechanism to engage to machine’s spindle only when a tool change is called for. The video below details the design and shows the build; skip to 11:32 to see the drawbar in action.

We’re looking forward to the rest of [Physics Anonymous]’ conversion. They’re no strangers to modifying off-the-shelf machines to do their bidding, after all – witness their improvements to an SLA printer.

Continue reading “Stacks Of Spring Washers Power The Drawbar On This CNC Mill Conversion”

Steel Tubes And Ground Plates Form The Skeleton Of This DIY Vertical CNC Mill

If you’re going to do it yourself, you might as well outdo yourself. That seems to be the thinking behind this scratch-built CNC mill, and it’s only just getting started.

According to [Kris Temmerman], the build will cost about $10,000 by the time he’s done. So it’s not cheap, and a personal CNC from Tormach can be had for less, but that’s missing the point entirely. [Kris] built most of the structural elements for the vertical mill from cheap, readily available steel tubing, of the kind used for support columns in commercial buildings. Mounted to those are thick, precision-ground steel plates, which eat up a fair fraction of the budget. Those in turn hold 35 mm linear bearings and ball screws for the three axes, each powered by a beefy servo. The spindle is a BT30 with a power drawbar, belt-driven by an external motor that [Kris] doesn’t share the specs on, but judging from the way it flings chips during the test cut in the video below, we’d say it’s pretty powerful.

There’s still plenty to do, not least of which is stiffening the column; perhaps filling it with epoxy granite would do the trick? But it sure looks like [Kris] is building a winner here, and if he keeps the level of craftsmanship up going forward, he’ll have a top-quality machine on his hands.

Continue reading “Steel Tubes And Ground Plates Form The Skeleton Of This DIY Vertical CNC Mill”

Giving MIDI Organs MIDI Drawbars

This goes back to Bach: if you want to change the sound an organ makes, you have to pull on some drawbars. This design didn’t change for 300 years, and in the 20th century with the advent of ‘tonewheel’ organs, you still had small bars to pull to change what sounds came out of the organ. While this was a simple solution for air-powered organs of the 1700s, when it comes to MIDI, rotary pots are a lot less expensive than linear pots. Given the lack of drawbar MIDI controllers, [Stefano] decided to build his own. It has nine drawbars and eight buttons, all connected to MIDI.

The interesting electromechanical part of this build, the drawbars themselves, are ripped from a Hammond organ. Don’t worry, plenty of these were made and only a handful actually sound good. To that, [Stefano] added a few pushbuttons soldered onto a piece of perfboard, and everything is wired up to a Teensy LC, the microcontroller platform that’s becoming the standard for everything from MIDI controllers to computer keyboards. MIDI over DIN and MIDI over USB are supported, and all the buttons and drawbars are individually programmable. You can even do that through SysEx messages, because that’s how things were done back in the day.

While there are a few MIDI-controlled organs that still use drawbars — the double manual Nord comes to mind imminently — this is a great solution to putting drawbars into anything that speaks MIDI, VSTs included.

Air Wrench Becomes A Milling Machine Power Drawbar

We sometimes wonder if designers ever actually use their own products, or even put them through some sort of human-factors testing before putting them on the market. Consider the mechanism that secures toolholders to the spindle of a milling machine: the drawbar. Some mills require you to lock the spindle with a spanner wrench, loosen the drawbar with another wrench, and catch the released collet and tool with – what exactly?

Unwilling to have the surgical modifications that would qualify him for the Galactic Presidency, [Physics Anonymous] chose instead to modify his mill with a power drawbar. The parts are cheap and easily available, with the power coming from a small butterfly-style pneumatic wrench. The drawbar on his mill has a nearly 3/8″ square drive – we’d guess it’s really 10 mm – which almost matches up with the 3/8″ drive on the air wrench, so he whipped up a female-to-female adapter from a couple of socket adapters. The wrench mounts to a cover above the drawbar in a 3D-printed holster. Pay close attention to the video below where he goes through the Fusion 360 design; we were intrigued by the way he imported three orthogonal photos on the wrench to design the holster around. That’s a tip to file away for a rainy day.

This is a great modification to a low-cost milling machine. If you’re in the process of buying machine tools, you should really check out our handy buyer’s guides for both milling machines and lathes. It’ll let you know what features to look out for, and which you’ll have to add later.

Continue reading “Air Wrench Becomes A Milling Machine Power Drawbar”

Retrotechtacular: Building Hammond Organ Tones

Here’s a short film made by the Hammond Organ Company with the intent to educate and persuade potential consumers. Right away we are assured that Hammond organs are the cream of the crop for two simple reasons: the tone generator that gives them that unique Hammond sound, and the great care taken at every step of their construction.

Hammond organs have ninety-one individual electromagnetic tone wheel assemblies. Each of these generate a specific frequency based on the waviness of a spinning disk’s edge and the speed at which it is rotated in front of an electromagnet. By using the drawbars to stack up harmonics, an organist can build lush walls of sound.

No cost is spared in Hammond’s tireless pursuit of excellence. All transformers are wound in-house and then sealed in wax to make them impervious to moisture. Each tone wheel is cut to exacting tolerances, cross-checked, and verified by an audio specialist. The assembly and fine tuning of the tone generators is so carefully performed that Hammond alleges they’ll never need tuning again.

This level of attention isn’t limited to the guts of the instrument. No, the cabinetry department is just as meticulous. Only the highest-quality lumber is carefully dried, cut, sanded, and lacquered by hand, then rubbed to a high shine. Before it leaves the shop, every Hammond organ is subject to rigorous inspection and a performance test in a soundproofed room.

Continue reading “Retrotechtacular: Building Hammond Organ Tones”