Rib Cage Lamp Kicks It Up A Notch With Party Mode

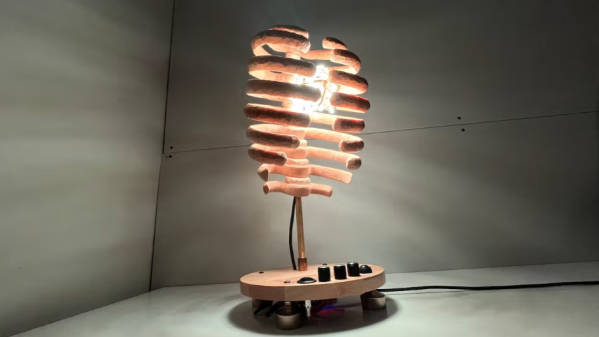
We think [Michelle]’s sound-reactive rib cage lamp turned out great, and the photos and details around how it was made are equally fantastic. The lamp is made of carved and waxed wood, and inside is a bundle of LED lighting capable of a variety of different color palettes and patterns, including the ability to react to sound. Every rib cage should have a party mode, after all.

The LED strip is fashioned into an atom-like structure.

Turns out that designing good rib cage pieces is a bigger challenge than one might think. [Michelle]’s method was to use an anatomical 3D model as reference, tracing each piece so that it could be cut from a flat sheet of wood.

The resulting flat pieces then get assembled into a stack, with each rib pointed downward at a roughly 20 degree angle. This process is a neat hack in itself: instead of drilling holes all at exactly the same angle, [Michelle] simply made the holes twice the diameter of the steel rod they stack on. The result? The pieces angle downward on their own.

The LED lighting is itself a nice piece of work. The basic structure comes from soldered solid-core wire. The RGB LED strip gets wound around that, then reinforced with garden wire. The result is an atomic-looking structure that sits inside the rib cage. An ESP32 development board drives everything with the FastLED library.

Code for everything, including the sound-reactive worky bits, which rely on an INMP441 I2C microphone module is all available on GitHub. And if you want to make your own sound-reactive art, make sure to check out these arms as well.

Want to see the rib cage in action? A short demo video is embedded below that demonstrates the sound reactivity. Equally applicable to either party or relaxation modes, we think.

Continue reading “Rib Cage Lamp Kicks It Up A Notch With Party Mode”

Six New HackadayU Courses Announced For Fall 2020

The fall lineup of HackadayU courses was just announced, get your tickets now!

Each course is led by expert instructors who have refined their topics into a set of four live, interactive classes plus one Q&A session we like to call Office Hours. Topics range from leveling up your Linux skills and learning about serial buses to building interactive art and getting into first-person view (FPV) drone flight.

Checkout the course titles, instructors, and details listed below. If you’d like to hear about each class from the instructors themselves, their teaser videos are embedded after the break.

  • Interactive Media Art with Light and Sensors
    • Instructor: Mirabelle Jones
    • Course overview: This course will cover how to develop interactive artworks, installations, and experiences based on sensor input.
  • Introduction to FPV Drones
    • Instructor: Ayan Pahwa
    • Course overview: We’ll get familiar with the multi-rotor category of Unmanned Aerial Vehicles (UAVs) including physics, aerodynamics, electronics, digital signal processing (DSP), and writing software that is involved.
  • Intro to LEDs Using Arduino and FastLED
    • Instructors: Cathy Laughlin & Mirabelle Jones
    • Course overview: Students will learn all about how LEDs work as well as how to program LED patterns using the Arduino IDE.
  • Linux + Electronics: A Raspberry Pi Course
    • Instructor: Pablo Oyarzo
    • Course overview: This course is for those who had wanted to go from Arduino to a Linux computer small enough to fit the project but greatly more powerful to full fill the project’s needs and don’t know where to start.
  • Embedded Serial Buses (Part 1)
    • Instructor: Alexander Rowsell
    • Course overview: This course will cover the I2C and 1-Wire serial buses. We will look at the hardware layer, the protocol layer, and the software/application layer for both bus types.
  • Art + Code
    • Instructor: Casey Hunt
    • Course overview: Students will grow their technical skills through mastery of the P5.js JavaScript library, and will also learn about aesthetics and art history in the digital space.

HackadayU courses are “pay-as-you-wish”. To help ensure the live seats don’t go to waste, the minimum donation for each class is $1. Proceeds go to charity and we’re happy to report a donation of $4,200 going to Steam Coders from the summer session of HackadayU. A new charity will be chosen for the fall classes, details to follow.

Each class will be recorded and made available once they’ve been edited. You can take a look at the excellent Reverse Engineering with Ghidra series right now. Videos of the Quantum Computing and KiCad + FreeCAD courses are coming soon.

Continue reading “Six New HackadayU Courses Announced For Fall 2020”

Hex Matrix Clock Is Spellbinding

Just when we think we’ve seen all possible combinations of 3D printing, microcontrollers, and pretty blinkenlights coming together to form DIY clocks, [Mukesh_Sankhla] goes and builds this geometric beauty. It’s kaleidoscopic, it’s mosaic, and it sorta resembles stained glass, but is way cheaper and easier.

The crucial part of the print does two jobs — it combines a plate full of holes for a string of addressable RGB LEDs with the light-dividing walls that turn the LEDs into triangular pixels. [Mukesh] designed digits for a clock that each use ten triangles. You’d need an ESP8266 to run the clock code, or if you’d rather sit and admire the rainbow light show unabated by the passing of time, just use an Arduino Uno or something similar.

Most of the aesthetic magic here is in the printed pieces and the FastLED library. It has a bunch of really cool animations baked in that look great with this design. Check out the demo video after the break. The audio is really quiet until the very end of the video, so be warned. In our opinion, the audio isn’t necessary to follow along with the build.

The humble clock takes many lovely forms around here, including pop art.

Continue reading “Hex Matrix Clock Is Spellbinding”

Cheap Party Light Gets Arduino Upgrade

If you’ve got a party coming up and are looking to add a little bit of excitement, you might be interested in this recent project from [Gav Lewis]. The build is based on a commercially available party light, but with some upgraded components the final product is brighter and more dynamic than it was stock.

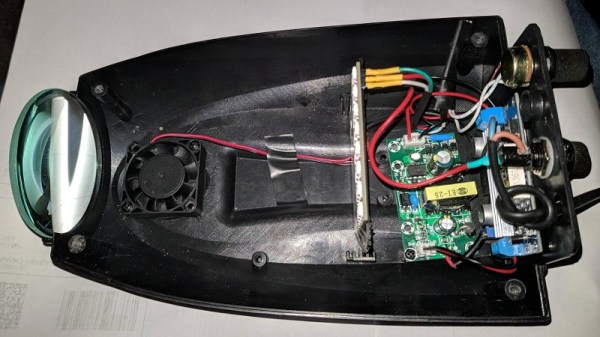
Realistically, [Gav] has changed out almost every component of this light except for the enclosure and the front lens. The original 5 mm LED array was replaced with a new 8×8 WS2812B panel, and the electronics completely replaced with an Arduino Nano. He’s still using the light’s original power supply, but as it only puts out around 4.2 V, he’s added a boost converter to provide a stable 5 V for the new hardware. He also added a small 12 V cooling fan, which he says is basically silent since it’s only getting half its rated voltage.

[Gav] has developed a number of lighting patterns with FastLED that do a good job of emulating what you might see from a much more expensive laser scanner. In the video after the break, you can see how multiple colored beams of light exit the housing at once, projecting patterns on the opposite wall. He says he’s like to restore the device’s original sound activation mode, but as of yet hasn’t gotten the code sorted out.

This project uses a off-the-shelf 8×8 matrix of WS2812B LEDs, but if you ever find yourself needing to piece together your own array from individual LEDs, we recently covered a great tip for making it a bit easier.

Continue reading “Cheap Party Light Gets Arduino Upgrade”

Jumbo LED Matrix Brings Classic Sprites To Life

Despite all the incredible advancements made in video game technology over the last few decades, the 8-bit classics never seem to go out of style. Even if you weren’t old enough to experience these games when they were new, it’s impossible not to be impressed by what the early video game pioneers were able to do with such meager hardware. They’re a reminder of what can be accomplished with dedication and technical mastery.

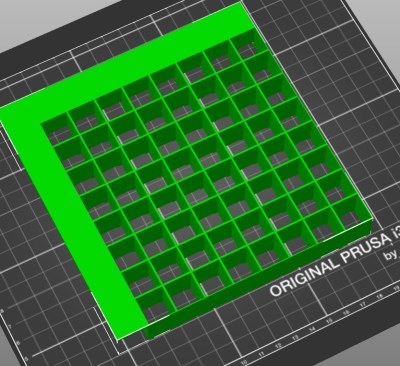
The grid has been split up for easier printing.

If you’d like to put a little retro inspiration on your desk, take a look at this fantastic 16 x 16 LED matrix put together by [Josh Gerdes]. While it’s obviously not the only thing you could use it for, the display certainly seems particularly adept at showing old school video game sprites in all their pixelated glory. There’s something about the internal 3D printed grid that gives the sprites a three dimensional look, while the diffused glow reminds us of nights spent hunched over a flickering CRT.

The best part might be how easy it is to put one of these together for yourself. You’ve probably got most of what you need in the parts bin; essentially it’s just a WS2812B strip long enough to liberate 256 LEDs from and a microcontroller to drive them. [Josh] used an Arduino Nano, but anything compatible with the FastLED library would be a drop-in replacement. You’ll also need a 3D printer to run off the grid, and something to put the whole thing into. The 12×12 shadowbox used here looks great, but we imagine clever folks such as yourselves could make do with whatever might be laying around if you can’t nip off to the arts and crafts store right now.

Beyond looking great, this project is a fantastic reminder of how incredibly handy WS2812 LEDs really are. Whether you’re recreating iconic game sprites or fashioning your own light-up sunglasses, it’s hard to imagine how we managed before these little wonders hit the scene.

Continue reading “Jumbo LED Matrix Brings Classic Sprites To Life”

LED Clock Strips Time Down To Pulses Of Light

Nietzsche said (essentially) that time is a flat circle — we are doomed to repeat history whether we remember it or not. This is a stark and sobering thought for sure, but it’s bound to dissipate the longer you look at [andrei.erdei]’s literal realization of time as a flat circle.

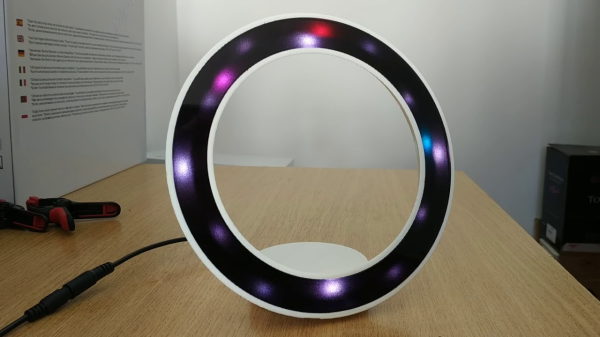
A clock that uses nothing but RGB LEDs to give the time sounds confusing and potentially cluttered, but the result here is quite pleasing and serene. We figure it must be the combination of brighter LEDs to represent 12, 3, 6, and 9, and dimmer LEDs for the rest of the numbers, plus the diffusion scheme. The front plate is smoky acrylic topped with two layers of frosted black window foil.

Inside the printed plastic ring are two adhesive RGB LED strips running on an ESP8266 that ultimately connects to an NTP time server. The strips are two halves of an adhesive 60 LED/meter run that have been stuck together back to back so that the lights are staggered for seamless coverage. This sets up the coolest thing about this clock — the second hand, which is represented by a single pink LED zig-zagging back and forth around the ring. Confused? Watch the short demo after the break and you’ll figure it out in no time.

Now that times are strange, you might be more interested in a straightforward approach to finding out what day it is. The wait is over.

Continue reading “LED Clock Strips Time Down To Pulses Of Light”

Hackaday Links Column Banner

Hackaday Links: September 8, 2019

We start this week with very sad news indeed. You may have heard about the horrific fire on the dive boat Conception off Santa Cruz Island last week, which claimed 33 lives. Sadly, we lost one of our own in the tragedy: Dan Garcia, author of the wildly popular FastLED library. Dan, 46, was an Apple engineer who lived in Berkley; his partner Yulia Krashennaya died with him. Our community owes Dan a lot for the work he put into FastLED over the last seven years, as many an addressable LED is being driven by his code today. Maybe this would be a good chance to build a project that uses FastLED and add a little light to the world, courtesy of Dan.

In happier news, the biggest party of the hardware hacking year is rapidly approaching. That’s right, the 2019 Hackaday Superconference will be upon us before you know it. Rumor has it that there aren’t that many tickets left, and we haven’t even announced the slate of talks yet. That’s likely to clean out the remaining stock pretty darn quickly. Are you seriously prepared to miss this? It seems like a big mistake to us, so why don’t you hop over and secure your spot before you’re crying into your Club-Mate and wondering what all the cool kids will be doing in November.

Of course one of the highlights of Superconference is the announcement of the Hackaday Prize winner. And while we naturally think our Prize is the best contest, that doesn’t mean there aren’t others worth entering. MyMiniFactory, the online 3D-printing community, is currently running a “Design with Arduino” competition that should be right up the alley of Hackaday readers. The goal is simple: submit a 3D-printed design that incorporates Arduino or other electronics. That’s it! Entries are accepted through September 16, so you’ve still got plenty of time.

Sometimes you see something that just floors you. Check out this tiny ESP32 board. It doesn’t just plug into a USB port – it fits completely inside a standard USB Type A jack. The four-layer board sports an ESP32, FTDI chip, voltage regulator, an LED and a ceramic antenna for WiFi and Bluetooth. Why would you want such a thing? Why wouldn’t you! The board is coming soon on CrowdSupply, so we hope to see projects using this start showing up in the tipline soon.

Here’s a “why didn’t I think of that?” bench tip that just struck us as brilliant. Ever had to probe a board to trace signal paths? It’s a common enough task for reverse engineering and repairs, but with increasingly dense boards, probing a massive number of traces is just too much of a chore. Hackaday superfriend Mike Harrison from “mikeselectricstuff” makes the chore easier with a brush made from fine stainless wires crimped into a ring terminal. Attached to one probe of a multimeter, the brush covers much more of the board at a time, finding the general area where your trace of interest ends up. Once you’re in the neighborhood you can drop back to probing one pad at a time. Genius! We’d imagine a decent brush could also be made from a bit of coax braid too.

Another shop tip to wrap up this week, this one for woodworkers and metalworkers alike. Raw materials are expensive, and getting the most bang for your buck is often a matter of carefully laying out parts on sheet goods to minimize waste. Doing this manually can be a real test of your spatial relations skills, so why not automate it with this cut list optimizer? The app will overlay parts onto user-defined rectangles and snuggle them together to minimize waste. The program takes any units, can account for material lost to kerfs, and will even respect grain direction if needed. It’s built for wood, but it should prove useful for sheet metal on a plasma cutter, acrylic on a laser, or even PCBs on a panel.