Chandelier Mimics The Solar Analemma

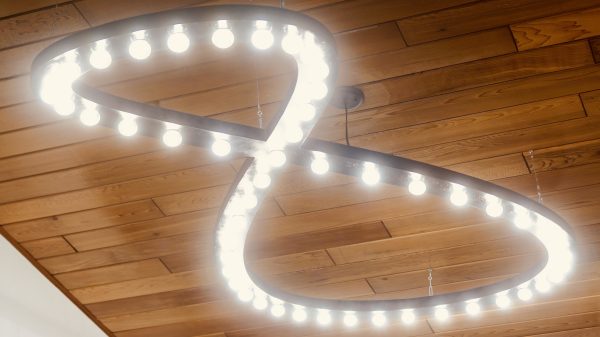
The solar analemma is the shape the sun traces out when photographed each day at the same time and same location for a whole year – but you probably knew that already. [makendo] decided to use this skewed figure-eight shape as the inspiration for a chandelier, and the results are stunning.

A laser cutter was used to cut out segments of the analemma shape in plywood, such that they could slot together into the full form. These were then glued together on to a plywood sheet as a template to cut out the full-size form in a single piece. Some laminate edging was then added and the entire thing was given a coat of black gloss paint. String lights were cut up to provide the many globe fittings required, and installed on the back of the chandelier.

[makendo] notes that with a full 51 bulbs in the chandelier, it’s way too bright for most dining room settings. A dimmer is thus used to tone down the output to reduce eyestrain at mealtimes. It’s a fun build, and we’ve always loved light fixtures that are inspired by astronomy. If you like the moon more than the sun, though, there’s a build for you too!

DIY Laptop Stand: Why Stop At One When You Can Slot Three?

We make the tools we need, and that’s definitely the case with [Marco Schulte]’s laptop stand. It slots not one, not two, but three laptops at once.

For all their portability, multiple laptops can be a bit clunky to manage on a desk, so [Marco]’s solution definitely saves space while keeping things accessible. The laptop in the front can be open for use and easy access, while the two in the back are held vertically and can be attached to external monitors or other peripherals.

Not only does it save space, but the stand provides ample spots to anchor cable ties for securing the inevitable mess of wires and cables that dealing with three laptops brings. It makes for a tidier desk, that’s for sure.

The stand was designed in Fusion 360 and was cut from plywood with a CNC router. Does this design give you any ideas, or would you like to make one for yourself? The design files are here.

No access to a CNC router? No problem if you have glue and some spare boxes laying around! You might be surprised at how sturdy a few layers of cardboard and glue can be.

ATtiny85 Snake Game Is A Circuit Sandwich

If there’s any looming, unwritten rule of learning a programming language, it states that one must break in the syntax by printing Hello, World! in some form or another. If any such rule exists for game programming on a new microcontroller, then it is certainly that thou shalt implement Snake.

This is [__cultsauce__]’s first foray away from Arduinoville, and although they did use one to program the ATtiny85, they learned a lot along the way.

It doesn’t take much to conjure Snake with an ’85 — mostly you need a screen to play it on (an OLED in this case), some buttons to direct the snake toward the food dot, a handful of passives, and a power source.

[__cultsauce__] started by programming the microcontroller and then tested everything on a breadboard, both of which are admirable actions. Then it was time to make this plywood and cork sandwich, which gives the point-to-point solder joints some breathing room and keeps them from getting crushed. Be sure to check it out in action after the break, and grab the files from GitHub if you want to charm your own ‘tiny Snake.

There’s a ton you can do with this miniature microcontroller, and that includes machine learning.

Continue reading “ATtiny85 Snake Game Is A Circuit Sandwich”

Throne Of Dev: An Endgame Office Chair

They say you shouldn’t cheap out on anything that comes between you and the ground. Typically, that list includes shoes, tires, and mattresses. But it’s 2021, and it’s high time to add ‘office chair’ to that list. Take it from someone who bought a handful of hundred-dollar office chairs and finally invested in an Aeron. Your throne makes a difference.

We’re not sure if there is conclusive evidence of this phenomenon, but it seems that for many people, the fastest way to get those creative juices flowing is to lean back and put your feet up. Now it’s one thing to lean back in an office chair and hold yourself there, but it’s quite another to sit in, say, a recliner that keeps the position for you. What if there was an office chair that could switch between the two? [Peter van der Walt] has been working from home for a decade now and will soon be moving to a new base of operations. The new space has a little office next to the main area, so it’s the perfect opportunity to build the dream chair — a day-to-night endgame throne for working, gaming, and everything in between.

[Peter] is working with some cyborg additions to his body and doesn’t care for the standard office chair fare. Currently, he splits his sits between a plastic chair like you’d find outside a coffee house (hey, whatever works best) and a cushy recliner. The idea is to find comfort and focus, and build something comfortable enough to accommodate the occasional afternoon siesta. It will be completely CNC-machineable from 18 mm plywood, and will probably have some upholstery eventually. Your ideas for feature creep are welcome below, or better yet, in the discussion area of the project page.

Some of us like to stand once in a while, but don’t want to go all in on a robotic desk. There are budget-friendly ways around that problem too, of course.

Custom Macro Keyboard Looks Good In Wood

There’s more than one way to make a mechanical macro pad, and this wooden wonder represents one of our favorites. [Tauno Erik] had an old rubber dome rectangle keyboard lying around that still worked, but the poor thing was missing some of its caps. After salvaging the controller, [Tauno Erik] got to work on the tedious task of figuring out the mapping of the matrix, which was made easier with a Python script.

Almost every component of this beauty is wood, including the mounting plate and those thicc and lovely keycaps — their top layer is solid oak, and the bottom bit is birch plywood. In order to interface the ‘caps with the switches, [Tauno Erik] designed and printed connector pieces that sit inside the extra large keycaps and accept the stems of the key switches.

Speaking of switches, we’re not sure if [Tauno Erik] ended up using Cherry green switches, browns, or a mix of both (that would be interesting), but each one is mounted on a custom PCB along with a diode and a pull-up resistor. You can see more build pictures at [Tauno Erik]’s site, and stick around for a visual tour of the completed build after the break.

Wood is a great choice for keycaps, and we imagine they’ll only look better with age and use. A more common use for wood on a keyboard build is in surprisingly comfortable wrist rests.

Wood Enclosure Lends Warmth To This DIY Ribbon Microphone

We love it when someone takes an idea they’ve seen on Hackaday and runs with it, taking it in a new and different direction. That’s pretty much what we’re here for, after all, and it’s pretty gratifying to see projects like this wooden ribbon microphone come to life.

Now, we’re not completely sure that [Maya Román] was inspired by our coverage of [Frank Olson]’s homage to the RCA Model 44 studio mic rendered in walnut veneer, but we’re going to pat ourselves on the back here anyway. The interesting thing with [Maya]’s build is that she chose completely different materials and design styles for her project. Where [Frank] built as much of his mic from wood as possible, [Maya] was fine with a mixed media approach — CNC-milled plywood for the case and stand, laser-cut acrylic for the ribbon motor frame, and 3D-printed pieces here and there as needed. The woven brass cloth used as a windscreen is a nice detail; while the whole thing looks — and sounds — great, we think it would be even better with a coat of dark stain to contrast against the brass, as well as a nice glossy coat of polyurethane.

The video below shows the whole design and build process, which was a final project for [Maya]’s audio production class this semester at college. Here’s hoping that it got as good a grade as we would give it.

Continue reading “Wood Enclosure Lends Warmth To This DIY Ribbon Microphone”

Skee-Ball Scoring With Coin Slot Switches

Bowling is great and all, but the unpredictability of that little ball jump in Skee-Ball is so much more exciting. You can play it straight, or spend a bunch of time perfecting the 100-point shot. And unlike bowling, there’s nothing to reset, because gravity gives you the balls back.

In one of [gcall1979]’s earlier Skee-Ball machines, gravity assisted the scoring mechanism, too: each ball rolls back to the player and lands in a lane labeled with the corresponding score, which is an interesting engineering challenge in its own right. He decided to build automatic scoring into his newest Skee-Ball machine.

At the bottom of each cylinder is an arcade machine coin door switch with a long wire actuator. These had to be mounted so they’re close enough to the hole, but out of the way of the balls.

Each switch is wired up to an Arduino Mega along with four large 7-segments for the score, and a giant 7-segment to show the number of balls played. Whenever the game is reset, a servo drops a door to release the balls, just like a commercial machine.

The arcade switches work pretty well, especially once he bent the wire into hook shape to cover more area. But they do fail once in a while, maybe because the targets are full-size, but the balls are half regulation size. For the next one, [gcall1979] is planning to use IR break-beam targets which ought to work with any size ball. If you prefer bowling, you won’t strike out with break-beam targets there, either.