How To Spend A Million Dollars On The Ultimate Stereo

We’ve all seen the excesses that the Golden Ears set revel in; the five-figure power conditioning boxes, the gold-plated HDMI cables. As covered by the Washington Post, however, [Ken Fritz] may have gone farther than most. Before he passed away, he estimated that he spent a million dollars on the greatest possible hi-fi setup he could imagine.

There’s plenty of hardcore gear in the rig. Massive cabinets loaded with carefully-tuned speaker drivers. A $50,000 record player built into a 1,500-pound weighted base for the utmost in stability and vibration resistance. Expensive cartridges, top-tier reel-to-reel decks, and amplifiers worth more than most used cars.

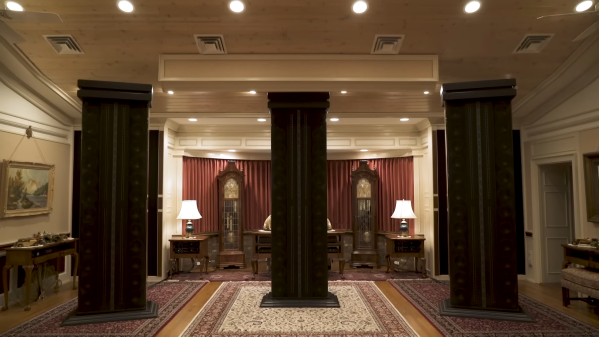
As the piece explores, [Fritz] knew that none of that was enough. Sound is all about the space as much as it is the equipment. Thus, the family home itself was transformed to become the ultimate listening environment in turn. The listening room got everything from concrete floors and its own HVAC and electrical systems. Much of the equipment was custom built to avoid wasting money on overpriced name-brand gear. The story of the kit was also the subject of a documentary shared online, by the name of One Man’s Dream.

The piece examines what goes into a top-tier setup like this, while also exploring the human cost that [Fritz’s] passion had on him and his family. The ending is sad and brutal in a way you wouldn’t think a story about hi-fi gear ever could be.  It’s an education in more ways then one, and teaches us that it’s worth keeping an eye on the rest of our lives while pursuing what we enjoy the most. Video after the break.

Continue reading “How To Spend A Million Dollars On The Ultimate Stereo”

ESP32 Drives Tiny FM Radio

Even as music streaming services and podcast apps dominate most of our listening time, it’s still a great idea to keep a radio on hand, if for nothing else than in emergency situations. After all, blizzards, hurricanes, and other natural disasters can quickly take out both home and mobile Internet access. If you’d like to have an FM radio with the absolute smallest footprint, take a look at this one built around an ESP32.

While the radio uses the ESP32 as the main control board hosted by a TTGO T-Display board which adds a 1.14 inch ST7789V IPS panel, it also makes use of the TEA5767 chip for handling the FM radio signals. As [Volos Projects] has it programmed, the ESP32 stores five preset channels which can be toggled using two buttons at the bottom of the device. There’s also some circuitry to handle output to headphones or a stereo.

For making the radio even smaller, some of the audio processing could be done on the ESP32 instead, although its much simpler to take a slightly larger footprint and offload this to an audio processing chip. Since the source code for this project is open, modifications could be done including adding seek/tune functionality instead of relying only on presets. If you’re not building this for emergencies, though, and your entire area is dominated by cookie cutter corporate-owned radio stations, an ESP32 with an internet connection is great for accessing better radio stations around the world.

Continue reading “ESP32 Drives Tiny FM Radio”

Get MOST Into Your Pi

When looking the modify a passenger vehicle, the Controller Area Network (CAN) bus is a pretty easy target. In modern vehicles it has access to most of the on-board systems — everything from the climate control to the instrument cluster and often even the throttle, braking, and steering systems. With as versatile as the CAN bus is, though, it’s not the right tool for every job. There’s also the Media Oriented Systems Transport (MOST) bus which is increasingly found in automotive systems to handle multimedia such as streaming music to the stereo. To access that system you’ll need to approach it slightly differently as [Rhys] demonstrates.

[Rhys] has been working on replacing the dated head unit in his Jaguar, and began by investigating the CAN bus. He got almost everything working with replacement hardware except the stereo, which is where the MOST bus comes into play. It provides a much higher bandwidth than the CAN bus can accommodate but with almost no documentation it was difficult to interact with at first. With the help of a Raspberry Pi and a lot of testing he is able to get the stereo working again with a much more modern-looking touchscreen for control. It is also able to do things like change CDs in the car’s CD player, gather song information from the CD to display on the panel, and can perform other functions of the infotainment center.

For more detailed information on the MOST bus, [Rhys] also maintains a website where he puts his discoveries and other information he finds about this system. Unfortunately car stereo systems in modern vehicles can get pretty complicated these days, but adapting car stereos in older vehicles to modern technology carries some interesting challenges as well.

Continue reading “Get MOST Into Your Pi”

A Look At Zweikanalton Stereo Audio And Comparison With NICAM

With how we take stereo sound for granted, there was a very long period where broadcast audio and television with accompanying audio track were in mono. Over the decades, multiple standards were developed that provide a way to transmit and receive two mono tracks, as a proper stereo transmission. In a recent video, [Matt] over at [Matt’s Tech Barn] takes a look at the German Zweikanalton (also known as A2 Stereo) standard, and compares it with the NICAM standard that was used elsewhere in the world.

Zweikanalton is quite simple compared to NICAM (which we covered previously), being purely analog with a second channel transmitted alongside the first. Since it didn’t really make much of a splash outside of the German-speaking countries, equipment for it is more limited. In this video [Matt] looks at the Philips PM 5588 and Rohde & Schwarz 392, analyzing the different modulations for FM, Zweikanalton and NICAM transmissions and the basic operation of the modulator and demodulator equipment.

An interesting aspect of these modulations are the visible sidebands, and the detection of which modulation is used. Ultimately NICAM’s only disadvantage compared to Zweikanalton was the higher cost of the hardware, but with increased technological development single-chip NICAM solutions like the Philips SAA7283 (1995) began to reduce total system cost and by the early 2000s NICAM was a standard feature of TV chipsets, just in time for analog broadcast television to essentially become irrelevant.

Continue reading “A Look At Zweikanalton Stereo Audio And Comparison With NICAM”

A Single Ended Vacuum Tube Amplifier With A Modern Twist

Despite the oldest solid state audio circuitry now qualifying for a pension and a bus pass where this is being written, the thermionic tube retains a foothold in the world of audio — cherished by enthusiasts for the warm sound it is claimed to impart. For  the electronics enthusiast a tube audio amplifier makes for an interesting and unusual project, and for that reason it’s one tackled by many. [Keri Szafir] is no exception, and she’s produced a stereo tube amp with a few modern features.

Electrically it’s a relatively conventional single-ended design using a double triode and a power pentode for each channel. It follows a so-called ultra-linear circuit, with a tap on the output transformer feeding one of the pentode’s grids. The modern features come via a switched Bluetooth input and a motorized volume control, something that would have never been found on such an amp when they were the cutting edge.

We have to admit a soft spot for this type of amp, and we particularly like this one for its very period construction style using cable lacing to keep the wiring under control. We more often see these amps using the cheaper integrated triode-pentode tubes which makes them especially easy to build, so the separate preamp is a little different. We’re not sure we’d have spent extra on the fancy E88cc tubes though. Continue reading “A Single Ended Vacuum Tube Amplifier With A Modern Twist”

Photography, The Stereo Way

Most consumer-grade audio equipment has been in stereo since at least the 1960s, allowing the listener to experience sounds with a three-dimensional perspective as if they were present when the sound was originally made. Stereo photography has lagged a little behind the stereo audio trend, though, with most of the technology existing as passing fads or requiring clumsy hardware to experience fully. Not so with the DIY stereoscopic cameras like this one produced by this group of 3D photography enthusiasts, who have also some methods to view the photos in 3D without any extra hardware.

The camera uses two imaging sensors to produce a stereo image. One sensor is fixed, and the other is on a slider which allows the user to adjust the “amount” of 3D effect needed for any particular photo. [Jim] is using this camera mostly for macro photography, which means that he only needs a few millimeters of separation between the two sensors to achieve the desired effect, but for more distant objects more separation can be used. The camera uses dual Raspberry Pi processors, a lithium battery, and a touch screen interface. It includes a ton of features as well including things like focus stacking, but to get a more full experience of this build we’d highly recommend checking out the video after the break.

As for viewing the photographs, these stereoscopic 3D images require nothing more than a little practice to view them. This guide is available with some simple examples to get started, and while it does at first feel like a Magic Eye puzzle from the late 90s, it quickly becomes intuitive. Another guide has some more intricate 3D maps at the end to practice on as well. This is quite the step up from needing to use special glasses or a wearable 3D viewer of some sort. There are also some methods available to create 3D images from those taken with a regular 2D camera as well.

Thanks to [Bill] for the tip and the additional links to the guides for viewing these images!

Continue reading “Photography, The Stereo Way”

Generating Stereo FM Signals, Thanks To Python

A casual understanding of how AM radio works is pretty easy to come by, and standard FM is only a little more complicated. Things can go off the tracks a bit with stereo FM, though — figuring out how they squeeze two separate audio tracks onto one radio signal is a bit of a head-scratcher. In that case, wrapping your head around the concept might be helped by mocking up a stereo FM signal with an arbitrary waveform generator and a little bit of Python.

Not that [Sebastian] of Baltic Lab was unfamiliar with multiplex FM theory, mind you. As he explains it, his goal was to generate a valid stereo FM signal with a different pure tone on each channel, 700 Hz on the left and 2,200 Hz on the right. Luckily, [Sebastian] has a nice AWG, the Siglent SDG1032X, which has an Ethernet connection that can be used to control it remotely along with PyVISA, a Python package for controlling instruments using the Virtual Instrument Software Architecture protocol.

The meat of this project, and what really helps drive home the concept of putting multiple audio signals onto an FM signal, lies in the Python code that generates the component parts. [Sebastian] does a great job explaining how he programatically generates the sum and difference signals along with the 19 kHz pilot tone, and puts them all together into one waveform. The output of the program is used to generate a series of values that are sent to the arbitrary waveform generator, which outputs the desired FM signal. Looking at the output on a spectrum analyzer, the two audio tones are clearly visible, as are the attenuated pilot tone and some other spikes a little further up.

Just add an antenna to the setup and you’d have the world’s dullest FM radio station — but at least it’d be in stereo. Or if you want to check out the origin story for FM radio, we’ve got something for that too.