Building A 60s Toy The Way It Should Have Been

The original Hasbro “Think-a-Tron”, a toy from the dawn of the computer revolution, was billed with the slogan, “It thinks! It answers! It remembers!” It, of course, did only one of these things, but that didn’t stop the marketers of the day from crushing the hopes and dreams of budding computer scientists and their eager parents just to make a few bucks. It’s not like we’re bitter or anything — just saying.

In an effort to right past wrongs, [Michael Gardi] rebuilt the 1960s “thinking machine” toy with modern components. The original may not have lived up to the hype, but at least did a decent job of evoking the room-filling computers of the day is a plastic cabinet with a dot-matrix-like display. The toy uses “punch-cards” with printed trivia questions that are inserted into the machine to be answered. A disk with punched holes spins between a light bulb and the display lenses, while a clever linkage mechanism reads the position of a notch in the edge of the card and stops the wheel to display the letter of the correct answer.

[Michael]’s update to the Think-aTron incorporates what would have qualified as extraterrestrial technology had it appeared in the 1960s. A 35-LED matrix with a 3D-printed diffuser and case form the display, with trivia questions and their answer as a QR code standing in for the punch-cards.He also added a pair of user consoles, so players can lock-in and answer before an ESP32-Cam reads the QR code and displays the answer on the LED matrix, after playing some suitable “thinking music” through a speaker.

As usual with [Michael]’s retrocomputing recreations, the level of detail here is fantastic. We especially like the custom buttons; controls like these seem to be one of his specialties judging by his slide switches and his motorized rotary switch.

Continue reading “Building A 60s Toy The Way It Should Have Been”

Electric Puzzle Board Lets You Assemble Circuits With Ease

Many hackers learned about electronics over the years with home experimenter kits from Radio Shack and its ilk. Eschewing soldering for easier screw or spring based connections, they let the inexperienced build circuits with a minimum of fuss, teaching them the arcane ways of the electron along the way. [victorqedu] has put a modern spin on the form, with his Electric Puzzle Game.

The build consists of a series of 3D printed blocks, each containing a particular electronic component or module. The blocks can be joined together to form circuits, with magnets in the blocks mating with screws in the motherboard to hold everything together and make electrical contact between the parts. It’s a project that requires a significant amount of 3D printing and upfront assembly to build, but it makes assembling circuits a cinch.

The variety of circuits that can be built is impressive. [victorqedu] shows off everything from simple LED and switch arrangements to touch sensors and even a low-powered “Tesla coil”. We imagine playing with the blocks and snapping circuits into place would be great fun. We’ve seen other unconventional approaches before, too – such as building squishy circuits for educational purposes. Video after the break.

Continue reading “Electric Puzzle Board Lets You Assemble Circuits With Ease”

Toy O-Scope Is Dope

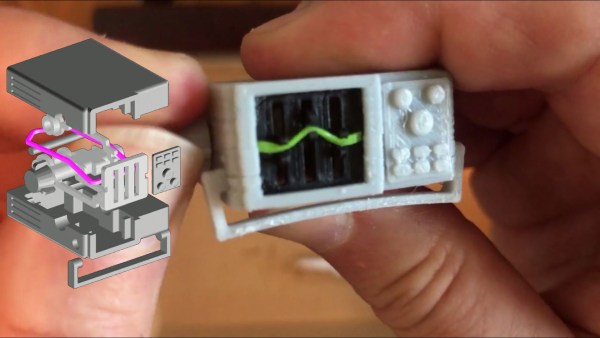
Not many of our childhood doll and action figure’s accessories revolved around lab equipment except maybe an Erlenmeyer flask if they were a “scientist.” No, they tended to be toasters, vehicles, and guns. When we were young, our heroes made food, drove sexy automobiles, and fought bad guys. Now that we’re older, some of our heroes wield soldering irons, keyboards, and oscilloscopes. [Adrian Herbez] made a scale model oscilloscope that outshines the beakers and test tube racks of yesteryear. Video also shown below. Continue reading “Toy O-Scope Is Dope”

Teardown: VTech Whiz Kid Luggable Computer

Back in the early 1980s, hotshot business types on the go would have used what were referred to at the time as portable computers from companies like Osborne or Kaypro. Due to the technical limitations of the era these so-called “luggables” were only slightly smaller and lighter than contemporary desktop computers, but they had integrated displays and keyboards so they were a bit easier to move around. A few years later the first generation of laptops would hit the market, and the portables predictably fell out of favor. Today they’re relatively rare collectors items; a largely forgotten first step in the steady march towards true mobile computing.

Which makes the 1984 edition of VTech’s “Whiz Kid” educational computer an especially unique specimen. The company’s later entries into the series of popular electronic toys would adopt (with some variations) the standard laptop form factor, but this version has the distinction of being what might be the most authentic luggable computer ever made for children. When this toy was being designed it would have been a reflection of the cutting edge in computer technology, but today, it’s a fascinating reminder that the latest-and-greatest doesn’t always stick around for very long.

The classic luggable hallmarks are all here. The flip down keyboard, the small and strangely offset display, there’s even lugs on the side to attach an included strap so the youngster can sling it over their shoulder. On the other hand, the fact that it’s just a toy allowed for some advantages over the real thing: it can actually run on battery power, and is quite lightweight relative to its size.

When we last took a peek inside one of VTech’s offerings, we found a surprisingly powerful Z80 machine that was more than deserving of its PreComputer moniker. But that BASIC-compatible design hailed from the late 80s, and was specifically marketed as a trainer for the next generation of computer owners. Will the 1984 Whiz Kid prove to have a similar relationship to its adult counterparts, or does the resemblance only go skin deep? Let’s find out.

Continue reading “Teardown: VTech Whiz Kid Luggable Computer”

Infinite Flying Glider

If you’ve exhausted your list of electronics projects over the past several weeks of trying to stay at home, it might be time to take a break from all of that and do something off the wall. [PeterSripol] shows us one option by building a few walkalong gliders and trying to get them to fly forever.

Walkalong gliders work by following a small glider, resembling a paper airplane but made from foam, with a large piece of cardboard. The cardboard generates an updraft which allows the glider to remain flying for as long as there’s space for it. [PeterSripol] and his friends try many other techniques to get these tiny gliders, weighing in at around half a gram, to stay aloft for as long as possible, including lighting several dozen tea candles to generate updrafts, using box fans, and other methods.

If you really need some electricity in your projects, the construction of the foam gliders shows a brief build of a hot wire cutting tool using some nichrome wire attached to a piece of wood, and how to assemble the gliders so they are as lightweight as possible. It’s a fun project that’s sure to be at least several hours worth of distraction, or even more if you have a slightly larger foam glider and some spare RC parts.

Continue reading “Infinite Flying Glider”

Classic Toy Helicopter Flies Again As DIY Version

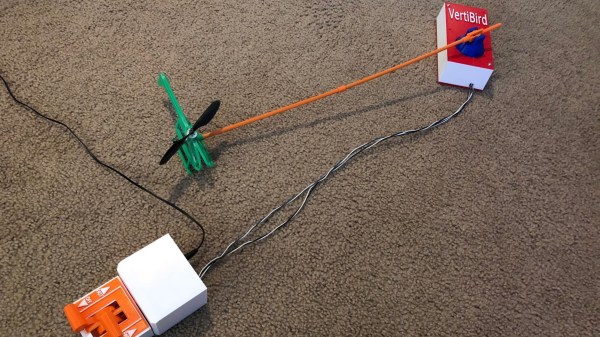
For many of us who grew up in the 1970s, “VertiBird”, the fly-it-yourself indoor helicopter, was a toy that was begged for often enough that it eventually appeared under the Christmas tree. And more than a few of the fascinating but delicate toys were defunct by Christmas afternoon, victims of the fatal combination of exuberant play and price-point engineering. But now a DIY version of the classic toy flies again, this time with a more robust design.

To be fair to the designers at Mattel, the toy company that marketed VertiBird, the toy was pretty amazing. The plastic helicopter was powered by a motor located in the central base, which rotated a drive rod that ran through a stiff tether. Small springs in the base and at the copter acted as universal joints to transmit power to the rotor. These springs were the weak point in the design, especially the one in the base, often snapping in two.

[Luke J. Barker]’s redesign puts a tiny gear motor in the aircraft rather than in the base, something that wouldn’t have been feasible in the original. To address the problem of getting electrical power from the base to the aircraft, [Luke] eschewed an expensive slip ring and instead used a standard 3.5-mm audio jack and plug. The plug serves as an axle for the main gear in the base that powers the copter’s rotation; sadly, this version doesn’t tilt the aircraft mechanically to control backward and forward flight like the original. A pair of pots with 3D-printed levers control throttle and flight direction through an Arduino; see it in action in the video below.

These pages abound with rotorcraft builds, both helicopters and multirotor. We appreciate all manner of flying machines, but this one really takes us back.

Continue reading “Classic Toy Helicopter Flies Again As DIY Version”

Catapult Your Best Wishes With This 3D-Printable Card

It’s the season to be surrounded by greeting cards of all shapes and sizes from friends old and new. News of their families and achievements, reminders that they exist, and a pile of cards to deal with sometime in January. Wouldn’t it be great if you could send something with a little more substance, something your friends would remember, maybe even hang on to?

[Brian Brocken]’s 3D-printed Da Vinci catapult kit may not fill that niche for everyone, but we can guarantee it will be a talking point. The Da Vinci catapult design uses a pair of springs similar to an archer’s bow, to unwind a pair of ropes and thus turn the shaft upon which the catapult shaft itself is fitted. All these components are mounted in a single piece with sprues similar to an injection moulded model kit, allowing the whole to easily be posted in an envelope.

The parts are all available to print separately among the files on the Thingiverse page for those with no need to mail them. For the casual spectator he’s made a YouTube video that we’ve placed below the break, detailing the design and build process as well as showing the device in use.

Continue reading “Catapult Your Best Wishes With This 3D-Printable Card”