Hidden Servo Automates Slat-style Window Blinds

slat-blind-automation

[Home Awesomation] has been working on automating his slat-style window blinds. His focus has been on adjusting the angle of the slats, not on completely retracting the shades. Since the slat angle adjustment requires little torque a servo motor turns out to be just perfect for the job. The good news is that the existing blinds in his house have room in the top enclosure to completely hide his add-on hardware.

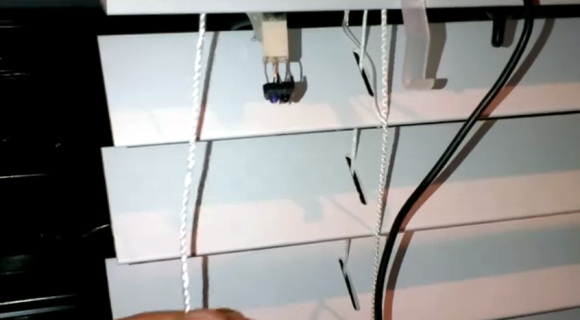
The image above is a screenshot from the demo which you can watch after the break. The top enclosure for the blinds is just shown at the top of the frame. Here [HA] is demonstrating a few different control designs which he has been trying out. You can see what looks like a Molex connector with some type of component attached to it. That’s an IR motion sensor and he’s really happy with its performance. He feels the same way about the black momentary push switch sticking down next to the power cable. But his DIY solution that works quite well is the pull string attached to a flexible piece of metal. When that metal bends enough to touch a stationary conductor it completes the circuit, telling the Arduino to start driving the servo.

The main idea behind the project is to poll a temperature sensor, closing the blind automatically to help keep the place cool during the day. We figure if he’s already using a microcontroller to drive the project he might as well throw a cheap Bluetooth in module there and make it controllable with a smart phone.

Continue reading “Hidden Servo Automates Slat-style Window Blinds”

Upgrade A Toy Keyboard’s Tone Production

hacking-a-toy-keyboard

[Jan] was given this toy keyboard and decided to make it the subject of his next project. In addition to having three octaves of keys it’s got a ton of buttons used to select different modes. He gave it an upgrade by installing his own tone production circuitry seen in the upper right.

His preliminary investigation of the stock components yielded a mystery uC encased in a blob of black epoxy. He wasn’t going to be getting anywhere with that, so he started by figuring out how to use 4051 multiplexers to read all of the keys. Outputs for that were routed to a 20 pin header for easy connection to the synthesizer board he would build in the next part of the project. He based it around an ATmega8, which we know can produce some killer chiptunes audio. Once he had everything working he laid out a circuit board in Kicad to ensure the transplanted circuitry would hold up inside of the toy keyboard. You can hear all of different effects it’s capable of in the clip after the break.

Continue reading “Upgrade A Toy Keyboard’s Tone Production”

3D Printing Sensor Mounts For The Oculus Rift

While browsing an oculus rift thread on reddit, I saw someone mention how nice it would be to have some actual mounts for external sensors on their Rift. The idea is that adding additional sensors or cameras will allow us to expand the capabilities of the rift. With something like the Razor Hydra, you can add quick positional tracking (the rift only tracks rotation, not position). With some webcams, you could theoretically do some stereoscopic augmented reality.  Unfortunately, attaching all these things to the rift is a bit of a pain at the moment.

I had all the things right here in front of me to make this happen, so I did! I’ve quickly tossed together two accessories for the Rift.

1. a small bracket that feeds onto the velcro on the back. People will likely use this for “heavy” position sensors. They may be fairly light, but any additional weight on the front of the rift is unwanted.

2. A snap-on face plate that has a modular design. This wold be for mounting cameras on the front of the rift.

All of these files can be downloaded here.

Apple MagSafe Cord Repair

[Tommy Ward] had a big problem with the cord for his laptop power supply. This thing’s not cheap so he figured out a way to fix the frayed cord on his Apple MagSafe. He asserts that the shortened rubber collar on the plug end of the cord is to blame for this type of damage. We think rough use may have something to do with it too, but having had to repair our own feline-damaged power cords we’re not about to start pointing fingers.

To pull off an appropriate fix [Tommy] pries apart the case housing the power converter. This lets him get at the solder connections of the cord. After removing it from the circuit board he clips off the damaged portion of the cable. To reuse the strain relief grommet he drilled out the old portion of wire and insulation, making room for the undamaged cable to pass through, adding a cable tie on the inside to aide in strain relief. The last part of the fix involves gluing everything back together.

If your power supply problems have to do with the computer connector itself there’s a fix for that too.

Hackerspace Security System Brings RFID, Video Feedback, And Automatic Doors

rfid-hackerspace-door-lock

[Will] has been hard at work on a replacement system for his Hackerspace’s RFID door lock. The original is now several years old and he’s decided to upgrade to a much more powerful processor, adding some bells and whistles along the way.

The control box seen above is the exterior component of the system. It’s a telephone service box like you’d find on the back of most houses in the US. They had a few of these lying around and they are a perfect choice because… well… they’re meant to be locking enclosures that brave the elements. [Will] made the jump from an Arduino which has run the locks for the last three years to a Raspberry Pi board. This gives him a lot of extra power to work with and he took advantage of that by adding a vehicle backup LCD screen for visual feedback. You can see it giving the ‘Access Granted’ message he used during testing but the demo video after the break shows that they plan to do some image scripting to display a head shot of the RFID tag owner whenever a tag is read.

There are several other features included as well. The system Tweets whenever a tag is read, helping the members keep tabs on who is hanging out at the space right now. It also patches into a sliding door which one of the members automated using a garage door opener motor.

Continue reading “Hackerspace Security System Brings RFID, Video Feedback, And Automatic Doors”

Hacked Together Mac Isn’t A Hackintosh

hacked-together-macintosh

Check out this 20″ iMac. Notice anything peculiar? Look closely at the branding above the Apple logo. The only thing that tips you off that this iMac is a hacked together unit is that Acer logo on the replacement screen.

As we’ve so often been caught doing, [Flippy] was browsing eBay for deals. It’s a dangerous activity because you end up falling into purchases like an Aluminum iMac for $35. That led to the purchase of a very slim LED LCD monitor to use as the display. It fits perfectly behind the iMac’s glass bezel, which has a tiny chip in the upper right corner that doesn’t bother [Flippy]. It’s thin enough that this actually left room for him to add in the guts of a MacBook Pro which he had sitting in his unused parts pile. With all of the main components accounted for the rest is really just logistics like routing all of the cable connectors and adding openings for USB ports. What he ended up with is a high-end computer for a low-end price.

Building A Kegerator With Visual Style

Let’s face it, most kegerator builds go something like this: acquire old refrigerator, drill hole for tap, profit. But [GiveMeMyNickelback] recently had the opportunity to do better and he delivered. Above you can see the stylish chest freezer mod that serves up six beers on tap.

Chest freezers are perfect for these builds as their top door design helps keep the cold air inside to boost the efficiency. The trick is to modify them without messing up the insulating properties of the appliance housing. [GMMN’s] approach is a common one, build a cuff to go in between the lid and the body of the freezer. He started by building a wooden box open at both the top and the bottom. Many would have stopped there but to bring the bling he tiled the sides and front of that cuff, leaving an empty spot for the shank of each tap. With that taken care of he glued insulation to the inside of the cuff, and added weather-stripping to the bottom to seal with the top of the case. He used the holes from the lid hinge brackets to attach his add-on so that the freeze can be converted back to stock without any sign of his alterations.

We’d love to see a Bluetooth or Wifi add-on that monitors the beer volume in each keg.

[via Reddit]