Microcontrollers existed before the Arduino, and a device that anyone could program and blink an LED existed before the first Maker Faire. This might come as a surprise to some, but for others PICs and 68HC11s will remain as the first popular microcontrollers, found in everything from toys to microwave ovens.
Arduino can’t even claim its prominence as the first user-friendly microcontroller development board. This title goes to the humble Basic Stamp, a four-component board that was introduced in the early 1990s. I recently managed to get my hands on an original Basic Stamp kit. This is the teardown and introduction to the first user friendly microcontroller development boards. Consider it a walk down memory lane, showing us how far the hobbyist electronics market has come in the past twenty year, and also an insight in how far we have left to go.
It’s no secret that hackers like fermentation, both the process and the end results. I myself have a crock of sauerkraut happily bubbling away in the kitchen right now. Fermentation can lead to tasty endpoints, and the process itself, which basically amounts to controlled rotting, is a fascinating set of biochemical reactions. But done wrong, fermentation can result in injury, as it did at CCC this year when a fermentation vessel exploded.
“It was the one on the left, officer. He did it.”
Exactly what happened isn’t really clear, except that Food Hacking Base ran a number of workshops at CCC 2015, several of which involved fermented foods or drinks. A Grolsch-style bottle with a ceramic flip-top was apparently used as a fermentation vessel, but unfortunately the seal was not broken. The bottle found its way to another tent at CCC, this one running an SMD soldering workshop. Carbon dioxide gas built up enough pressure in the bottle to shatter it and send shrapnel flying through the workshop tent. According to a discussion thread on the incident, “people got hurt and need to go to the hospital because glas [sic] particles were stuck in their faces, a throat was cut and an eyelid bleeding.” The explosion was quite energetic, because, “we also found a 20cm long piece of glass that went trough [sic] the ceiling of the tent and propelled for another 4-5 meters afterwards.”
We’ve seen lots of Hackaday projects involving instrumentation and automation of fermentation, including some with really large vessels. The potential for destruction if such a vessel isn’t properly vented is pretty high. At the very least, you’ll be left with a really big mess to clean up. Be careful out there – microbes are not to be trifled with. We don’t want to give you the wrong idea about CCC; this year was incredible as [Elliot Williams] reported during his time there.
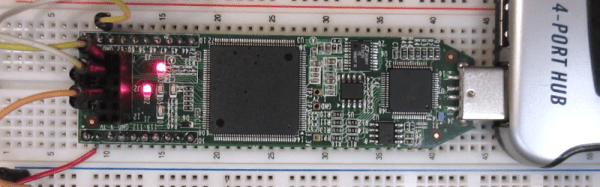
Getting into FPGA design isn’t a monolithic experience. You have to figure out a toolchain, learn how to think in hardware during the design, and translate that into working Verliog. The end goal is getting your work onto an actual piece of hardware, and that’s what this post is all about.
In the previous pair of installments in this series, you built a simple Verilog demonstration consisting of an adder and a few flip flop-based circuits. The simulations work, so now it is time to put the design into a real FPGA and see if it works in the real world. The FPGA board we’ll use is the Lattice iCEstick, an inexpensive ($22) board that fits into a USB socket.
Like most vendors, Lattice lets you download free tools that will work with the iCEstick. I had planned to use them. I didn’t. If you don’t want to hear me rant about the tools, feel free to skip down to the next heading.
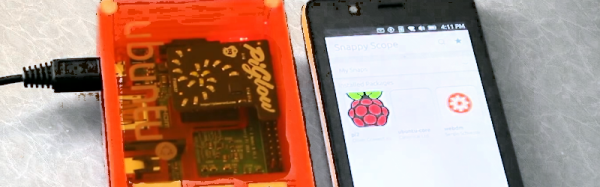
Although it isn’t official, Ubuntu Core–the tiny Internet of Things version of Ubuntu–now runs on the Raspberry Pi 2. There are prebuilt binaries as well as instructions for how to roll your own, if you prefer. You can even access GPIO
Ubuntu Core abandons the old-style Debian packages, in favor of Snap, a new version of the Ubuntu phone’s Click package manager. Snap offers transactional updates. The idea is that all of these “things” on the IoT need to be updated to patch security holes or fix other issues.
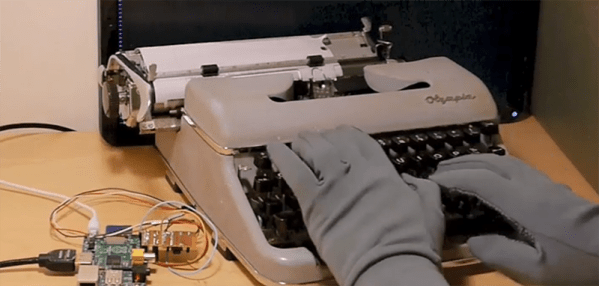
Is your keyboard too quiet? Is your Cherry MX Blue board not driving your coworkers crazy enough? If the machine gun fire of a buckling spring keyboard isn’t enough for you, there’s only one solution: [Russell]’s typewriter turned into a mechanical keyboard.
Converting typewriters into keyboards has been done for a very long time; teletypes, the first computer keyboards, were basically typewriters, and the 1970s saw a number of IBM Selectrics converted into a keyboard with serial output. Even in recent years, typewriters have been converted into keyboards with the help of some switches and an ATMega. [Russell]’s mechanical keyboard improves on all of these builds by making the electronic interface dead simple, and a project that can be done by anyone.
Instead of installing switches underneath every key or futzing about with the weird mechanics of a Selectric typewriter, [Russell] is only installing a touch-sensitive position sensor into the frame of the typewriter. When a key is pressed, it strikes a crossbar in the frame of the typewriter. With a single ADC chip and a Raspberry Pi, [Russell] can determine which key was pressed and use that information to output a character to a terminal.
It’s a very simple solution for an electrical interface to a mechanical device, and the project seems to work well enough. [Russell] is using his new keyboard with Vim, even, something you can check out in the video below.
For his project entered in the Hackaday Prize, [Neil] is working on a navigation aid for the blind. He’s calling his device Pathfinder, and it’s designed to allow greater freedom of motion for the disabled.
Pathfinder is a relatively simple device, with a cheap, off the shelf ultrasonic distance sensor, an ATMega, and a few passives. On its own, the ultrasonic distance sensor is only accurate to about 5%. By incorporating a temperature sensor, [Neil] was able to nail down the accuracy of his sensor to about 1%. Impressive!
For the machine to human interface, [Neil] chose haptic feedback, or small vibration motors tucked away inside a wristband. It’s by far the easiest way to add the output needed, and with a haptic motor driver, it’s easy to add specialized drive patterns to the vibration motor
You can check out [Neil]’s quarterfinal entry video for the Pathfinder below.
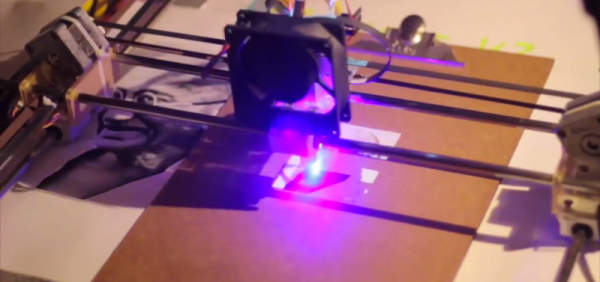
If there’s one thing about laser cutters that makes them a little difficult to use, it’s the fact that it’s hard for a person to interact with them one-on-one without a clunky computer in the middle of everything. Granted, that laser is a little dangerous, but it would be nice if there was a way to use a laser cutter without having to deal with a computer. Luckily, [Anirudh] and team have been working on solving this problem, creating a laser cutter that can interact directly with its user.
The laser cutter is tied to a visual system which watches for a number of cues. As we’ve featured before, this particular laser cutter can “see” pen strokes and will instruct the laser cutter to cut along the pen strokes (once all fingers are away from the cutting area, of course). The update to this system is that now, a user can import a drawing from a smartphone and manipulate it with a set of physical tokens that the camera can watch. One token changes the location of the cut, and the other changes the scale. This extends the functionality of the laser cutter from simply cutting at the location of pen strokes to being able to cut around any user-manipulated image without interacting directly with a computer. Be sure to check out the video after the break for a demonstration of how this works.