Hackaday Prize Entry: A Cute Synthesizer

For electronics aficionados, there are few devices cooler than music synthesizers. The first synths were baroque confabulations of opamps and ladder filters. In the 70s and 80s, synths began their inexorable march toward digitization. There were wavetable synths that stored samples on 27-series EPROMs. Synths on a chip, like the MOS 6581 “SID chip”, are still venerated today. For his Hackaday Prize entry, [Tim] is building his own synthesizer from scratch. It isn’t a copy of an old synth, instead it’s a completely modern synthesizer with a classic sound.

[Tim] is a former game developer and has already released a synthesizer of sorts. Rhythm Core Alpha 2 for the Nintendo DSi and 3DS is a fully functional synthesizer, but the limitations of the Nintendo hardware made [Tim] want to build his own synth from scratch.

The specs for the synth are more of a wish list, but already [Tim] has a few design features nailed down. This is a virtual analog synth, where everything is digital and handled by DSP algorithms. It’s polyphonic and MIDI capable, with buttons and dials for almost every parameter. For the few things you can’t do with a knob, [Tim] is including a touch screen display.

[Tim] already has the synthesis model working, and from the videos he’s put together, the whole thing sounds pretty good. The next step is turning a bunch of wires, breadboards, and components into  something that looks like an instrument. We can’t wait to see how this one turns out!

You can check out a few of [Tim]’s synth videos below.

Continue reading “Hackaday Prize Entry: A Cute Synthesizer”

Madison Maker Faire

Saturday was the first Madison Mini Maker Faire. In this case, it’s Madison, Wisconsin (sorry Madison, SD I didn’t mean to get your hopes up) where I live. Of course I’m not the only crazy hardware hacker in the area. As soon as I got there I almost tripped over Ben Heckendorn who also lives in the area.

ben-heck-gameboy

Check out that incredible Giant Game Boy the he was exhibiting. Okay, you think to yourself: Raspberry Pi and an LCD. Wrong! He’s actually using an FPGA to drive the LCD. Even cooler, it’s using an original Game Boy brain board, which the FPGA is connected to in order to translate the handheld’s LCD connector signals to work with the big LCD.

Continue reading “Madison Maker Faire”

Electronic Driver Replaces Master Clock

In these days of cheap microprocessors and easy access to accurate timing through NTP or from the likes of MSF, WWVB, or DCF77, it’s no problem to ensure that any number of clocks keep the same time. In a simpler age though they didn’t have these tools at their disposal, so when a large organisation wished to ensure that all its parts ran on the same time they used an electromechanical solution. A master clock of as high a quality as the clockmakers of the day could build was fitted with a microswitch. The switch would send pulses to slave clocks which had a solenoid where a traditional clock has a pendulum. Thus every clock in the system lost or gained time at the same rate.

[Edo Lelic] has a rather nice Iskra slave clock, but unfortunately not the master that once drove it. Undeterred by this setback, he’s created an electronic driver board that generates the required 100mS pulses. His weapon of choice was a PIC microcontroller and an H-bridge driver to deliver their required voltage and polarity. The clock was designed to accept 100V pulses, but since it has an internal series resistor he determined that the solenoid was happy with a mere 24V. Source code is available, downloadable at the bottom of the linked article.

These clocks are an unseen piece of technology that is disappearing without our noticing. If you find one – or even better if you find a master clock – you’ll find it to be a very high quality timepiece indeed. A master clock would be well worth snapping up. At least now you won’t have to look too far for a driver for it.

We haven’t seen too many projects like this here at Hackaday. Save for a rather nice digital master clock build, it’s uncharted territory. Almost justification for a Retrotechtacular piece, perhaps.

Thanks [Muris Pučić] for the tip.

Hackaday Links: May 15, 2016

The Hackaday Overlords (or Hackaday family) are running a series of AMAs on SupplyFX. What is SupplyFX? It’s a social network for EEs. Who’s in the first AMA? [Brady Forrest], the guy who runs Highway1, a Bay Area hardware accelerator. They’re the accelerator responsible for the lustworthy Keyboardio, and the startup that is purely mechanical and has shipped zero lines of code, CoolChip. If you want to talk about hardware startups, [Brady] is your man. The AMA is tomorrow, May 16th, at 13:00 Pacific.

Makerbot is dead, or at least they will be soon. Whatever. Nothing of value was lost. Lulzbot, on the other hand, is going gangbusters. They saw eight hundred percent growth over the last two years. and $15M in revenue in 2015. They did this all with open source hardware and software, and using 3D printing in a manufacturing context. They’re the jewel of the Open Hardware movement, and a shining example of what Free Software can do.

The current generation of software defined radios started with the ubiquitous TV tuner dongles, and quickly graduated to the HackRF. You can only get so much bandwidth out of a USB 2.0 socket, and the newest and bestest SDR is the LimeSDR. They’re about halfway through their crowdfunding campaign (and halfway funded), and have finally changed out the USB A connector to a USB micro B connector. Good choice.

The ESP8266 is quickly becoming the go-to device for when you want a cheap way to put a sensor on the Internet. The only problem is programming it. No problem – here’s a bunch of Lua scripts that do 90% of everything. Need to read a PIR sensor? Light up a few LEDs? Put the data from a temperature and humidity on the Internet? There you have it.

The Vintage Computer Festival West is back on this year. We’ve gone to VCF East in New Jersey for a few years now, and had a few occasional outings to the southeast and midwest Vintage Computer Festivals over the years. This is the first time the west coast has had a Vintage Computer Festival in several years. It’s in Mountain View, on August 6th and 7th. Yes, that’s the same weekend as DEF CON.

E3D, makers of fine hot ends and 3D printer paraphernalia, have released a new kind of filament. It’s called Edge, it’s based on PET, and it prints as easily as PLA, with better mechanical properties than ABS. A few sample prints made from Edge were at this year’s Midwest RepRap Festival, and the Edge’s bridging ability is crazy. You need a heated bed for Edge and it’s sensitive to moisture, but it has some very interesting properties that can be cleverly exploited.

In other filament news, Colorfabb released a filament to print clear parts. Yes, that’s very weird. Clear parts require 100% infill, meaning it will use a lot of filament. It’s still very advanced wizardry, and I’m very interested in seeing the first print of a sanded and polished convex lens.

Holy Crap it’s the 3D printing edition of the links post. [Prusa] just released the latest version of the i3. It’s now bigger: 250x210x200mm build volume. The heated bed – [Prusa] was one of the first to experiment with PCB heated beds – is now vastly improved when looking at it through a FLIR. The Mk. 42 heated bed doesn’t have a hot center or cool corners. PEI sheet removes the need for blue painters tape, glass, aqua net, or glue sticks. The printer has self-test capabilities. The mechanics of the printer, especially the Z axis, are improved. [Prusa] will be selling this as a kit for ~19000 Czech Crowns or $699 USD, but he’s RepRap to the core. Buy a spool and start printing your next printer.


Classic Amplifier Reborn With Modern Transistors

Someone brought a dead Marantz amplifier to [Lansing]’s attention, a rather nice model from the 1980s with one channel entirely dead and the other very quiet. His account of its repair is straightforward, but provides some insights should you find yourself with a similar item on your bench.

Opening up the box, he was presented with 35 years of accumulated dust. It’s the annoying side of cracking open classic kit, we all have our dusty horror stories. His first task was routine: to replace all the unit’s capacitors. The mains voltage in France has gone up by 10 volts from 220V to 230V as part of EU harmonization in the years since the amp was built, so he used capacitors with an appropriately higher rating to compensate. We might have waited until the rest of the amp was proven fixed before splashing the cash on caps, but maybe we’re more thrifty.

The quiet channel fix turned out to be from a muting circuit designed to keep the amp quiet during the turn-on phase and suppress that annoying “thump”. A dead transistor replaced, and all was well. The dead channel though had a whole slew of dead transistors in it, which turned the problem from one of repair to one of transistor equivalence. Quite a few of the 1980s parts were no longer available, so modern replacements had to be found.

It is tempting to think of particularly all small-signal transistors as functionally equivalent. You will get away with this in logic and switching circuits in which the device is either On or Off and never in between, but in an audio amplifier like the Marantz things are not so simple. A lot of effort will have been made by the designers to calculate resistances for the current passing through them to deliver the right DC bias points without sending the circuit into wild oscillation. An important part of that calculation comes from the current gain of the transistors involved. [Lansing] had to carefully select his transistors for equivalence, though it some cases he had to do a bit of creative lead-bending to fit a different pin-out.

So, all dead transistors replaced with appropriate equivalents, and the amp was reborn. Success, and very much worth the effort!

We’ve covered a lot of amplifiers here in the past. Some were dead, like this little amp with blown capacitors or this smokin’ subwoofer. Others are more esoteric, like this ion wind 1KV tube creation.

AV Remote Control Teams Arduino With – Visual Basic?

A large installed base of powered speakers from a defunct manufacturer and a dwindling supply of working remote controls. Sounds like nightmare fuel for an AV professional – unless you take matters into your own hands and replace the IR remotes with an Arduino and custom software.

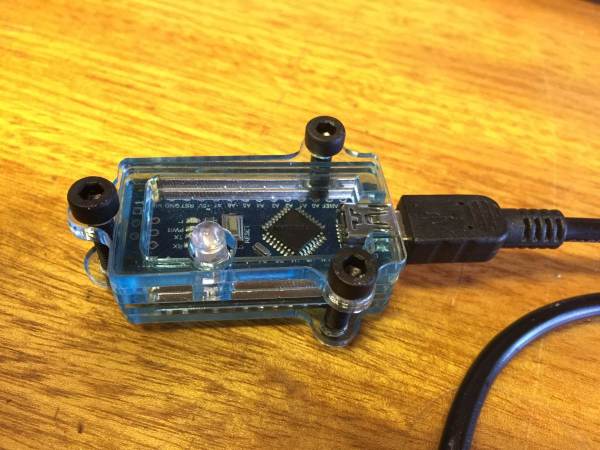
From the sound of it, [Steve]’s crew was working on AV gear for a corporate conference room – powered speakers and an LCD projector. It was the speakers that were giving them trouble, or rather the easily broken or lost remotes. Before the last one gave up the ghost, [Steve] captured the IR codes for each button using an Arduino and the IRRemote library. With codes in hand, it was pretty straightforward to get the Nano to send them with an IR LED. But what makes this project unique is that the custom GUI that controls the Arduino was written in the language that everyone loves to hate, Visual Basic. It’s a dirty little secret that lots of corporate shops still depend on VB, and it’s good to see a little love for the much-maligned language for a change. Plus it got the job done.

Want to dive deeper into IR? Maybe this primer on cloning IR remotes with an Arduino will help. And for another project where VB shines, check out this voice controlled RGB LED lamp.

Super Strong 3D Component Carbon Fiber Parts

[prubeš] shows that parts printed with carbon fiber filament are as strong, or at least as stiff, as you’d expect. He then shows that his method for producing carbon fiber parts with a mixture of traditional lay-up and 3D printing is even stronger and lighter.

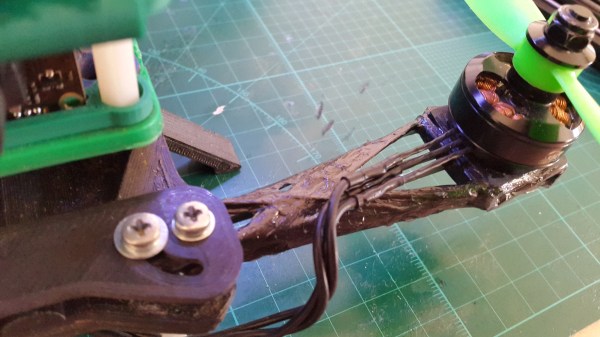
[prubeš] appears to be into the OpenR/C project and quadcopters. These things require light and strong parts for maximum performance. He managed to get strength with carbon fiber fill filament, but the parts weren’t light enough. Then he saw [RichMac]’s work on Thingiverse. [RichMac] designed parts with pre-planned grooves in which he ran regular carbon fiber tow with epoxy. This produced some incredibly strong parts. There’s a section in his example video, viewable after the break, where he tests a T joint. Even though the plastic starts to fail underneath the carbon fiber, the joint is still strong enough that the aluminum tube inside of it fails first.

[prubeš] innovation on [RichMac]’s method is to remove as much of the plastic from the method as possible. He designs only the connection points of the part, and then designs a 3D printable frame to hold them in place. After he has those in hand, he winds the tow around the parts in a sometimes predetermined path. The epoxy cures onto the 3D print creating a strong mounting location and the woven carbon fiber provides the strength.

His final parts are stronger than 100% infill carbon fill prints, but weighs 8g instead of 12g.  For a quadcopter this kind of saving can add up fast.

Continue reading “Super Strong 3D Component Carbon Fiber Parts”