Hackaday Prize Entry: Selfie Bot Let’s You Vlog Hands Free

[Sergey Mironov] sent in his SelfieBot project. His company, Endurance Robots, sells a commercial version of the bot, which leads us to believe that in a strange and maybe brilliant move he decided to just sell the prototype stage of the product development as a kit. Since he also gave away the firmware, STLs, BOM, and made a guide so anyone can build it, we’re not complaining.

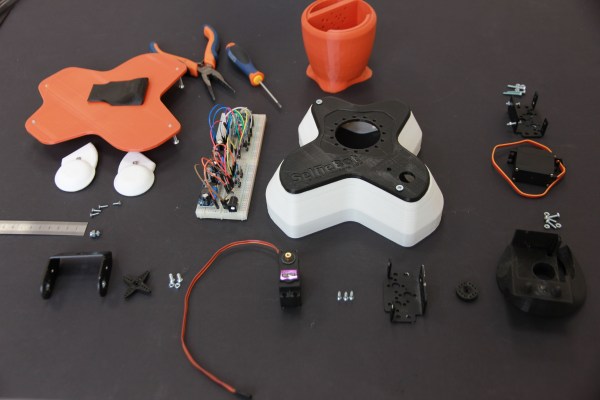
The bot is simple enough. Nicely housed hobby servos in a 3D printed case take care of the pan and tilt of the camera. The base of the bot encloses the electronics, which are an Arduino nano, a Bluetooth module, and the support electronics for power and motor driving.

To perform the face tracking, the build assumes you have a second phone. This is silly, but isn’t so unreasonable. Most people who’ve had a smart phone for a few years have a spare one living in a drawer as back-up. One phone runs the face tracking software and points the bot, via Bluetooth, towards the user. The other phone records the video.

The bot is pretty jumpy in the example video, but this can be taken care of with better motors. For a proof-of-concept, it works. A video of it in action after the break.

Continue reading “Hackaday Prize Entry: Selfie Bot Let’s You Vlog Hands Free”

Digital Opponent In An Analog Package

Unsatisfied with the present options for chess computers and preferring the feel of a real board and pieces, [Max Dobres] decided that his best option would be to build his own.

Light and dark wood veneer on 8mm MDF board created a board that was thin enough for adding LEDs to display moves and for the 10mm x 1mm neodymium magnets in the pieces to trip the reed switches under each space. The LEDs were wired in a matrix and connected to an Arduino Uno by a MAX7219 LED driver, while the reed switches were connected via a Centipede card. [Dobres] notes that you’ll want to test that the reed switches are positioned correctly — otherwise they might not detect the pieces!

Continue reading “Digital Opponent In An Analog Package”

Converting A Lawnmower Engine To Run On Compressed Air

Our most likely exposure to a steam engine these days will probably come courtesy of a railway locomotive. A machine capable of immense power and probably with significant complexity and engineering  in its construction, something the majority of us will only ever be able to see at second-hand. But there was a period when steam engines were much more accessible, before internal combustion engines and electric motors took on the task of automating hard work you would have found small stationary steam engines in all corners of industry.

These engines are on a scale much more easily embraced by hackers and makers, and though vintage stationary engines are thin on the ground these days there are a significant number of people pursuing their construction by converting modern petrol and diesel engines to a more old-fashioned medium.

[Lindsay Wilson] has a lawnmower engine which a few years ago he converted with the addition of a sleeve valve to run on compressed air. It’s not a steam engine because creating a safe and legal steam boiler is an expensive process, but despite this it amounts to the same thing. The engine in question is a small sidevalve single cylinder Suffolk Punch lawnmower engine from which he has removed and blocked the valve gear, and added a sleeve valve powered by a linkage from the crankshaft and using the spark plug hole as an inlet and outlet. He provides a lot of detail on the sleeve valve’s construction, and it really is a surprisingly simple arrangement. We might look for a harder metal than copper pipe for the guide in which it runs though.

The video below the break shows the engine being run up after a period of storage. It’s an effective device, easily capable of taking more air than his compressor can supply.

Continue reading “Converting A Lawnmower Engine To Run On Compressed Air”

Neural Network Targets Cats With A Sprinkler System

It’s overkill, but it’s really cool. [Bob Bond] took an NVIDIA Jetson TX1 single-board computer and a webcam and wirelessly combined them with his lawn sprinklers. Now, when his neighbors’ cats come to poop in his yard, a carefully trained neural network detects them and gets them wet.

It is absolutely the case that this could have been done with a simple motion sensor, but if the neural network discriminates sufficiently well between cats and (for instance) his wife, this is an improved solution for sure. Because the single-board computer he’s chosen for the project has a ridiculous amount of horsepower, he can afford to do a lot of image processing, so there’s a chance that everyone on two legs will stay dry. And the code is up on GitHub for you to see, if you’re interested.

[Bob] promises more detail about the neural network in the future. We can’t wait. (And we’d love to see a sentry-turret style build in the future. Think of the water savings!)

Via the NVIDIA blog, and thanks [Jaqen] for the tip!

Join The GUI Generation: QTCreator

More and more projects require a software component these days. With everything being networked, it is getting harder to avoid having to provide software for a desktop or phone environment as well as the code in your embedded device.

If you’ve done a lot of embedded systems work, you probably already know C and C++. If so, it is pretty easy to grab up a C compiler and write a command-line application that does what you want. The problem is that today’s users have varying degrees of fear about the command line ranging from discomfort to sheer terror. On a mobile device, they probably don’t even know how to get to a command line. I’ve been waiting for years for the WIMP (Windows/Icon/Mouse/Pointer) fad to fade away, but even I have to admit that it is probably here for the foreseeable future.
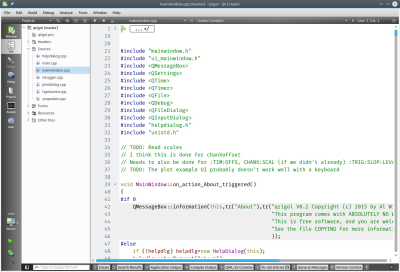
qtrigolSo what’s the alternative? There are actually quite a few. However, I wanted to talk about one that is free, has a wide range of deployment options, uses C++, and is easy to pick up: Qt. Specifically, creating programs with QtCreator (see right). Yes, there are other options, and you can develop Qt programs in a number of ways.

You might think Qt isn’t free. There was a time that it was free for open source projects, but not for commercial projects. However, recent licensing changes (as of version 4.5) have made it more like using gcc. You can elect to use the LGPL which means it is easy to use the Qt shared libraries with closed software. You might also think that a lot of strange constructs that “extend” C++ in unusual ways. The truth is, it does, but with QtCreator, you probably won’t need to know anything about that since the tool will set up most, if not all, of that for you.

Background

If you ever used Visual Basic or something similar, you will feel right at home with QtCreator. You can place buttons and text edit boxes and other widgets on a form and then back them up with code. Buttons create signals when you push them. There are lots of signals like text changed or widgets (controls) being created or destroyed.

To handle a signal, an object provides a slot. There is a meta-compiler that preprocesses your C++ code to get all the signal and slot stuff converted into regular C++. Here’s the good news: you don’t really care. In QtCreator you can write code to handle a button push and exactly how that happens isn’t really much of a worry.

QtCreator has kits that can target different platforms and — in general — the code is reasonably portable between platforms. If you do want to do mobile development for Android or iOS, be sure that you understand the limitations before you start so you can avoid future pitfalls.

You Need Class

Like many similar frameworks, Qt uses an application class (QtApplication) that represents a do-nothing application. Your job is to customize a subclass and have it do what you want. You add widgets and you can even add more screens, if you like. You can connect signals to existing slots or new slots.

There are many classes available, and the online documentation is quite good. Depending on which version of Qt you are using, you’ll need to find the right page (or ask QtCreator to find it for you). However, just to whet your appetite, here’s the Qt5 reference page. From there you can find classes for GUI widgets, strings, network sockets, database queries, and even serial ports.

I could do an entire tutorial on using QtCreator, but it would be a duplication of effort. There’s already a great getting started one provided. You’ll find there is plenty of documentation.

Portability

How do you enumerate serial ports? It depends on the platform, right? In Qt, the platform-specific part is hidden from you. For example, here’s a bit of code that fills in a combo box with the available serial port:

MainWindow::MainWindow(QWidget *parent) :
 QMainWindow(parent),
 ui(new Ui::MainWindow)
{
 ui->setupUi(this);
// initialize list of serial ports
 ports = QSerialPortInfo::availablePorts();
// fill in combo box
 for (int i=0; i<ports.length(); i++) 
 {
   ui->comport->addItem(ports[i].portName(), QVariant(i));
 }
}

The QSerialPortInfo object provides an array of serial port objects. The ui->comport is a combo box and the addItem method lets me put a display string and a data item in for each selection. In this case, the display is the portName of the port and the extra data is just the index in the array (as a variant, which could be different types of data, not just a number). When you select a port, the index lets the program look up the port to, for example, open it.

When the combo box changes, a currentIndexChanged signal will occur. Here’s the slot handler for that:

void MainWindow::on_comport_currentIndexChanged(int index)
{
 QString out;
 // get selected index
 int sel=ui->comport->currentData().toInt();
// build up HTML info string in out
 out="<h1>Serial Port Info</h1>";
 ui->output->clear();
 out += ports[sel].portName() + " " + ports[sel].description() + "
";
 out += ports[sel].systemLocation() + "
";
 if (ports[sel].hasVendorIdentifier() && ports[sel].hasProductIdentifier())
 out += ports[sel].manufacturer() + " ("+ QString::number(ports[sel].vendorIdentifier(),16) + ":" + QString::number(ports[sel].productIdentifier(),16) + ")";
 // and put it on the screen
 ui->output->setText(out);
}

In this case, the result is information about the serial port. You can see the resulting output, below. The QString is Qt’s string class and, obviously, the text display widget understands some HTML.

qtserial

Not Just for GUIs

You can develop console applications using Qt, but then many of the provided classes don’t make sense. There’s even a Qt for Embedded (essentially Linux with no GUI). You can find guides for Raspberry Pi and BeagleBoard.

On the mobile side, you can target Android, iOS, and even Blackberry, along with others. Like anything, it probably won’t just be “push a button” and a ported application will fall out. But it still should cut down on development time and cost compared to rewriting a mobile app from scratch.

And the Winner Is…

I’m sure if you want some alternatives, our comment section is about to fill up with recommendations. Some of them are probably good. But it strikes me that not everyone has the same needs and background. The best tool for you might not work as well for me. I find Qt useful and productive.

Even if Qt isn’t your tool of choice, it still can be handy to have in your tool bag. You never know when you will need a quick and dirty cross-platform application.

Beautiful Raspberry Pi Laptop Inspired By Psion

In the four years since the first Raspberry Pi appeared, there have been many takes on a portable computer based on it. The choice of components is fairly straightforward, there is now a wide selection of suitable keyboards, displays, and battery packs to choose from. You might therefore think that there could be nothing new in the world of the portable Pi, indeed another one might be as mundane as just another PC build.

News reaches us from Japan this morning of [nokton35mm]’s “RasPSION” Pi laptop build (machine translation) inspired by the Psion portable computers of the late 1990s.

That hinge, in close-up

The RasPSION features the Raspberry Pi 7″ display as well as a Bluetooth keyboard, 5V battery pack and the Pi camera. What makes it special is its laser cut case, and in particular its pivoting hinge mechanism. This is the part that takes its inspiration from the Psion machines, and its operation can be seen in the video below the break.

He claims the finished laptop gives him about two hours of battery life, which is no mean feat given that it lacks the sophisticated power management you’ll find in a commercial laptop. We hope that in time we’ll see him posting the details of the build somewhere other than Twitter, as this is a laptop we’d love to know more about.

Continue reading “Beautiful Raspberry Pi Laptop Inspired By Psion”

Ask Hackaday: How Hard Is It To Make A Bad Solder Joint?

When you learn to solder, you are warned about the pitfalls of creating a solder joint. Too much solder, too little solder, cold joints, dry joints, failing to “wet” the joint properly, a plethora of terms are explained  if you read one of the many online guides to soldering.

Unsurprisingly it can all seem rather daunting to a novice, especially if they are not used to the dexterity required to manipulate a tool on a very small-scale at a distance. And since the soldering iron likely to be in the hands of a beginner will not be one of the more accomplished models with fine temperature control and a good tip, it’s likely that they will experience most of those pitfalls early on in their soldering career.

As your soldering skills increase, you get the knack of making a good joint. Applying just the right amount of heat and supplying just enough solder becomes second nature, and though you still mess up from time to time you learn to spot your errors and how to rework and fix them. Your progression through the art becomes a series of plateaux, as you achieve each new task whose tiny size or complexity you previously thought rendered it impossible. Did you too recoil in horror before your first 0.1″ DIP IC, only to find it had been surprisingly easy once you’d completed it?

A few weeks ago we posted a Hackaday Fail of the Week, revolving around a soldering iron failure and confirmation bias leading to a lengthy reworking session when the real culprit was a missing set of jumpers. Mildly embarrassing and something over which a veil is best drawn, but its comments raised some interesting questions about bad solder joints. In the FoTW case I was worried I’d overheated the joints causing them to go bad, evaporating the flux and oxidising the solder. This was disputed by some commenters, but left me with some curiosity over bad solder joints. We all know roughly how solder joints go wrong, but how much of what we know is heresay? Perhaps it is time for a thorough investigation of what makes a good solder joint, and the best way to understand that would surely be to look at what makes a bad one.

Continue reading “Ask Hackaday: How Hard Is It To Make A Bad Solder Joint?”