A Polar Coordinate CNC Plotter Even Descartes Could Love

Take apart a few old DVD drives, stitch them together with cable ties, add a pen and paper, and you’ve got a simple CNC plotter. They’re quick and easy projects that are fun, but they do tend to be a little on the “plug and chug” side. But a CNC plotter that uses polar coordinates? That takes a little more effort.

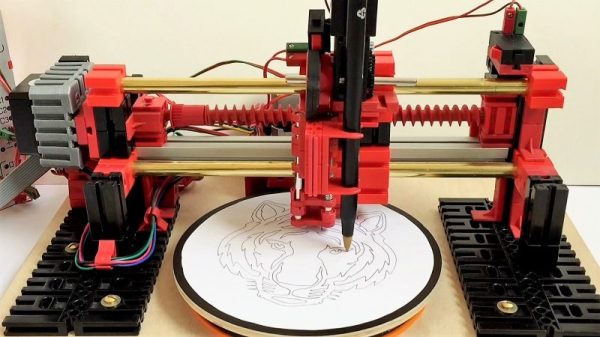
The vast majority of CNC projects, from simple two-axis plotters to big CNC routers, all tend to use Cartesian coordinate systems, where points on a plane are described by their distances from an origin point on two perpendicular axes. Everything is nice and square, measurements are straightforward, and the math is easy. [davidatfsg] decided to level up his CNC plotter a bit by choosing a polar coordinate system, with points described as a vector extending a certain distance from the origin at a specified angle. Most of the plotter is built from FischerTechnik parts, with a single linear axis intersecting the center point of a rotary drawing platform. Standard G-code is translated to polar coordinates by a Java applet before being sent to a custom Arduino controller to execute the moves. Check out the video below; it’s pretty mesmerizing to watch, and we can’t help but wonder how a polar 3D-printer would work out.

Have polar coordinates got you stumped? It can be a bit of an adjustment from Cartesian space for sure. It can be worth it, though, showing up in everything from cable plotters to POV fidget spinners and even to color space models.

Continue reading “A Polar Coordinate CNC Plotter Even Descartes Could Love”

This Is Your Last Chance To Design The Greatest In Open Hardware

This is the last weekend to get in on the Open Hardware Design Challenge, the first challenge of the 2018 Hackaday Prize. We’re looking for the boldest idea you can come up with. We want to see the beginnings of the next great bit of Open Hardware, and this is your chance to do it.

The Hackaday community has thrown itself into The Hackaday Prize and so far we have more than five hundred entries in the running to Build Hope and become the next great piece of Open Hardware. Next week, we’ll choose the top twenty projects to advance to the finals. Each of those twenty project will be awarded $1,000 and be in the running to win the Grand Prize of $50,000 and four other top cash prizes.

You still have time. This challenge doesn’t require a specific prototype — it’s all about great design. Demonstrate an uplifting use of technology and show a plan to build it. When you make it into the finals, you’ll have all summer to fabricate and refine your vision. This is your chance to be a hardware hero, so start your entry now.

Continue reading “This Is Your Last Chance To Design The Greatest In Open Hardware”

ETextile Spring Break Tackles Signal Blocking, Audio Generation, And Radio Transmissions

Finding a killer application for e-textiles is the realm of the hacker and within that realm, anything goes. Whether it’s protecting your digital privacy with signal shielding, generating audio with a wearable BeagleBone or 555 timer, or making your favorite garment into an antenna, the eTextile Spring Break is testing out ways to combine electronics and fabric.

You may be asking yourself “What are e-textiles good for?”. Well, that’s an excellent question and likely the most common one facing the industry today. I’m afraid I won’t be able to give a definitive answer. As an e-textile practitioner, I too am constantly posing this question to myself. There’s an inherently personal nature to fabric worn on the body and to our electronic devices that makes this answer elusive. Instead of trying to fabricate some narrow definition, what I offer is a look at topics of interest, material experimentation, and technical exploration through the lens of a week-long event held recently in New York called eTextile Spring Break.

Continue reading “ETextile Spring Break Tackles Signal Blocking, Audio Generation, And Radio Transmissions”

Laser Projector Ditches Galvanometer For Spinning Drum

Laser projectors like those popular in clubs or laser shows often use mirror galvanometers to reflect the laser and draw in 2D. Without galvos, and on a tight budget, [Vitaliy Mosesov] decided that instead of downgrading the quality, he would seek an entirely different solution: a spinning mirror drum.

He fires a laser at a rotating drum with twelve mirror faces, each at a different adjustable vertical angle. The laser will hit a higher or lower point on the projection surface depending on which mirror it’s reflecting off – this creates resolution in the Y direction.

Timing the pulsing of the laser so that it reflects off the mirror at a certain horizontal angle provides the X resolution.

As you can already tell, speed and timing is critical for this to work. So much so that [Vitaliy] decided he wanted to overclock his Arduino – from 16 MHz to 24.576 MHz. Since this changes the baud rate, an AVR ISP II was used for programming after the modification, and the ‘duino’s hardware serial initialization had to be hacked too.

For the laser itself, [Vitaliy] designed some nifty driver circuitry, which can respond quickly to the required >50 kHz modulation, supply high current, and filter out voltage transients on the power supply (semiconductor lasers have no protection from current spikes).

On the motor side of things, closed loop control is essential. A photo-interrupter was added to the drum for exact speed detection, as well as a differentiator to clean up the signal. Oh, and did we mention the motor is from a floppy disk drive?

We’ve actually seen builds like this before, including a dot-matrix version with multiple lasers and one made apparently out of Meccano and hot-glue that can project a Jolly Wrencher. But this build, with its multiple, adjustable mirrors, is a beauty.  Check it out in action below.

Continue reading “Laser Projector Ditches Galvanometer For Spinning Drum”

Life On Contract: Lowering Your Cost Without Dropping Your Price

Last time in Life on Contract, I discussed ways to figure out a starting point on how much to charge for your services. However, sometimes you and a client may wish to work together but for some reason they cannot (or do not wish to) pay what you have decided to charge. If you are inexperienced, it can be tempting to assume you have overpriced yourself and discount down to what they are willing to pay. But if your price is a number you have chosen for reasons you can explain, dropping it is not something you should do unless you have thought about it carefully.

Instead of just agreeing to do the same work but for less money, it is often possible to offer a lower overall cost without cheapening the value of your work. I’ll share a process I use to find opportunities to make this happen.

It Should be Win-Win, Not Hard Sell

The best case scenario is a client wants your service, your cost is within their budget, and everyone agrees to work together. Tragically, the process isn’t always that smooth. If cost is an issue, the alternative to lowering your price is to fine-tune what you provide to better fit the actual needs. To do that, you will need two things:

  1. A detailed understanding of your own time and costs for the work.
  2. Knowledge of what things your client considers most important.

By intimately knowing your own costs, you can figure out where to make savings without scrimping on the things your client considers important.
Continue reading “Life On Contract: Lowering Your Cost Without Dropping Your Price”

This Vapour Deposition Chamber Isn’t Vapourware

If you are an astronomer with an optical reflecting telescope, the quality of your mirror is one of your most significant concerns. Large observatories will therefore often have on-site vapour deposition plants to revitalise their reflectors by depositing a fresh layer of aluminium upon them. You might think that such a device would be the preserve only of such well-funded sites, but perhaps [Michael Koch]’s work will prove you wrong. He’s created his own vapour deposition system (Google Translate link of the German original) from scratch, and while it might be smaller than the institutional equivalents it is no less effective in its task.

At the heart of it is a stainless steel vacuum vessel with a two stage vacuum pump system to evacuate it. The mirror to be silvered is suspended in the vessel, and a piece of aluminium is suspended over a coil of tungsten wire that his electrically heated to melt it. The molten aluminium is described as “wetting” the tungsten wire in the same manner as we’ll be used to solder working on copper, but in the vacuum it vaporizes and deposits itself upon the mirror. Such a simple description glosses over the impressive work that went into it.

This is a long-running project that isn’t entirely new, but very much worth a look if only for its introduction to this fascinating field. If you are new to vacuum work, how about looking at a Superconference presentation introducing vacuum technology?

Thanks [Paul Bauer] for the tip.

Tesla Coil Uses Vacuum Tube

What do you do when you find a 5 kW transmitting tube in your local electronics store? If you are [TannerTech], you build a vacuum tube tesla coil. This isn’t the usual little wimpy coil, but a big bad boy that would look at home in an old horror movie.

The first power up was a bit anticlimactic, although it was working, it wasn’t very spectacular other than the tube glowing brightly. A few adjustments and some mineral oil did the trick.

Continue reading “Tesla Coil Uses Vacuum Tube”